Adding Parts
Once a Job is on the RO, parts get added one of two ways:
- From our inventory — parts already on the shelf, pulled in through the + Add → Inventory menu on the Job.
- From outside our inventory — parts ordered through PartsTech when the shelf doesn't have what's needed.
Adding labor works a little differently — see Adding Labor.
From our inventory
When the shop already has the part on the shelf, you add it directly to the Job from OverDrive's inventory list — no supplier order, no waiting. OverDrive shows you Available Quantity in real time so you can confirm the part's actually there before you commit it.
Step through the slides — click the chips at the top, the Previous / Next buttons, or use the ← → arrow keys.
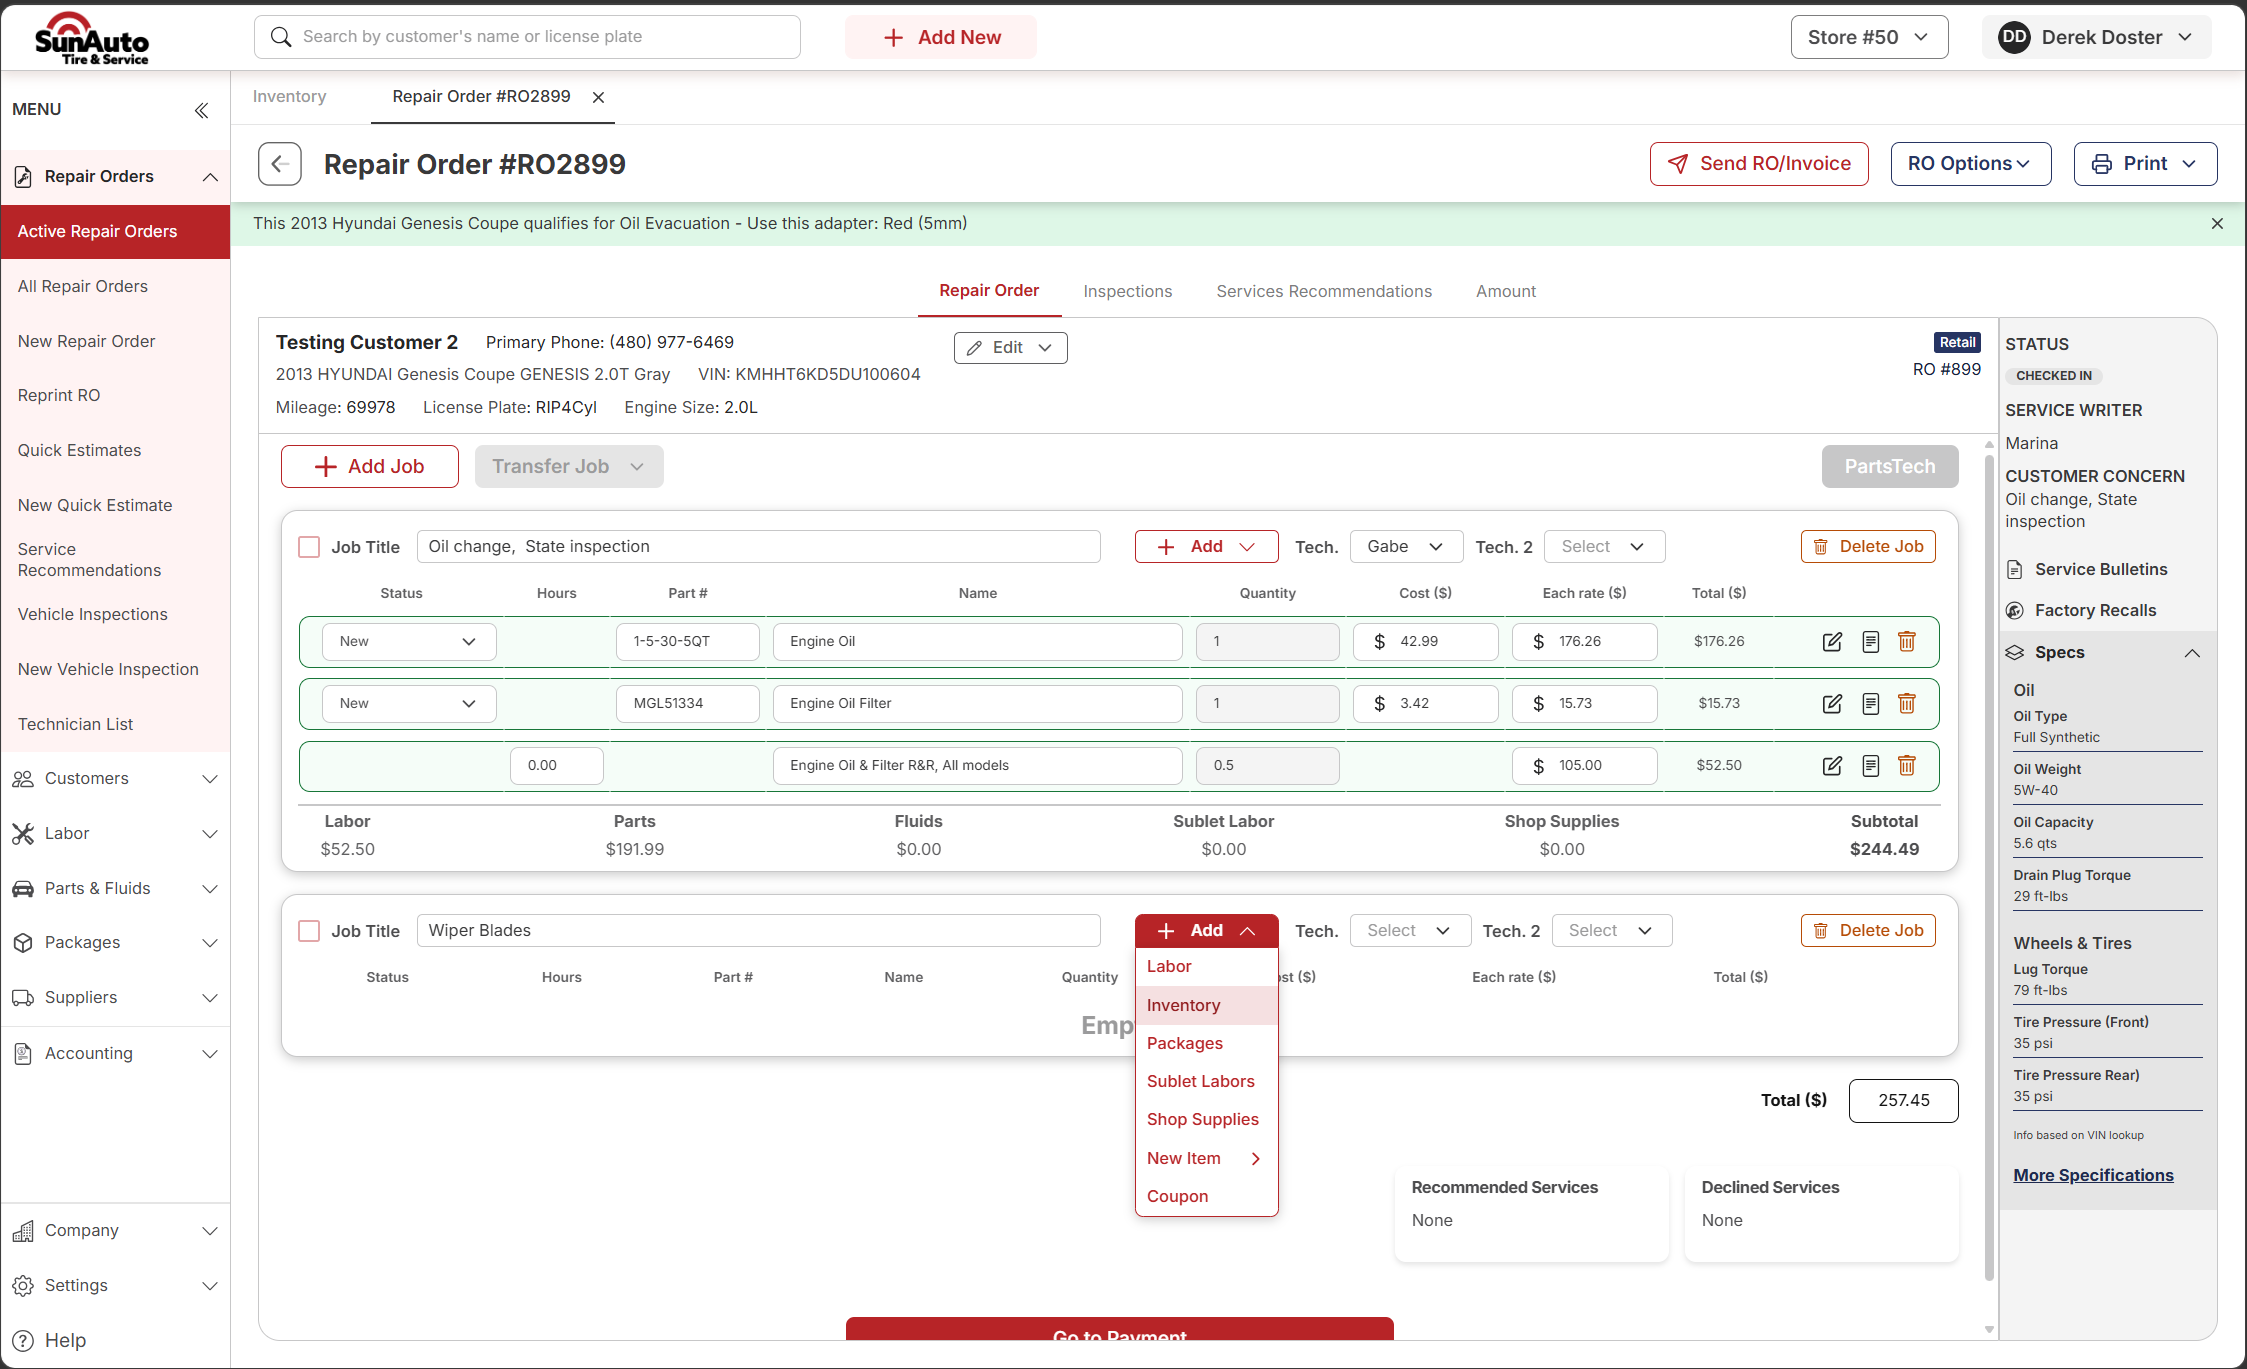
Step 1 — Open Inventory from the Job. On the open RO, find the Job that needs the part and click the red + Add button. Pick Inventory from the dropdown.
 1
The Job needing the part — here, an empty Wiper Blades Job. The part will attach to whichever Job you open the +Add menu on.
2
+ Add — the red button on the Job toolbar opens the dropdown. Inventory is the second item.
3
Inventory — opens the inventory picker for this store.
1
The Job needing the part — here, an empty Wiper Blades Job. The part will attach to whichever Job you open the +Add menu on.
2
+ Add — the red button on the Job toolbar opens the dropdown. Inventory is the second item.
3
Inventory — opens the inventory picker for this store.
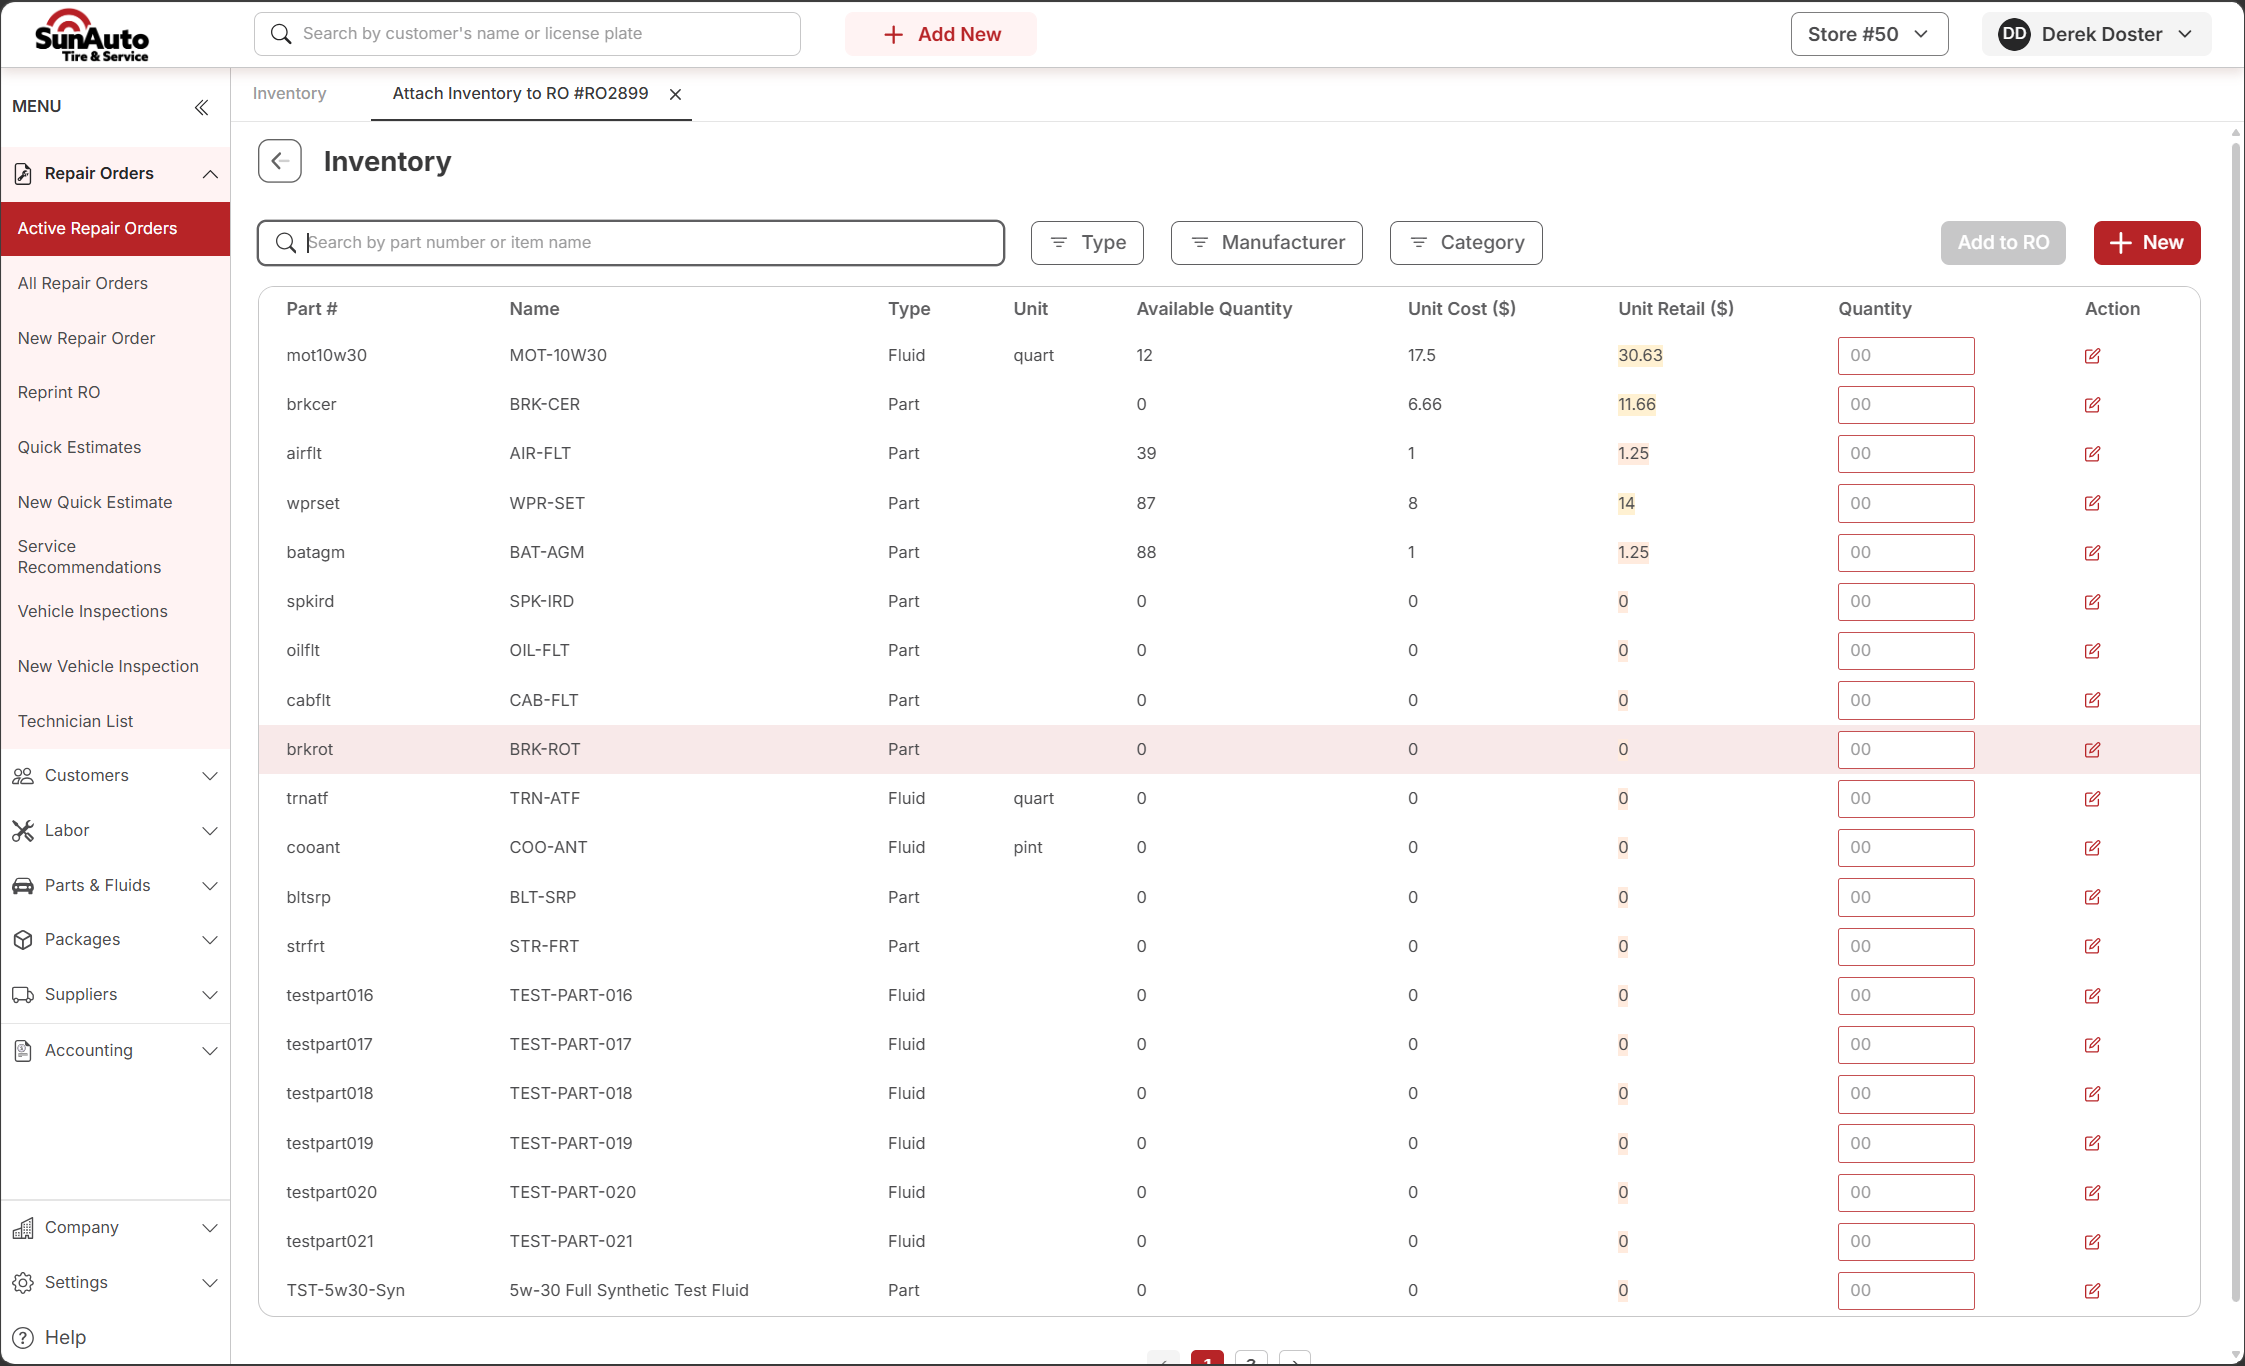
Step 2 — The inventory list. The picker shows every part stocked at this store, with availability and pricing. Search, filter, and check Available Quantity before you commit.
 1
Search — type part number, name, or keyword. Fastest way in.
2
Filters — narrow by Type (Part / Fluid), Manufacturer, or Category. Useful when you know the kind of part but not the exact name.
3
Available Quantity — what's actually on the shelf right now (Quantity on Hand minus what's already committed to other ROs). If this shows 0, the shelf doesn't have it — go to PartsTech instead.
4
Quantity — type how many you need on this Job. The Add to RO button stays disabled until you put a number in at least one row.
1
Search — type part number, name, or keyword. Fastest way in.
2
Filters — narrow by Type (Part / Fluid), Manufacturer, or Category. Useful when you know the kind of part but not the exact name.
3
Available Quantity — what's actually on the shelf right now (Quantity on Hand minus what's already committed to other ROs). If this shows 0, the shelf doesn't have it — go to PartsTech instead.
4
Quantity — type how many you need on this Job. The Add to RO button stays disabled until you put a number in at least one row.
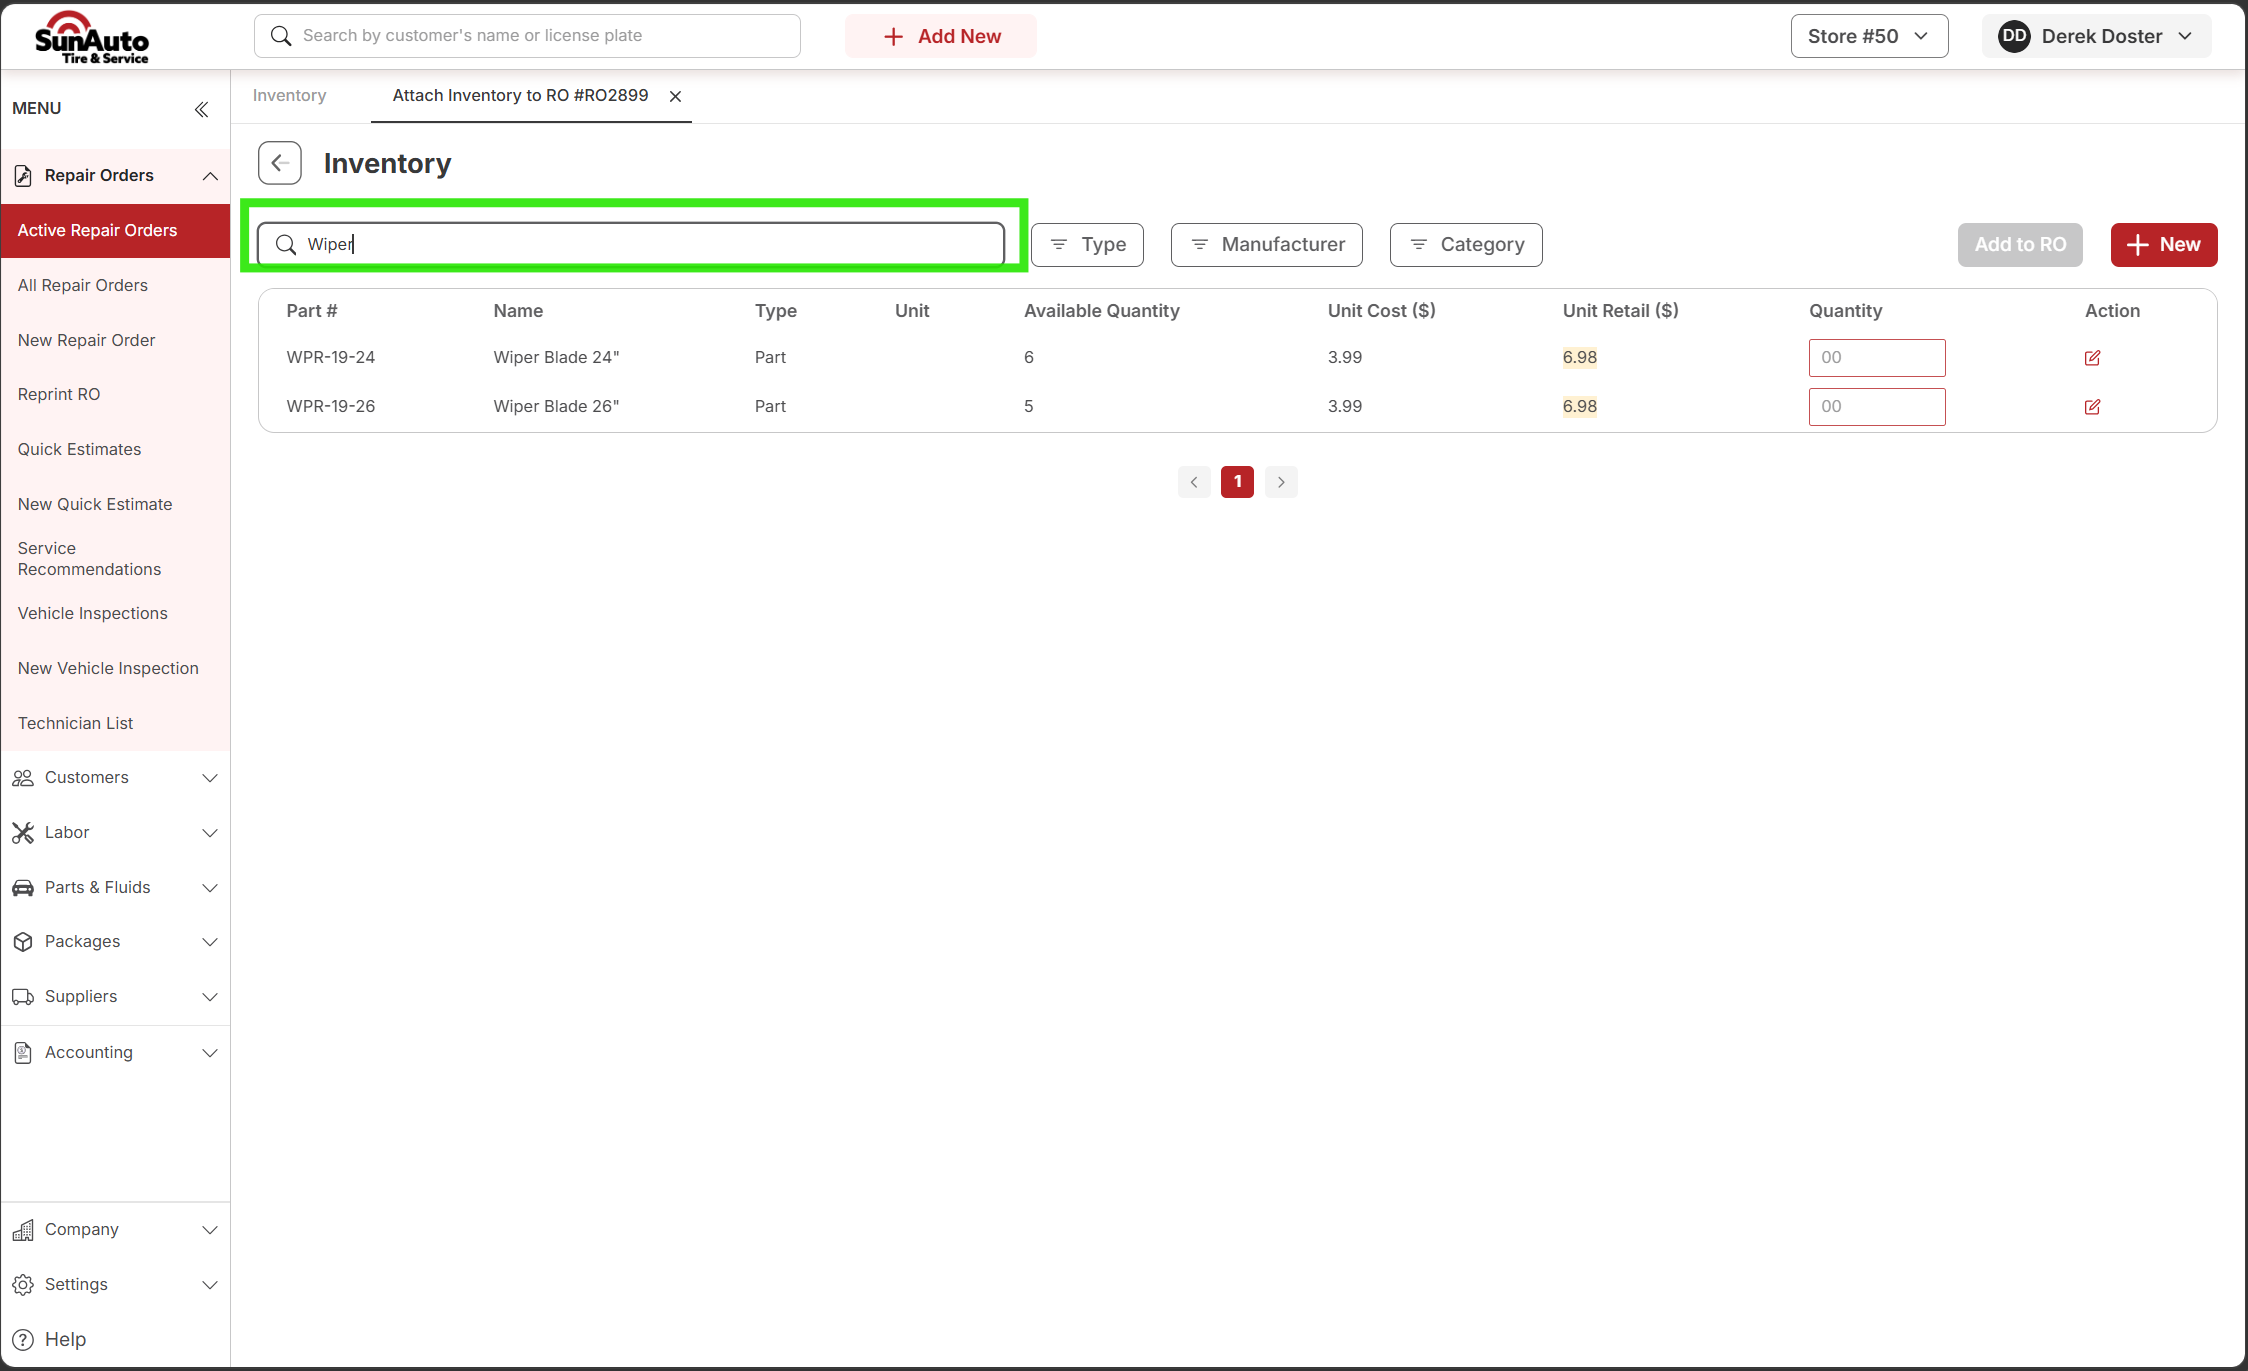
Step 3 — Search down to the part. Type into the search bar and the list narrows in real time. Here, typing Wiper filters down to the two wiper blades in stock.
 1
Active search — the list filters as you type. Two wiper blades match: 24" and 26".
2
Check Available Quantity before you commit — 6 of the 24" in stock and 5 of the 26". Pick the right size for the vehicle.
1
Active search — the list filters as you type. Two wiper blades match: 24" and 26".
2
Check Available Quantity before you commit — 6 of the 24" in stock and 5 of the 26". Pick the right size for the vehicle.
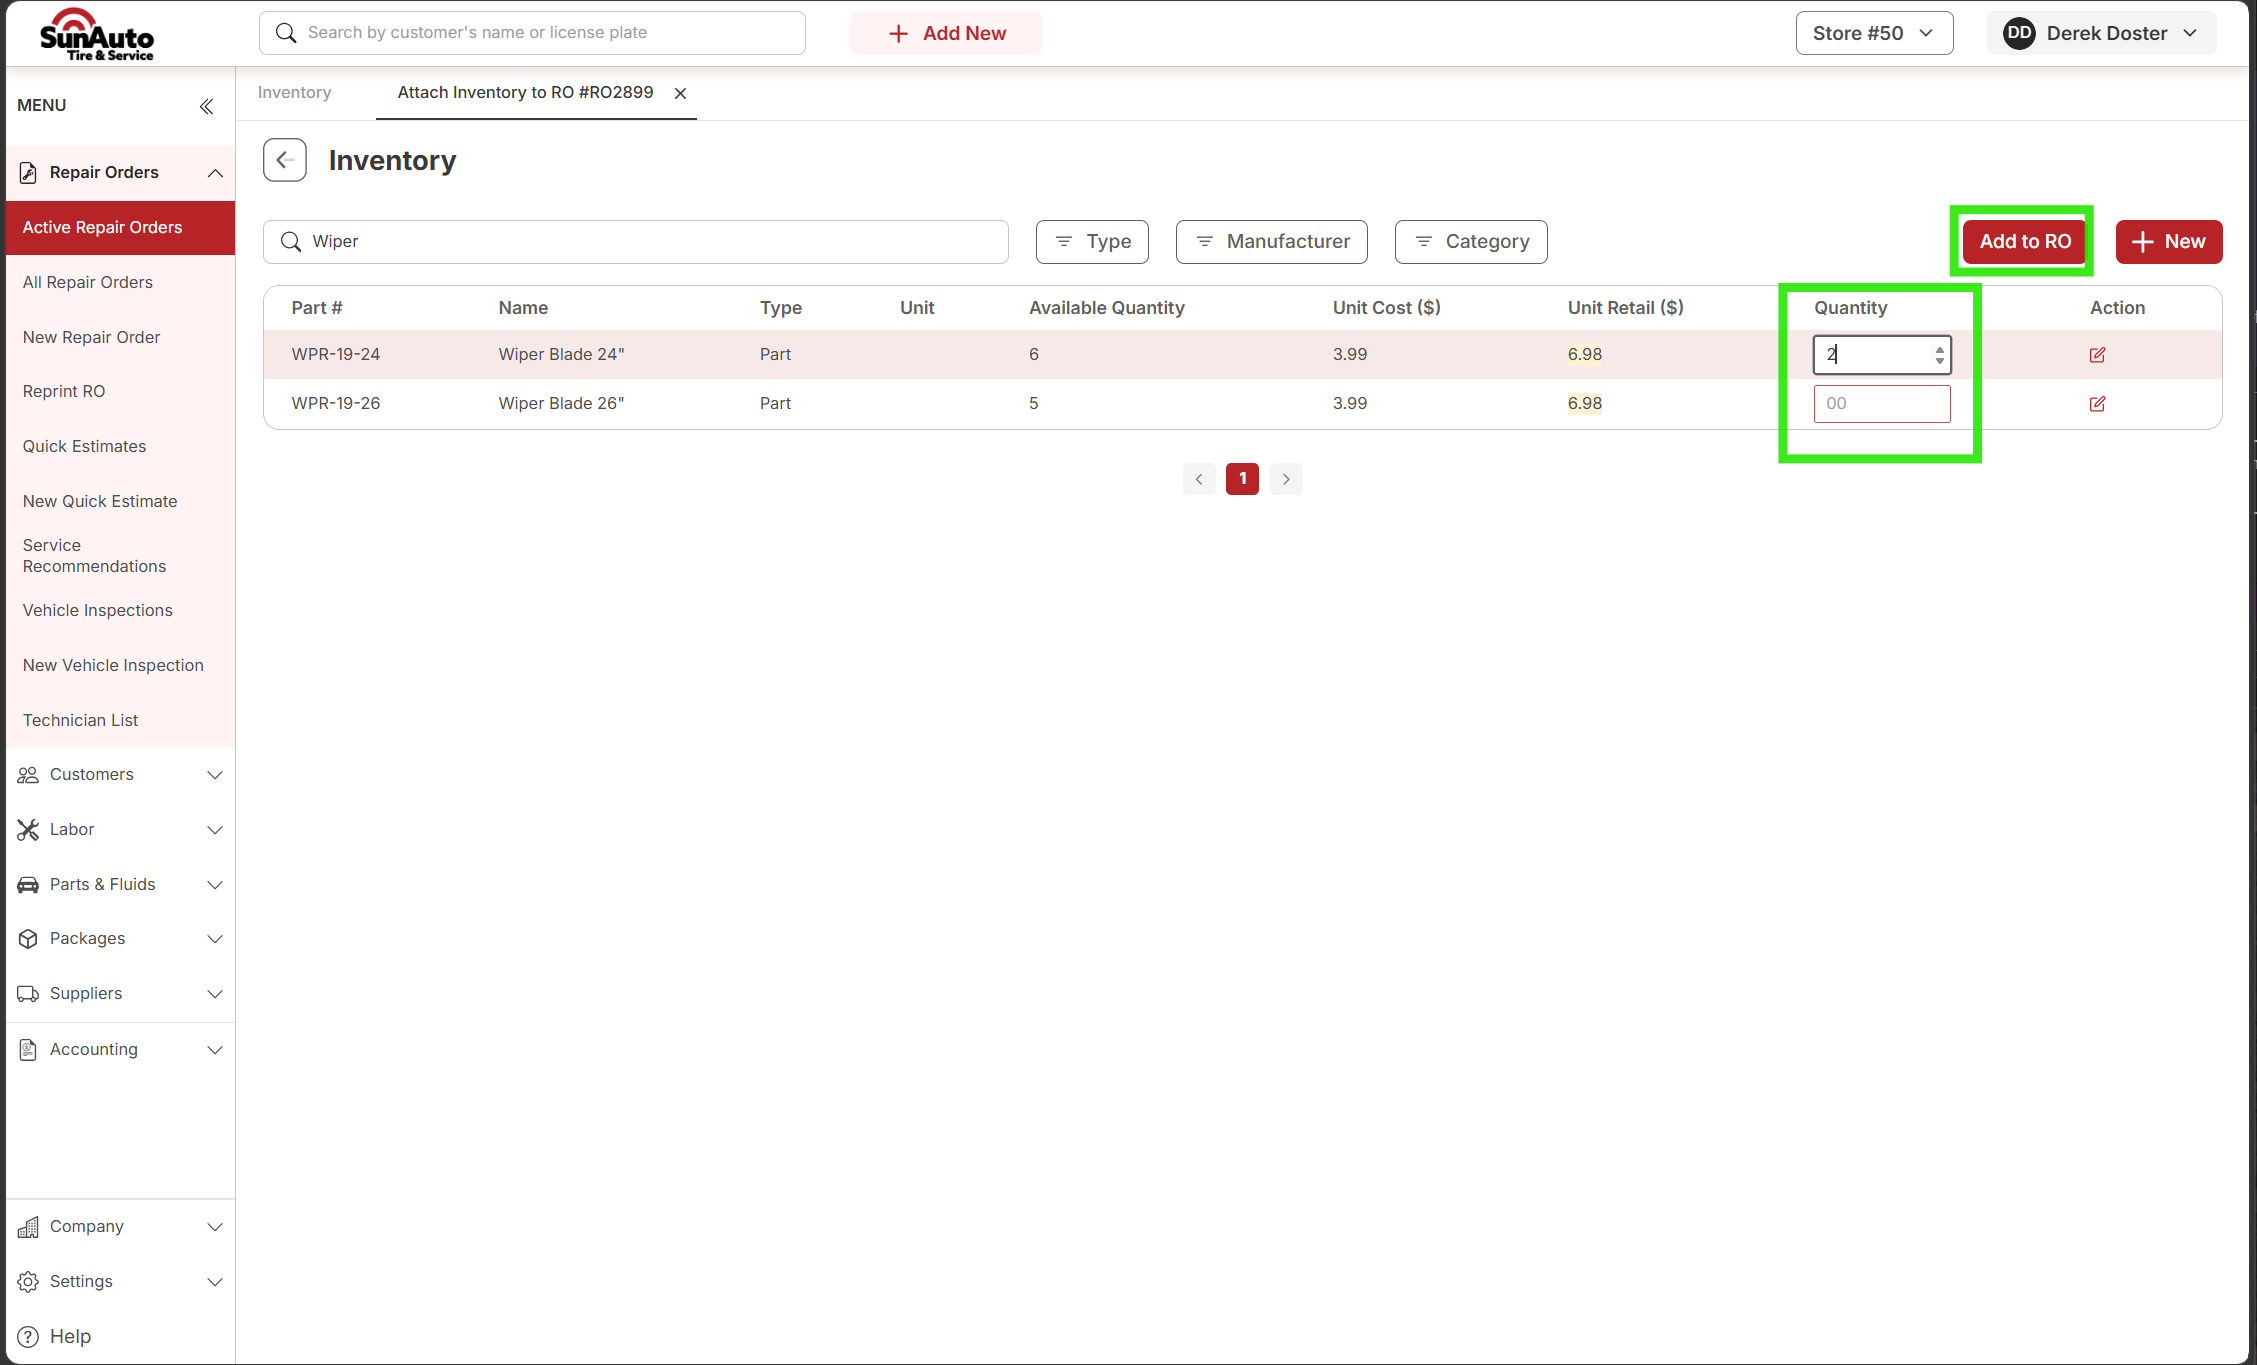
Step 4 — Set the quantity and Add to RO. Type how many you need into the row, then click Add to RO. You can set quantities on multiple rows first and add them all in one click.
 1
Quantity entered — 1 unit of the 24" wiper. The row highlights to show it's selected.
2
Add to RO — now active (red). Click to attach the line to the Job and close the picker.
1
Quantity entered — 1 unit of the 24" wiper. The row highlights to show it's selected.
2
Add to RO — now active (red). Click to attach the line to the Job and close the picker.
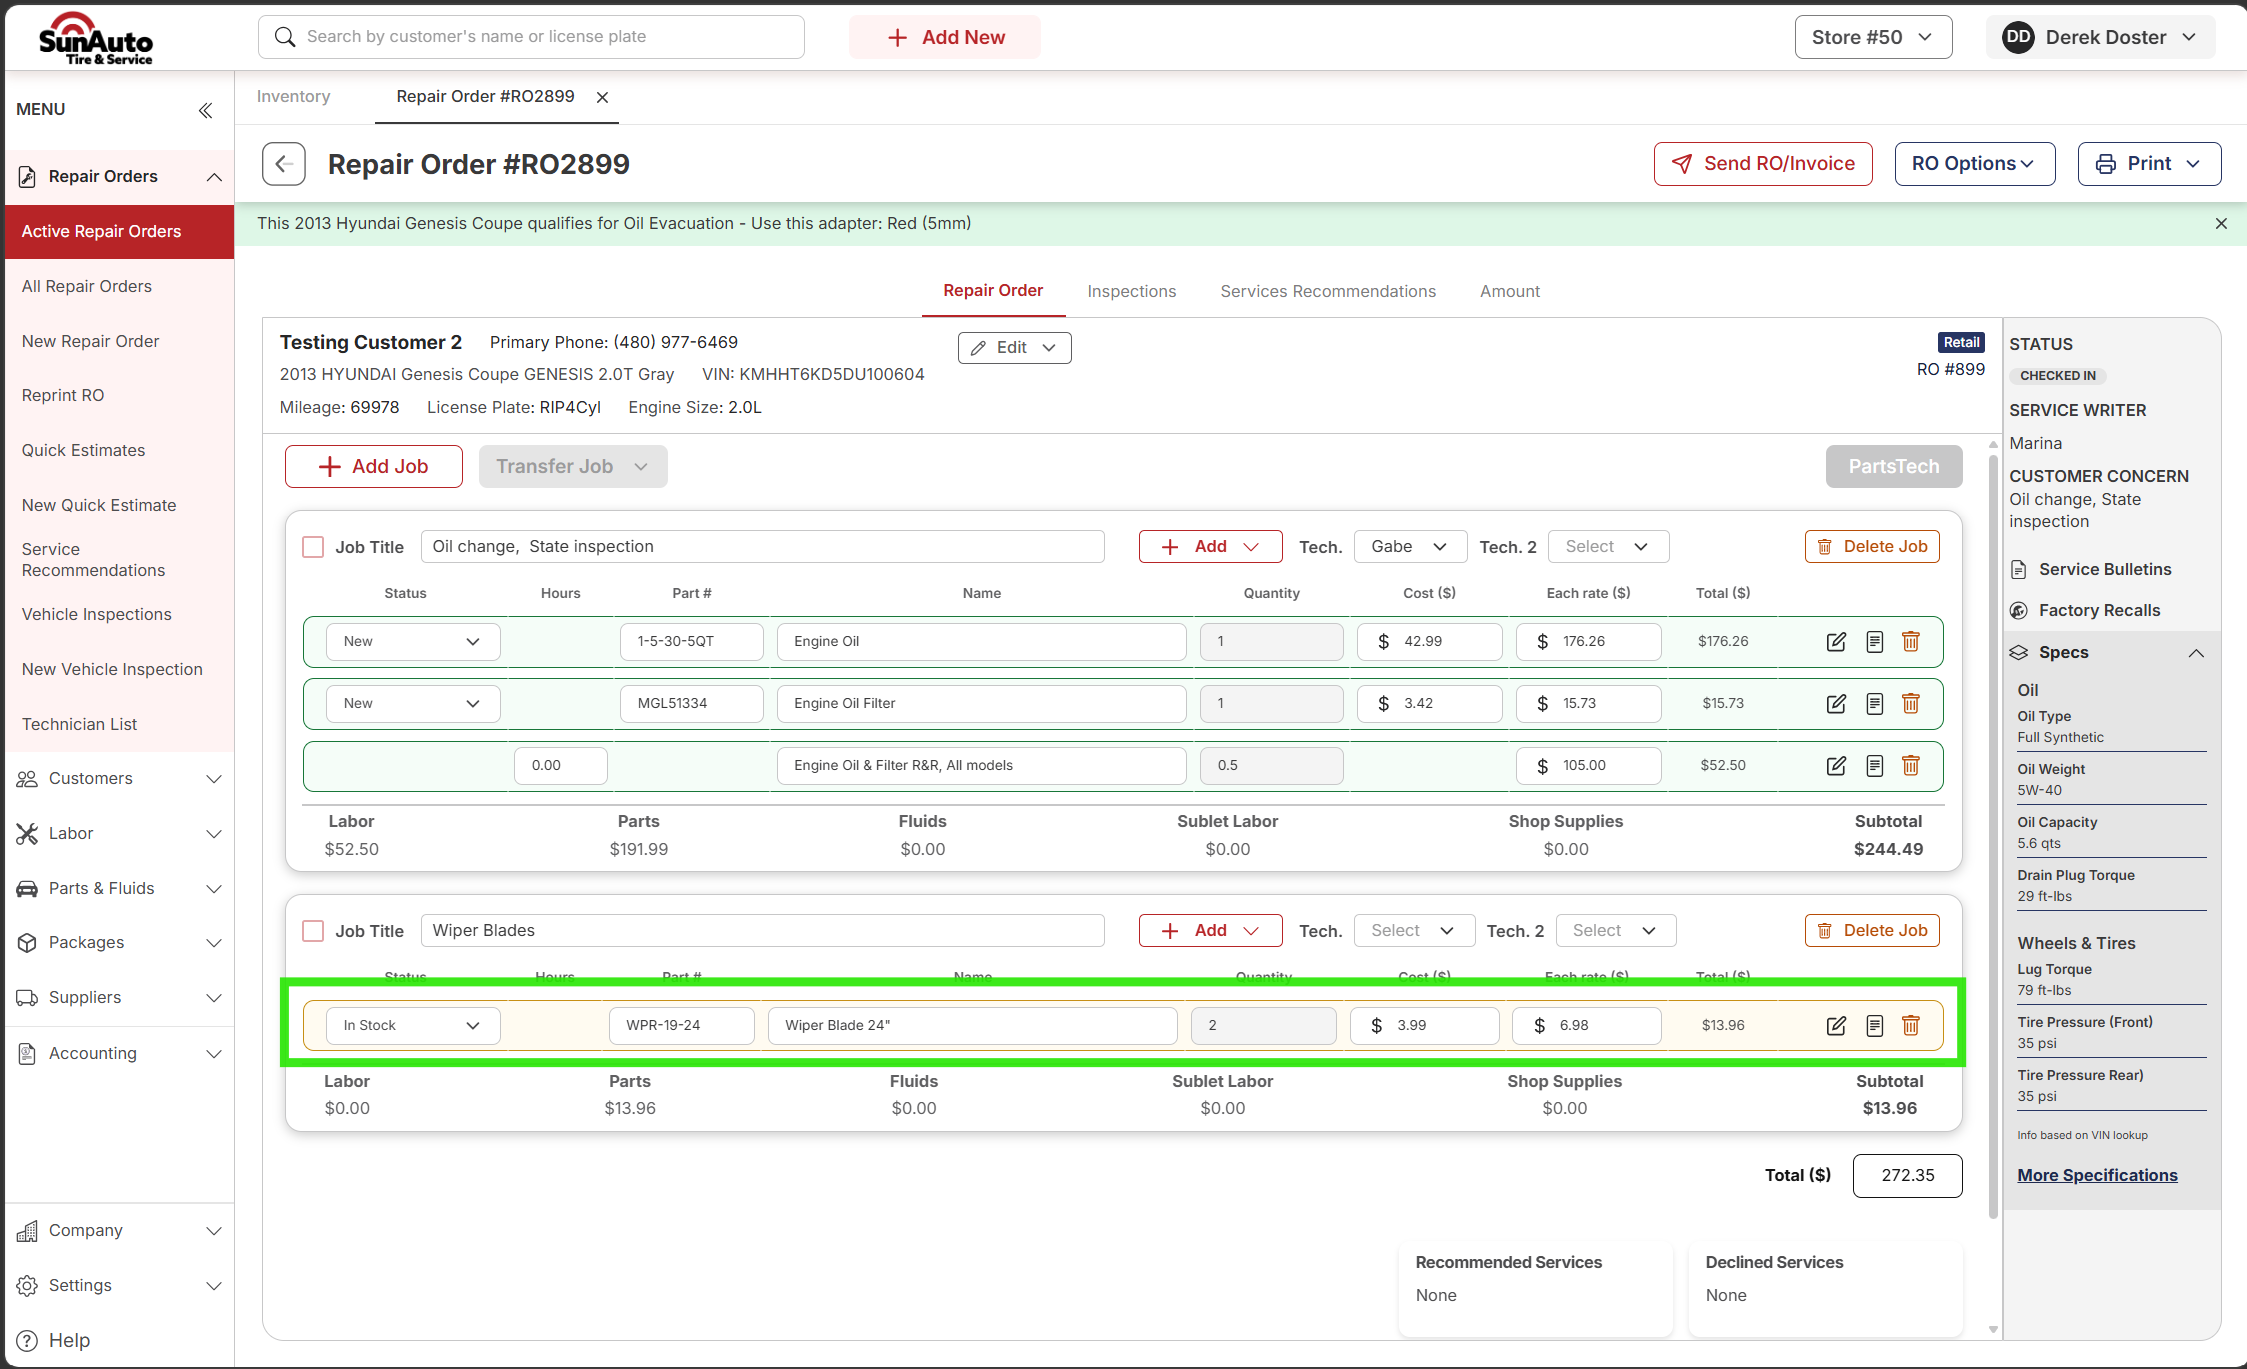
Step 5 — The line lands on the Job. Back on the RO, the part shows as a line on the Job with In Stock status, retail price, and the Job subtotal updated. Treat it like any other line — adjust quantity in place, set the tech, etc.
 1
The part on the Job — status In Stock, part number, name, quantity, cost, retail, and line total.
2
Job subtotal updates immediately. The RO total at the bottom picks it up too.
1
The part on the Job — status In Stock, part number, name, quantity, cost, retail, and line total.
2
Job subtotal updates immediately. The RO total at the bottom picks it up too.
Watch the flow
A few inventory tips
- Trust Available Quantity. It's the live number — Quantity on Hand minus what's already committed to other ROs. If it shows 1 and someone else just grabbed it, you'll see 0 on a refresh. See Available QTY.
- Available Quantity is 0? The shelf doesn't have it. Switch to PartsTech and pull it in from a supplier instead.
- Wrong store's inventory? The list filters to the store on the RO (see the store selector in the top right). If you're on the wrong store, switch stores before opening the RO.
- Added the wrong part? Use the row's action icon on the Job to remove the line; quantity returns to inventory as soon as the line comes off the RO.
From outside our inventory (PartsTech)
When the shop doesn't have a part on the shelf, you can pull one in through PartsTech straight from the RO. The part flows back onto that specific RO when you submit the quote — it doesn't go to the shelf for resale.
Don't mix this up with an Inventory PO
Inventory Purchase Orders stock parts onto the shelf for resale. Pulling parts in through PartsTech from an RO brings in a specific part for one customer's repair. The words "Received" and "Returned" show up in both, but you'll be on different screens with different steps.
Step through the slides — click the chips at the top, the Previous / Next buttons, or use the ← → arrow keys.
Step 1 — Open the Job. Start on the Repair Order with an empty Job for the work you need parts for. On RO #RO3902 below, the Job is Front Brake Pads and Rotors. Notice the PartsTech button at the top-right of the Job row — that's the way out to the supplier catalog.
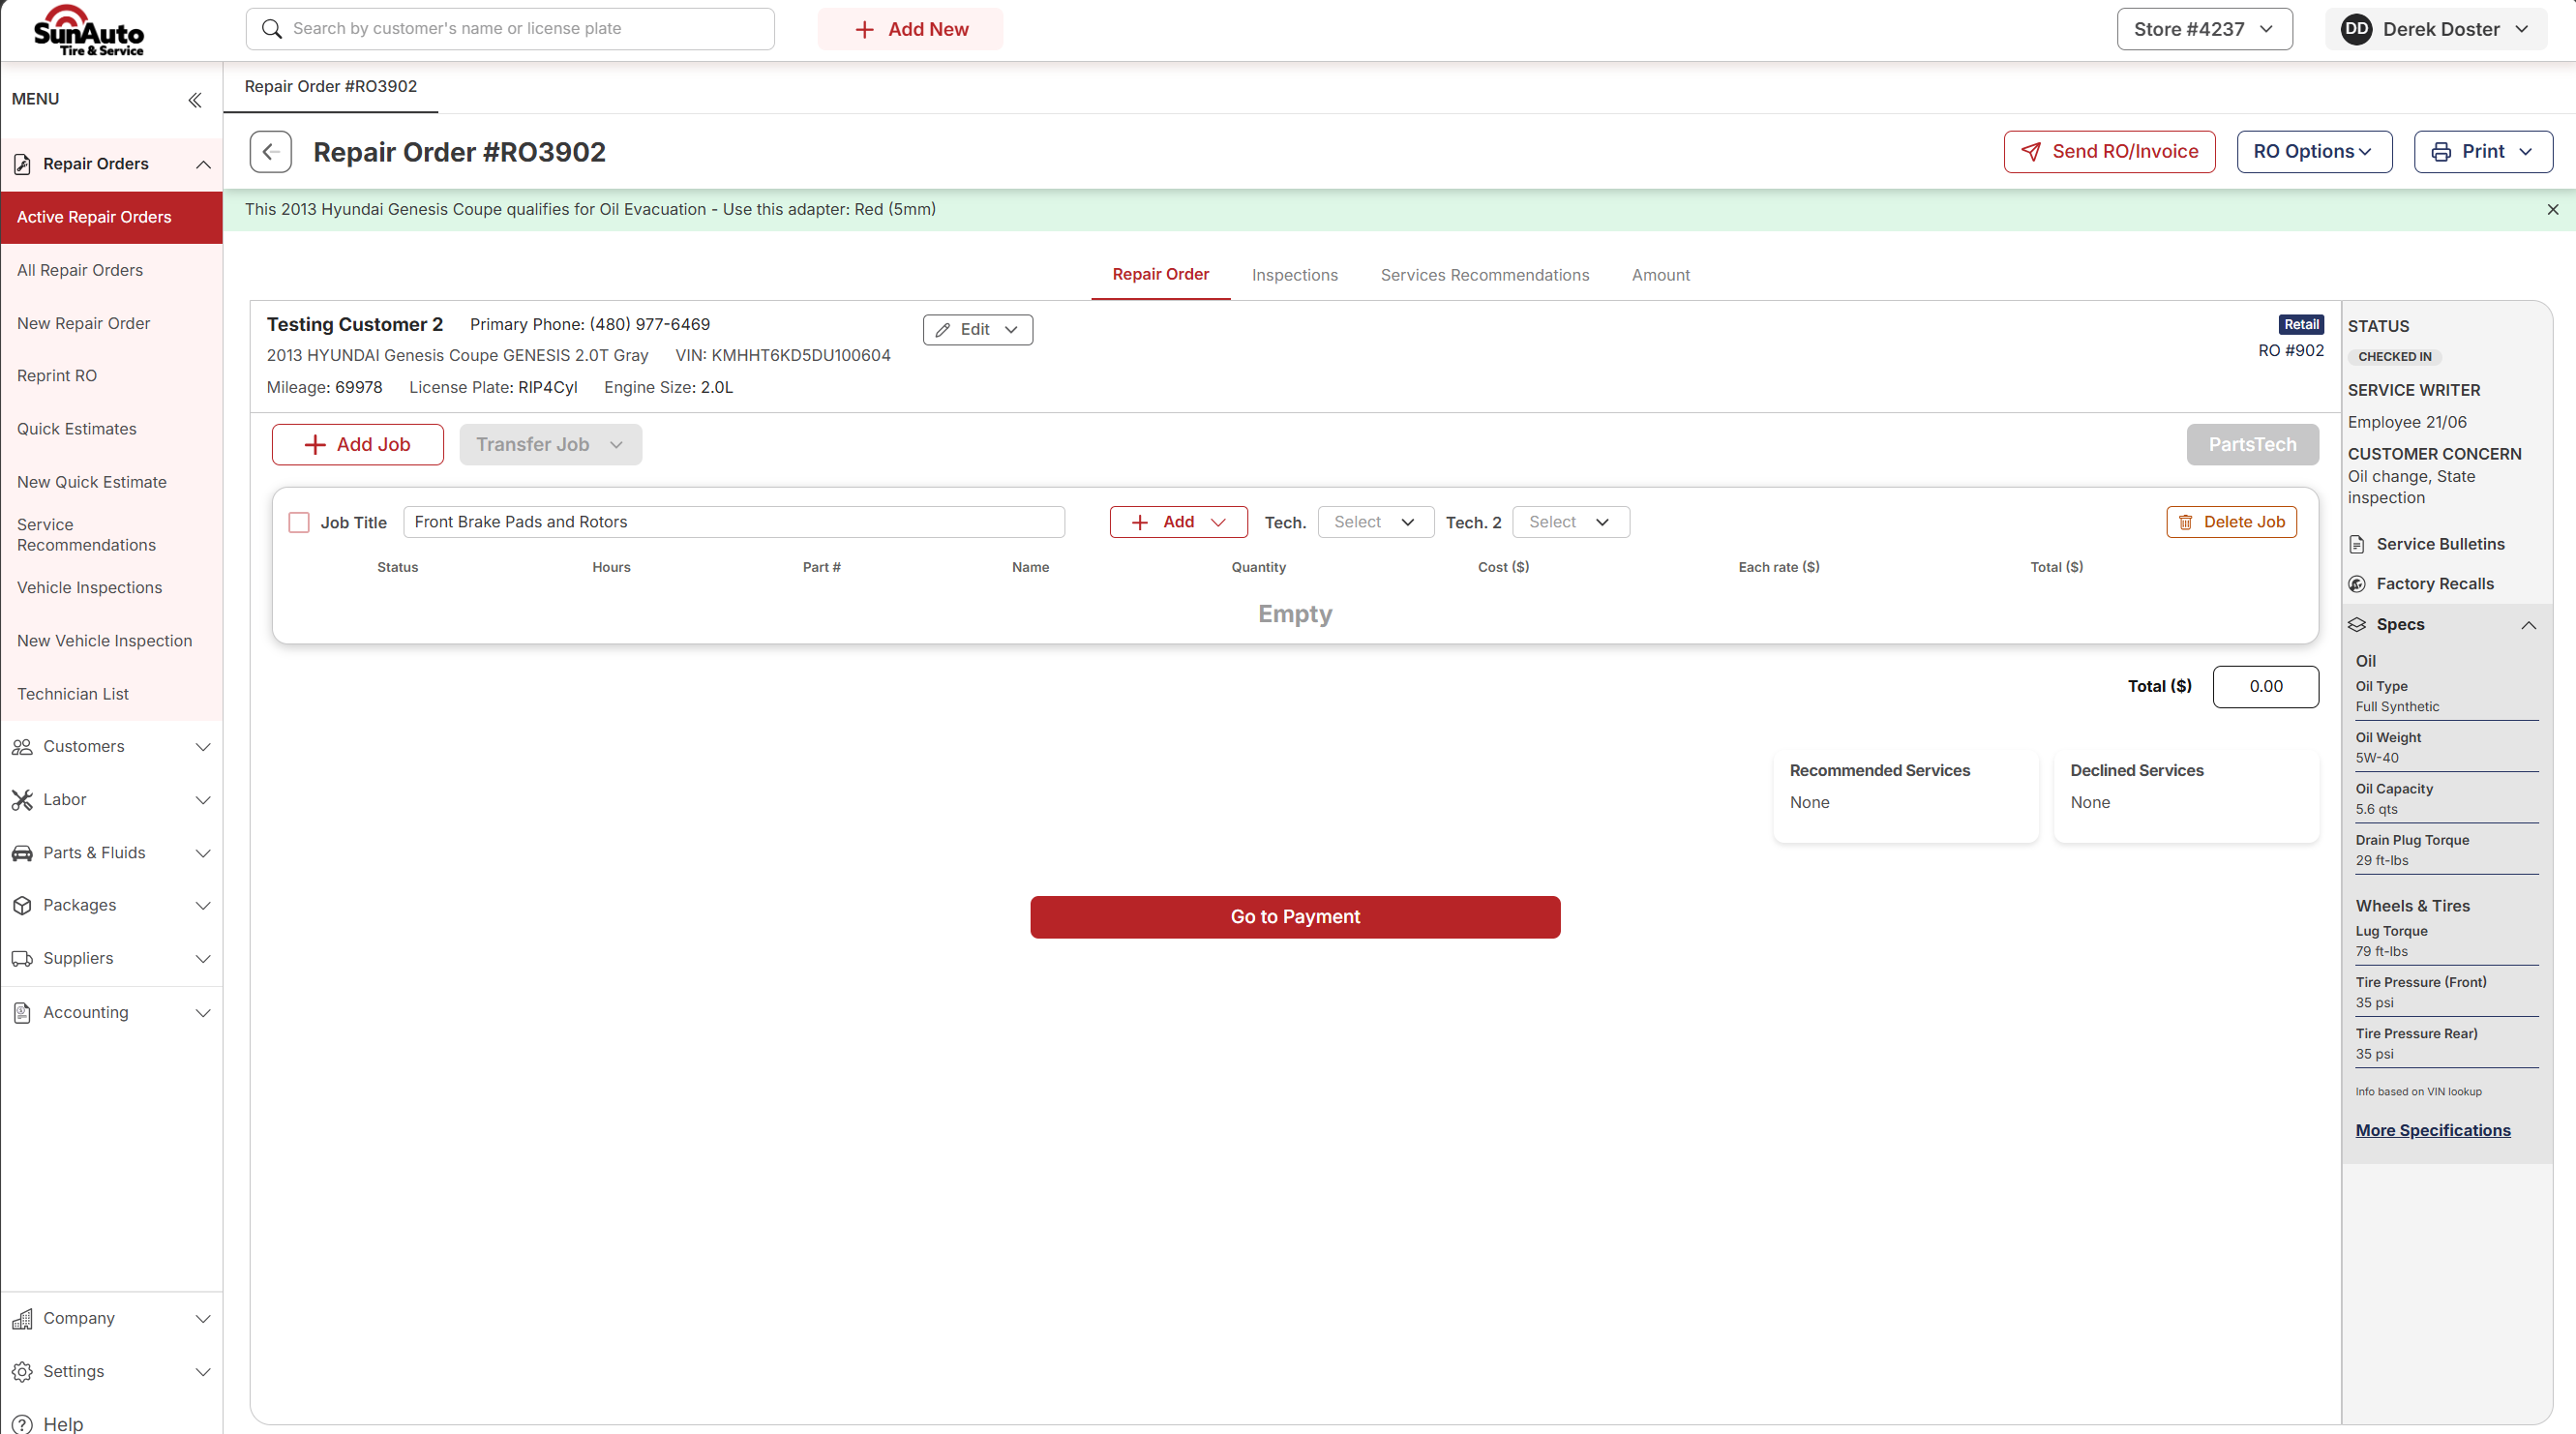
Step 2 — Click PartsTech. The vehicle (Year/Make/Model/Engine), mileage, and store info travel with you into PartsTech, so you don't have to enter them again on the supplier side.

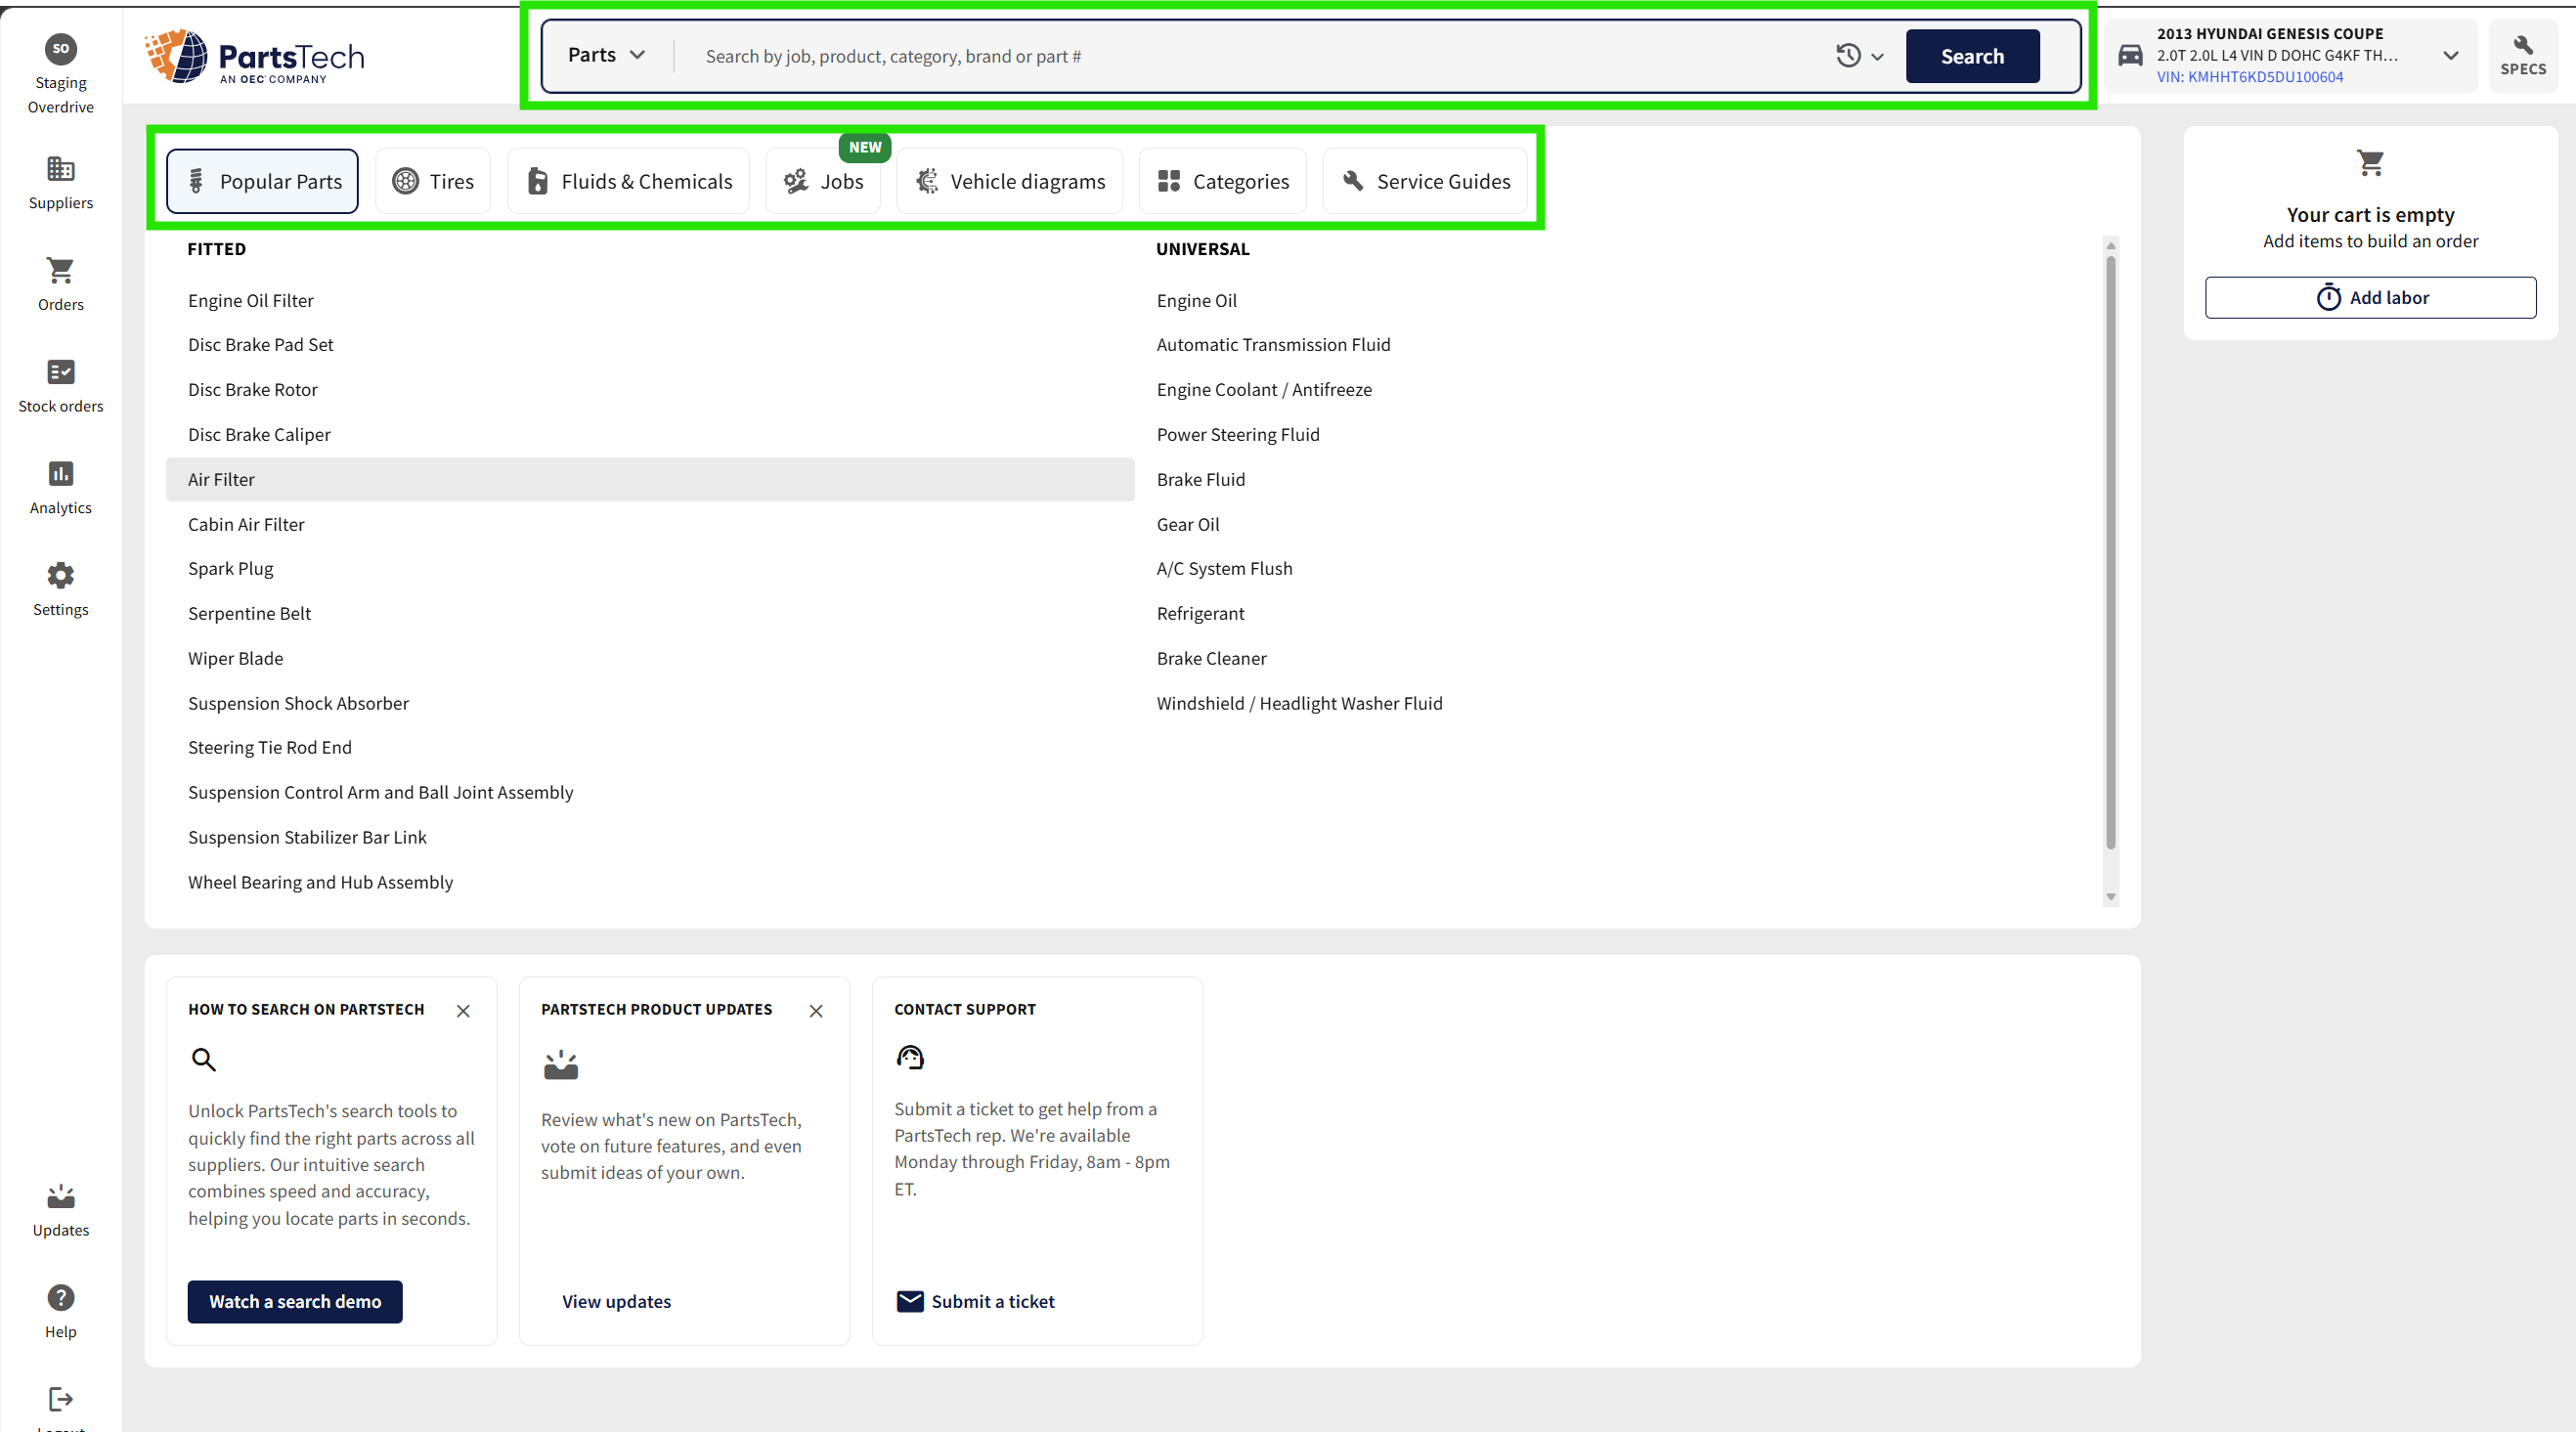
Step 3 — Land in PartsTech. PartsTech opens preloaded with the customer's vehicle (top right). Browse by category — Popular Parts, Tires, Fluids & Chemicals, Jobs, Vehicle diagrams, Categories, Service Guides — or type what you need in the search bar at the top.
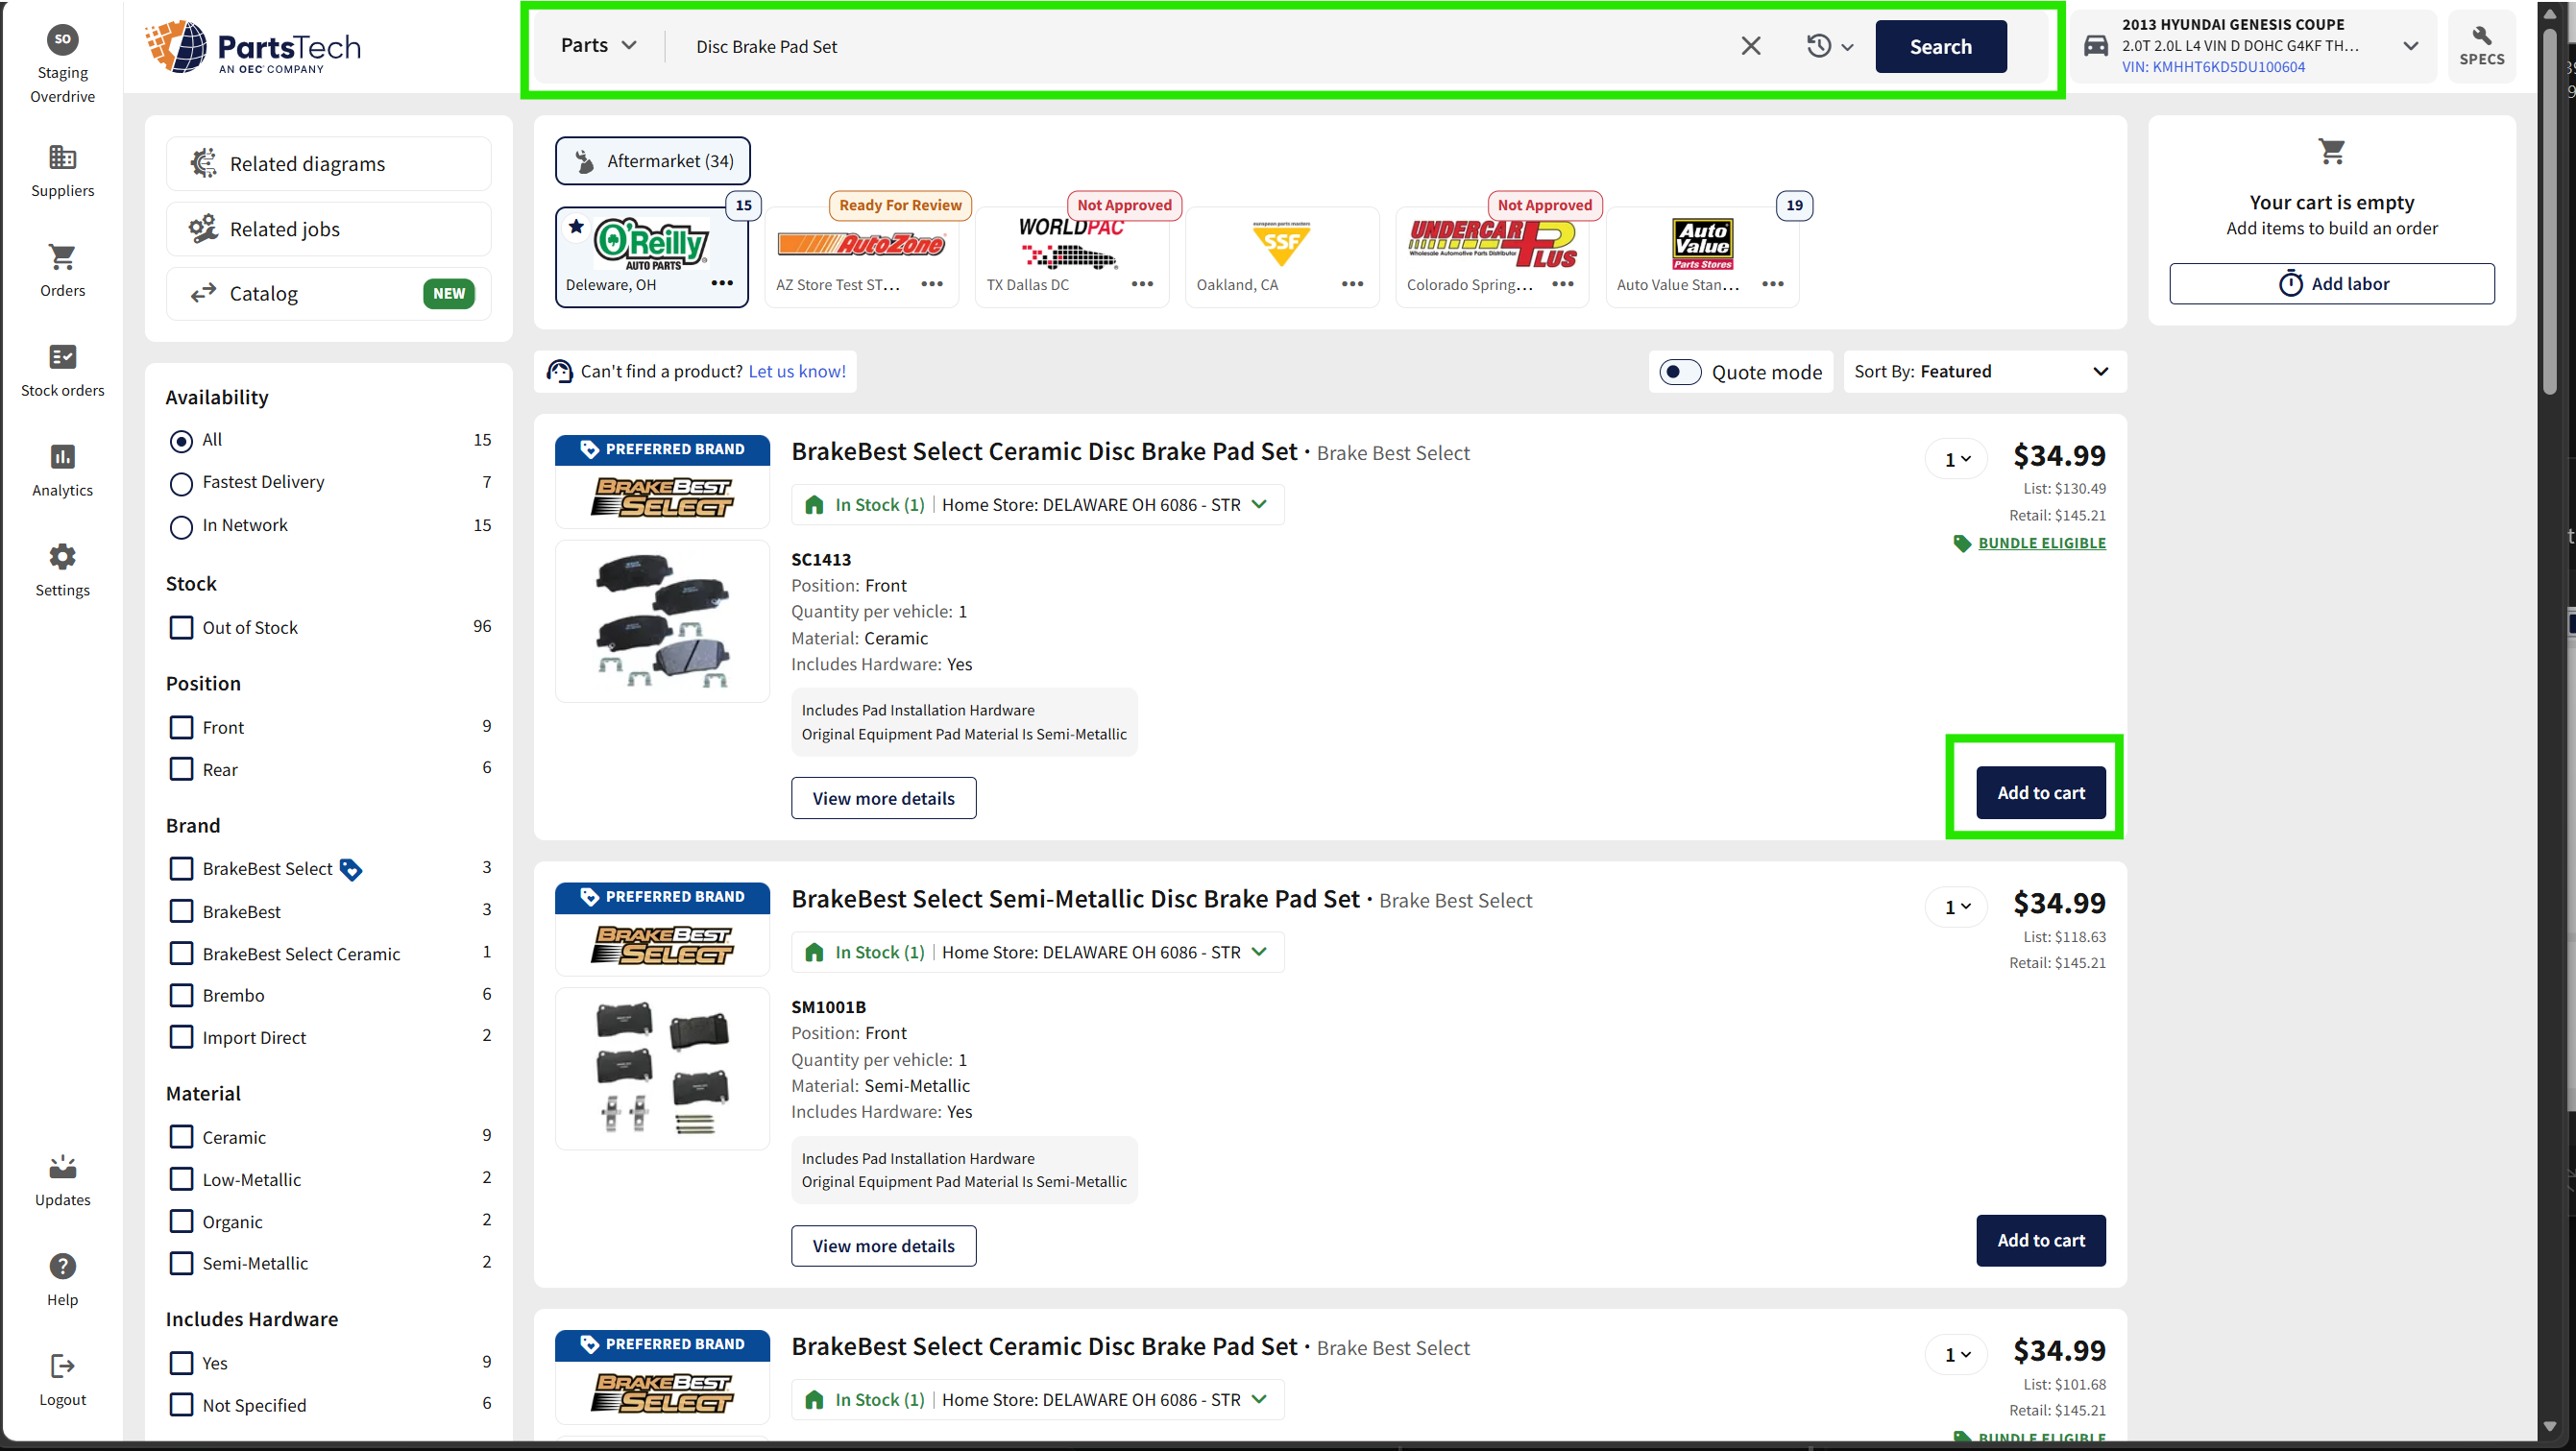
Step 4 — Search and filter. Search for the part you need (here, Disc Brake Pad Set). The supplier strip at the top shows what each nearby supplier has in stock right now. Use the filters on the left — Availability, Brand, Material, etc. — to narrow the list. Click Add to cart on the part you want.
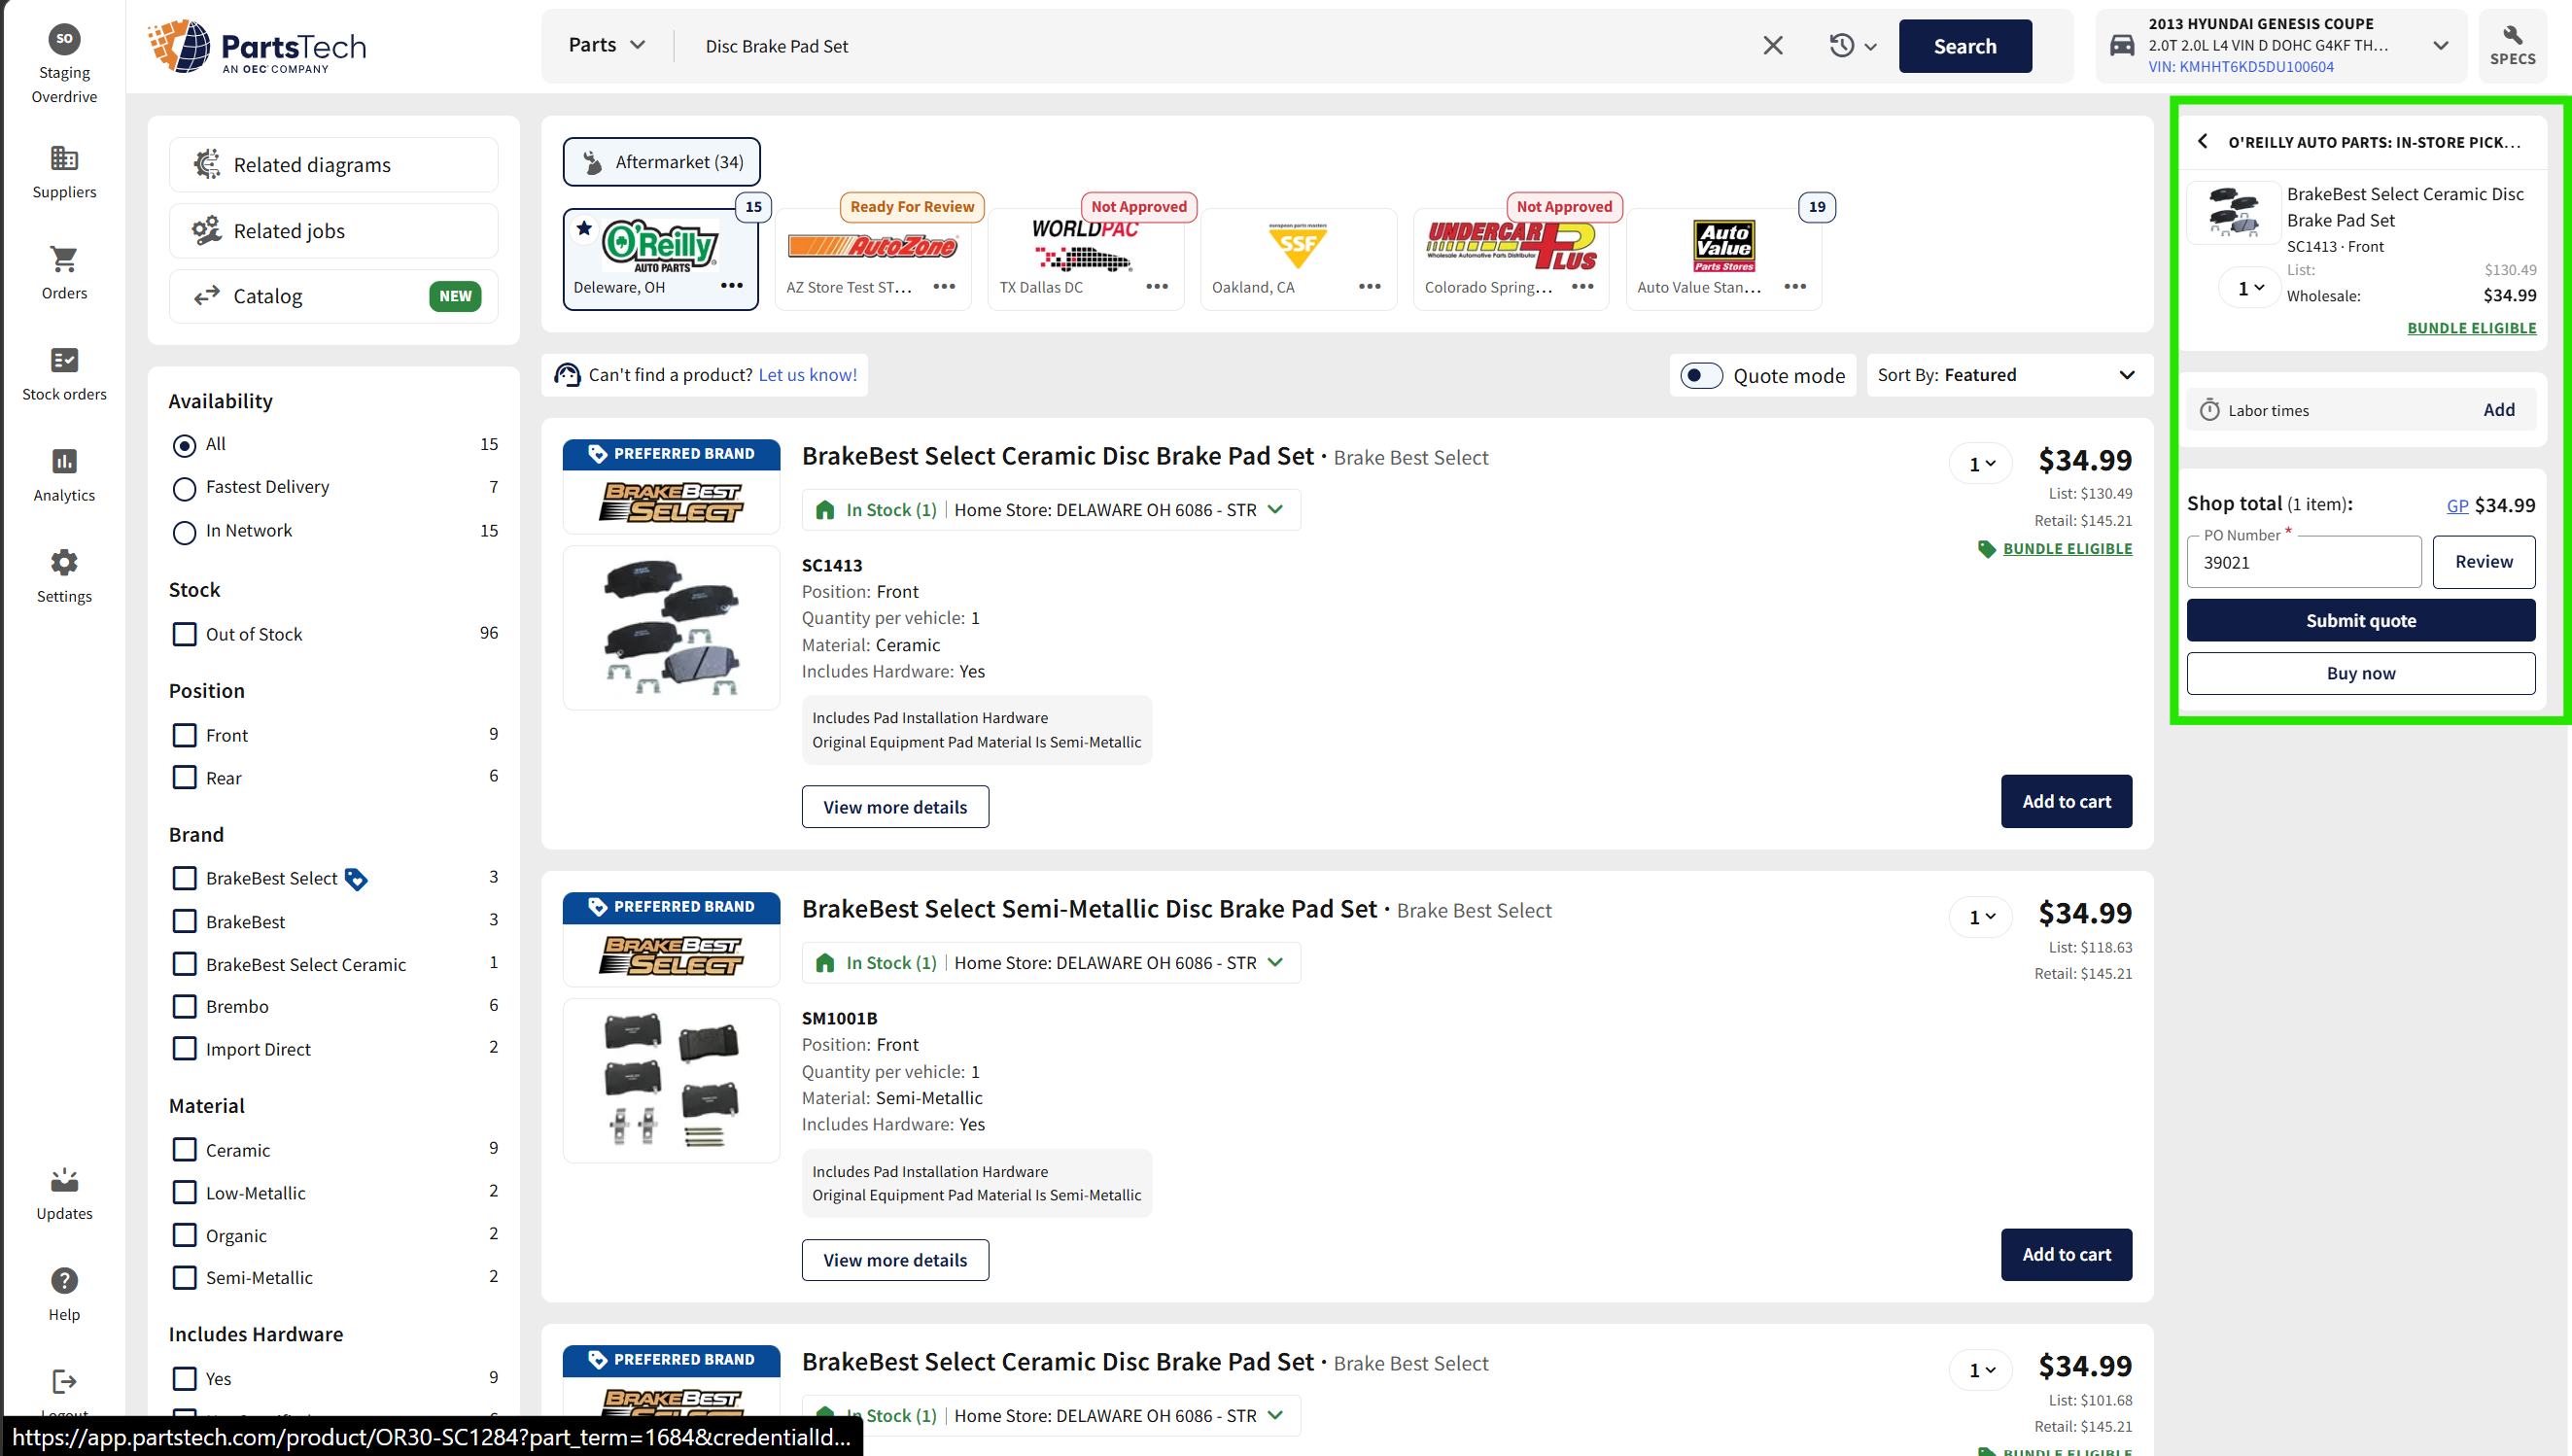
Step 5 — First part in the cart. Once a part is added, the right-side cart panel fills in: Shop total, PO Number (auto-filled from the RO), and the Submit quote / Buy now buttons. Keep going if there's more to order.
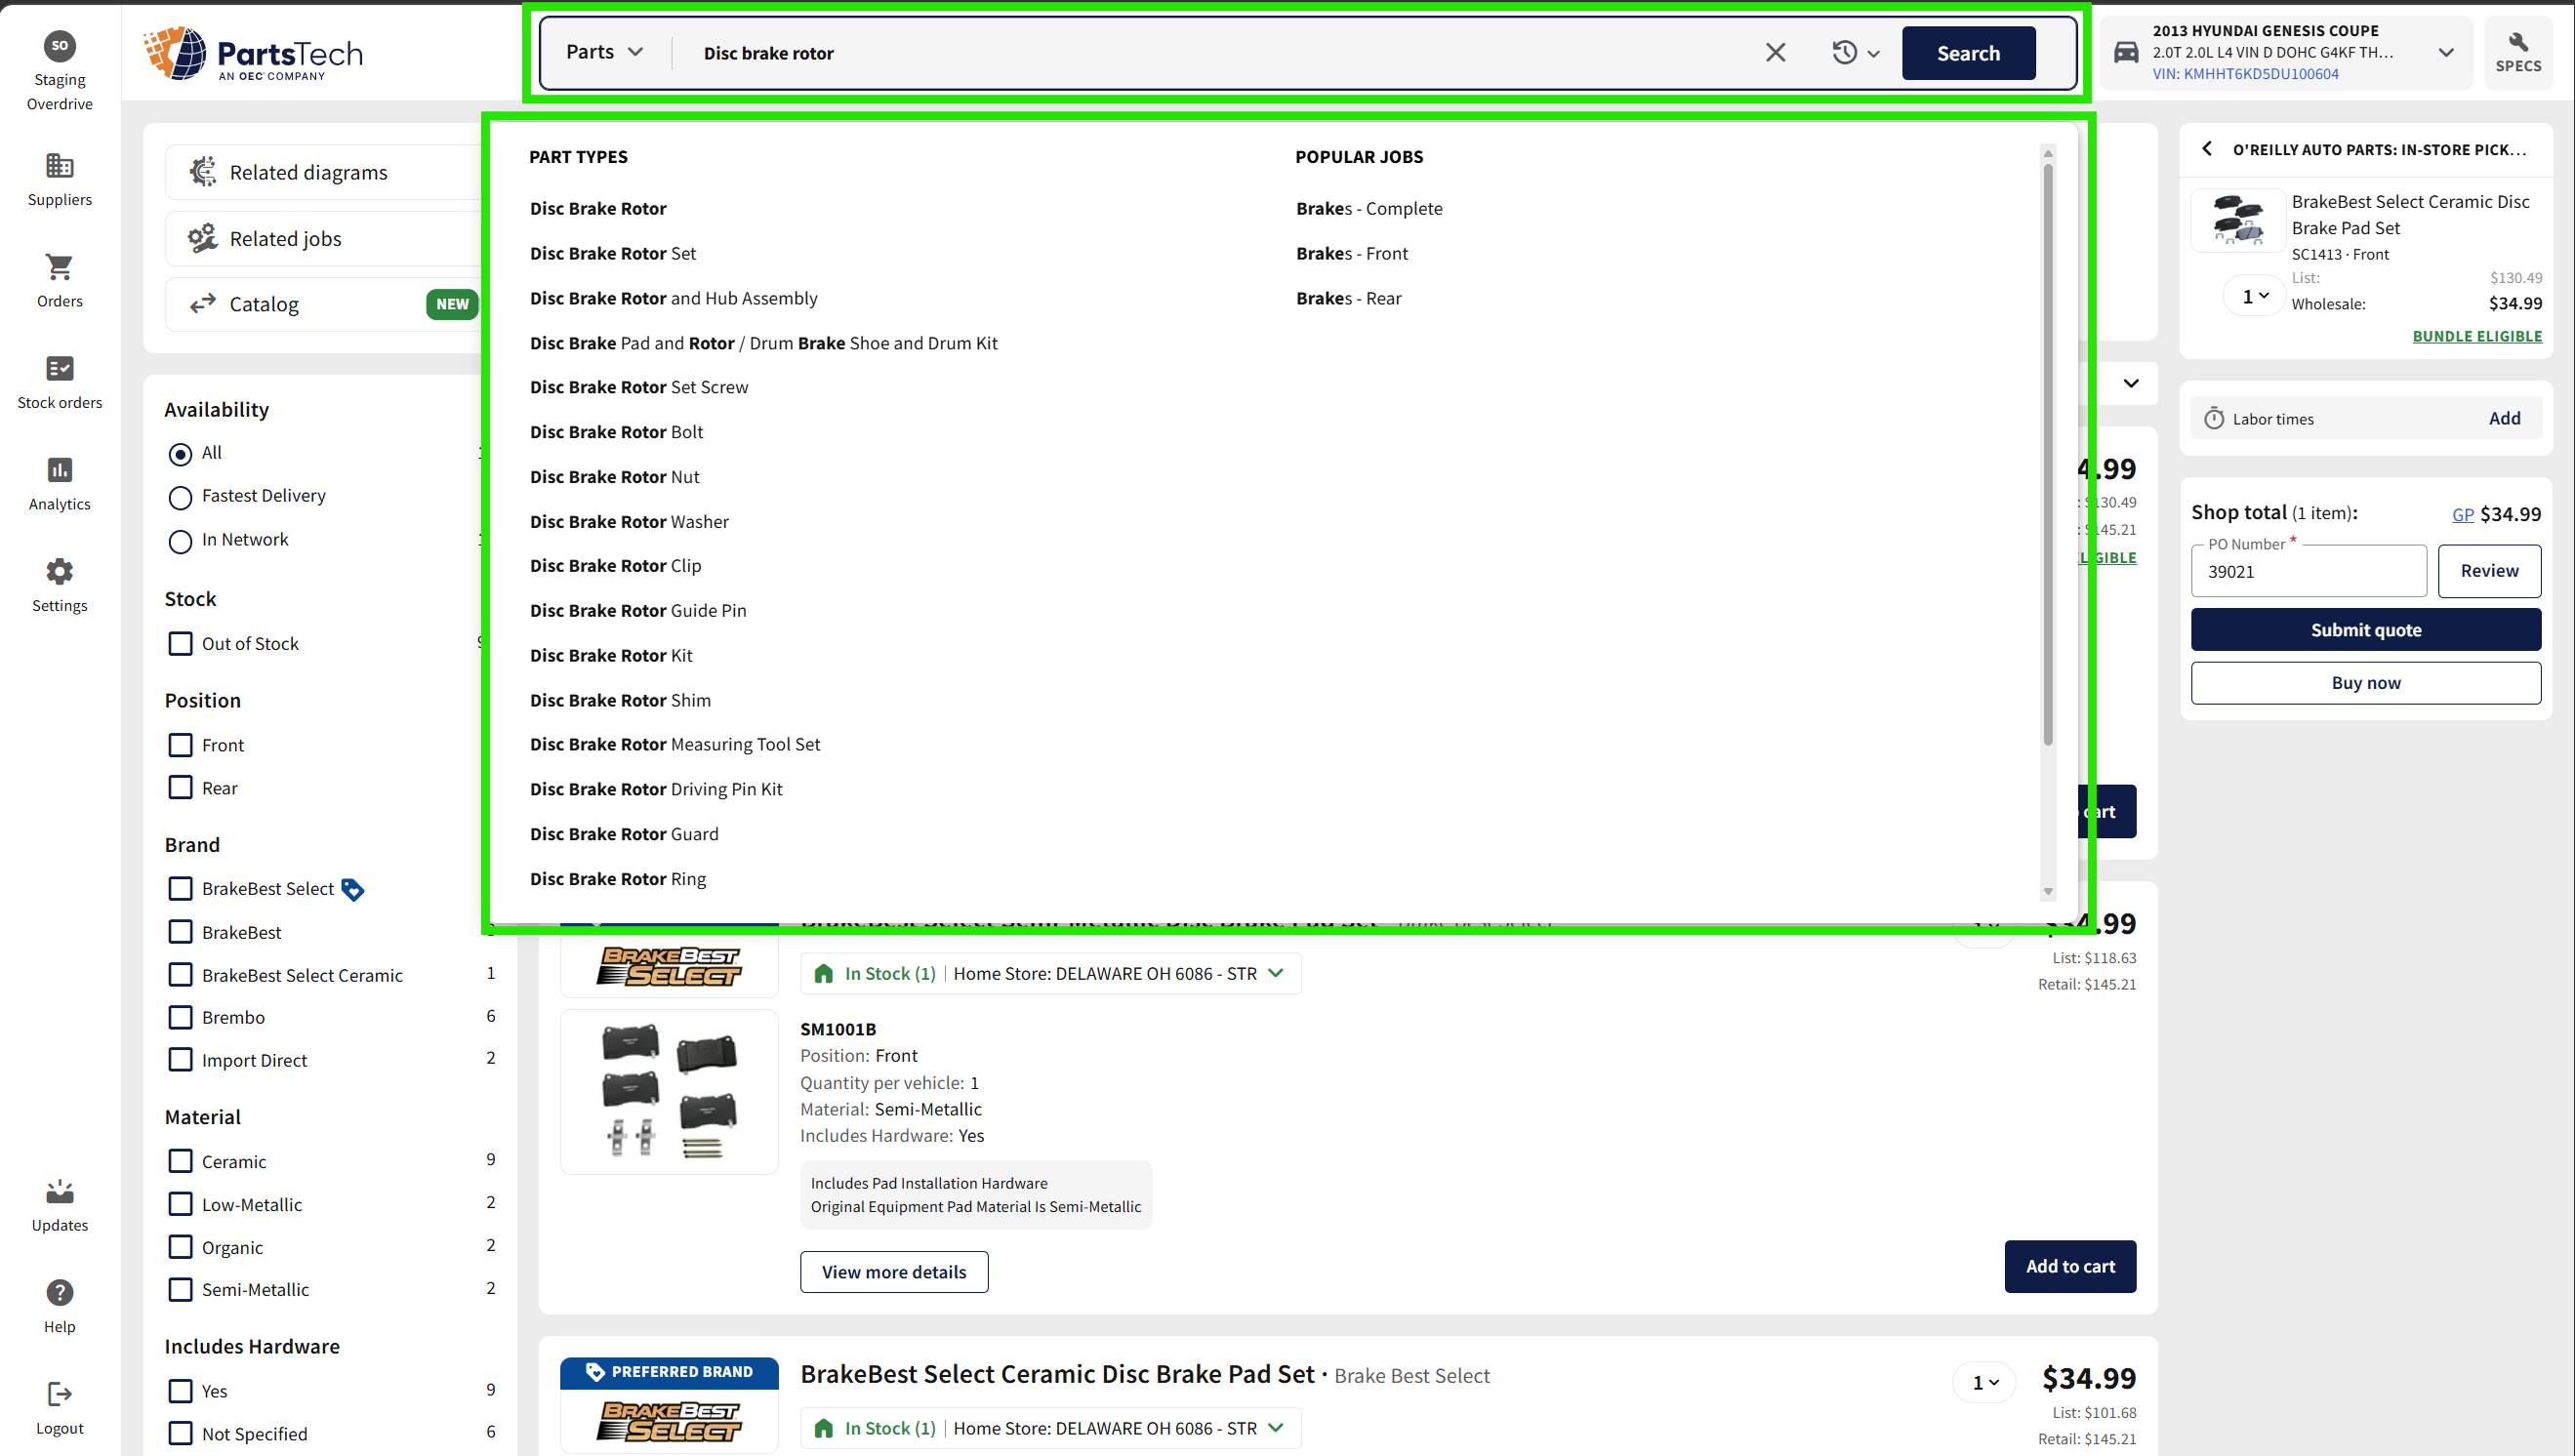
Step 6 — Search for the next part. Type the next part into the search bar — here, Disc Brake Rotor. The autocomplete groups suggestions by Part Types (Disc Brake Rotor, Rotor Set, Rotor and Hub Assembly, etc.) and Popular Jobs (Brake: Complete, Front, Rear). Pick the closest match.
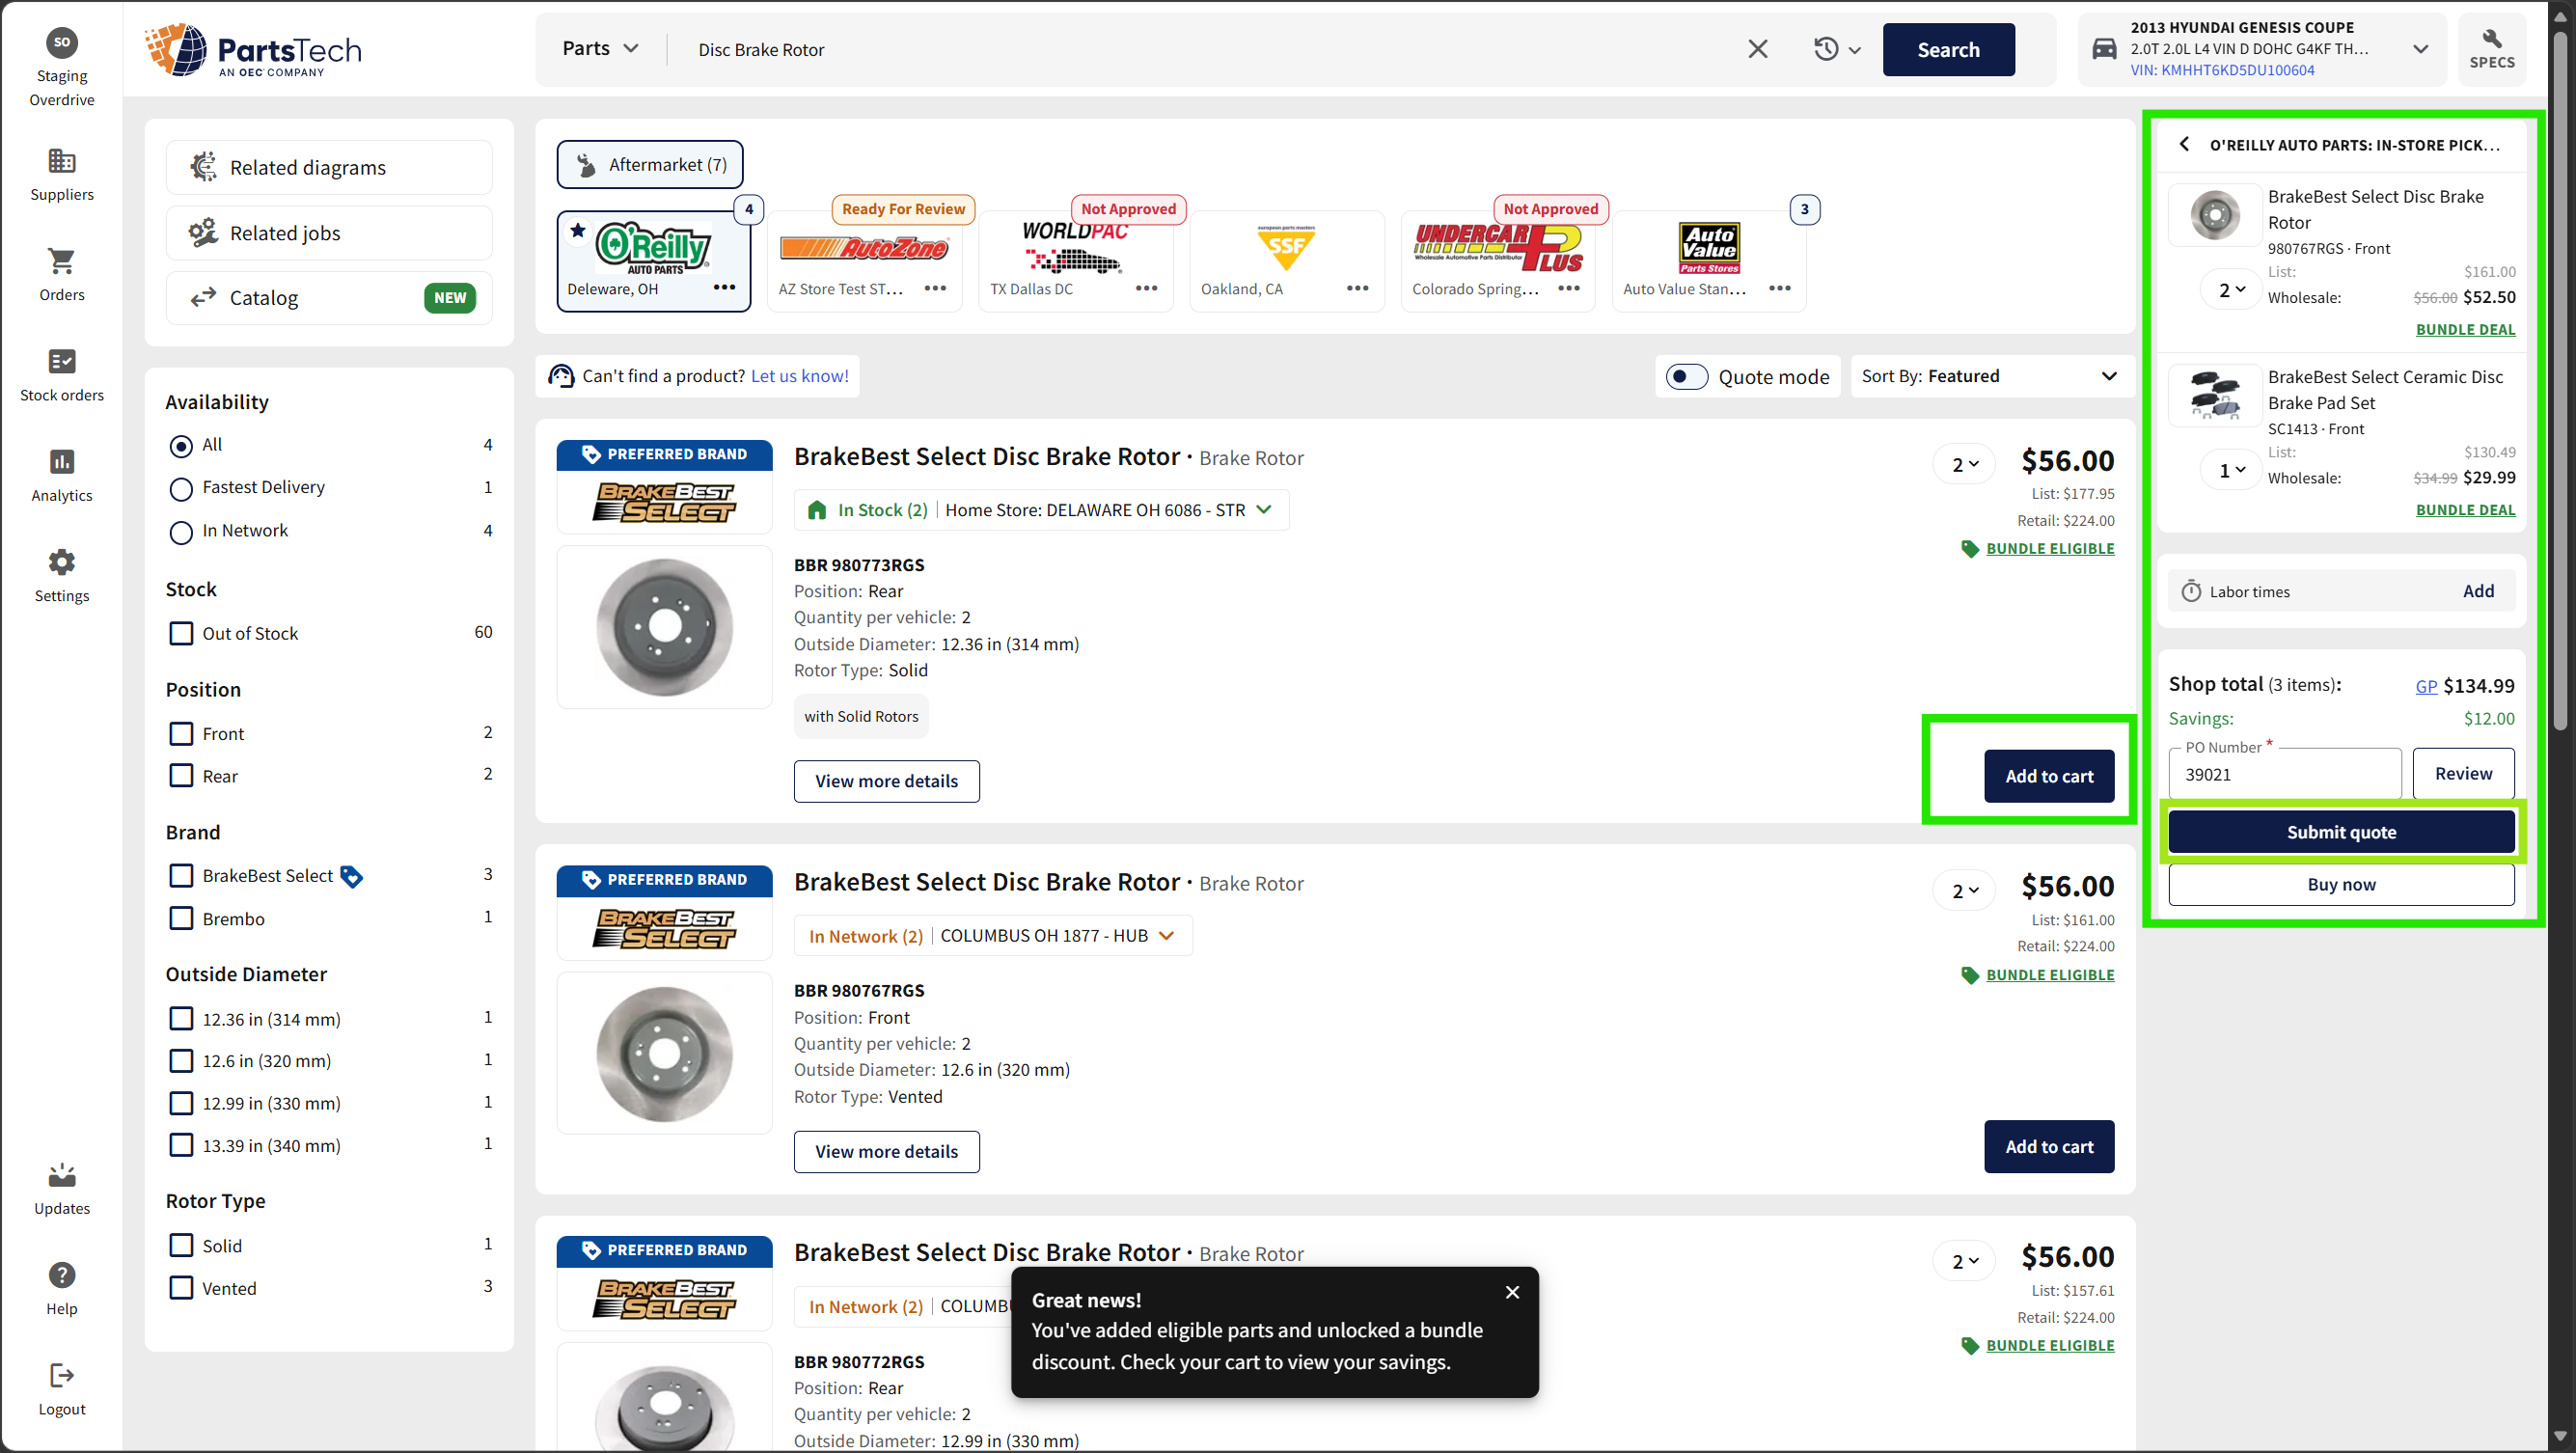
Step 7 — Add more, watch for bundle discounts. Add the rotors the same way you added the pads. If related parts in the cart qualify for a bundle discount, PartsTech will flag it — take the discount when it appears.
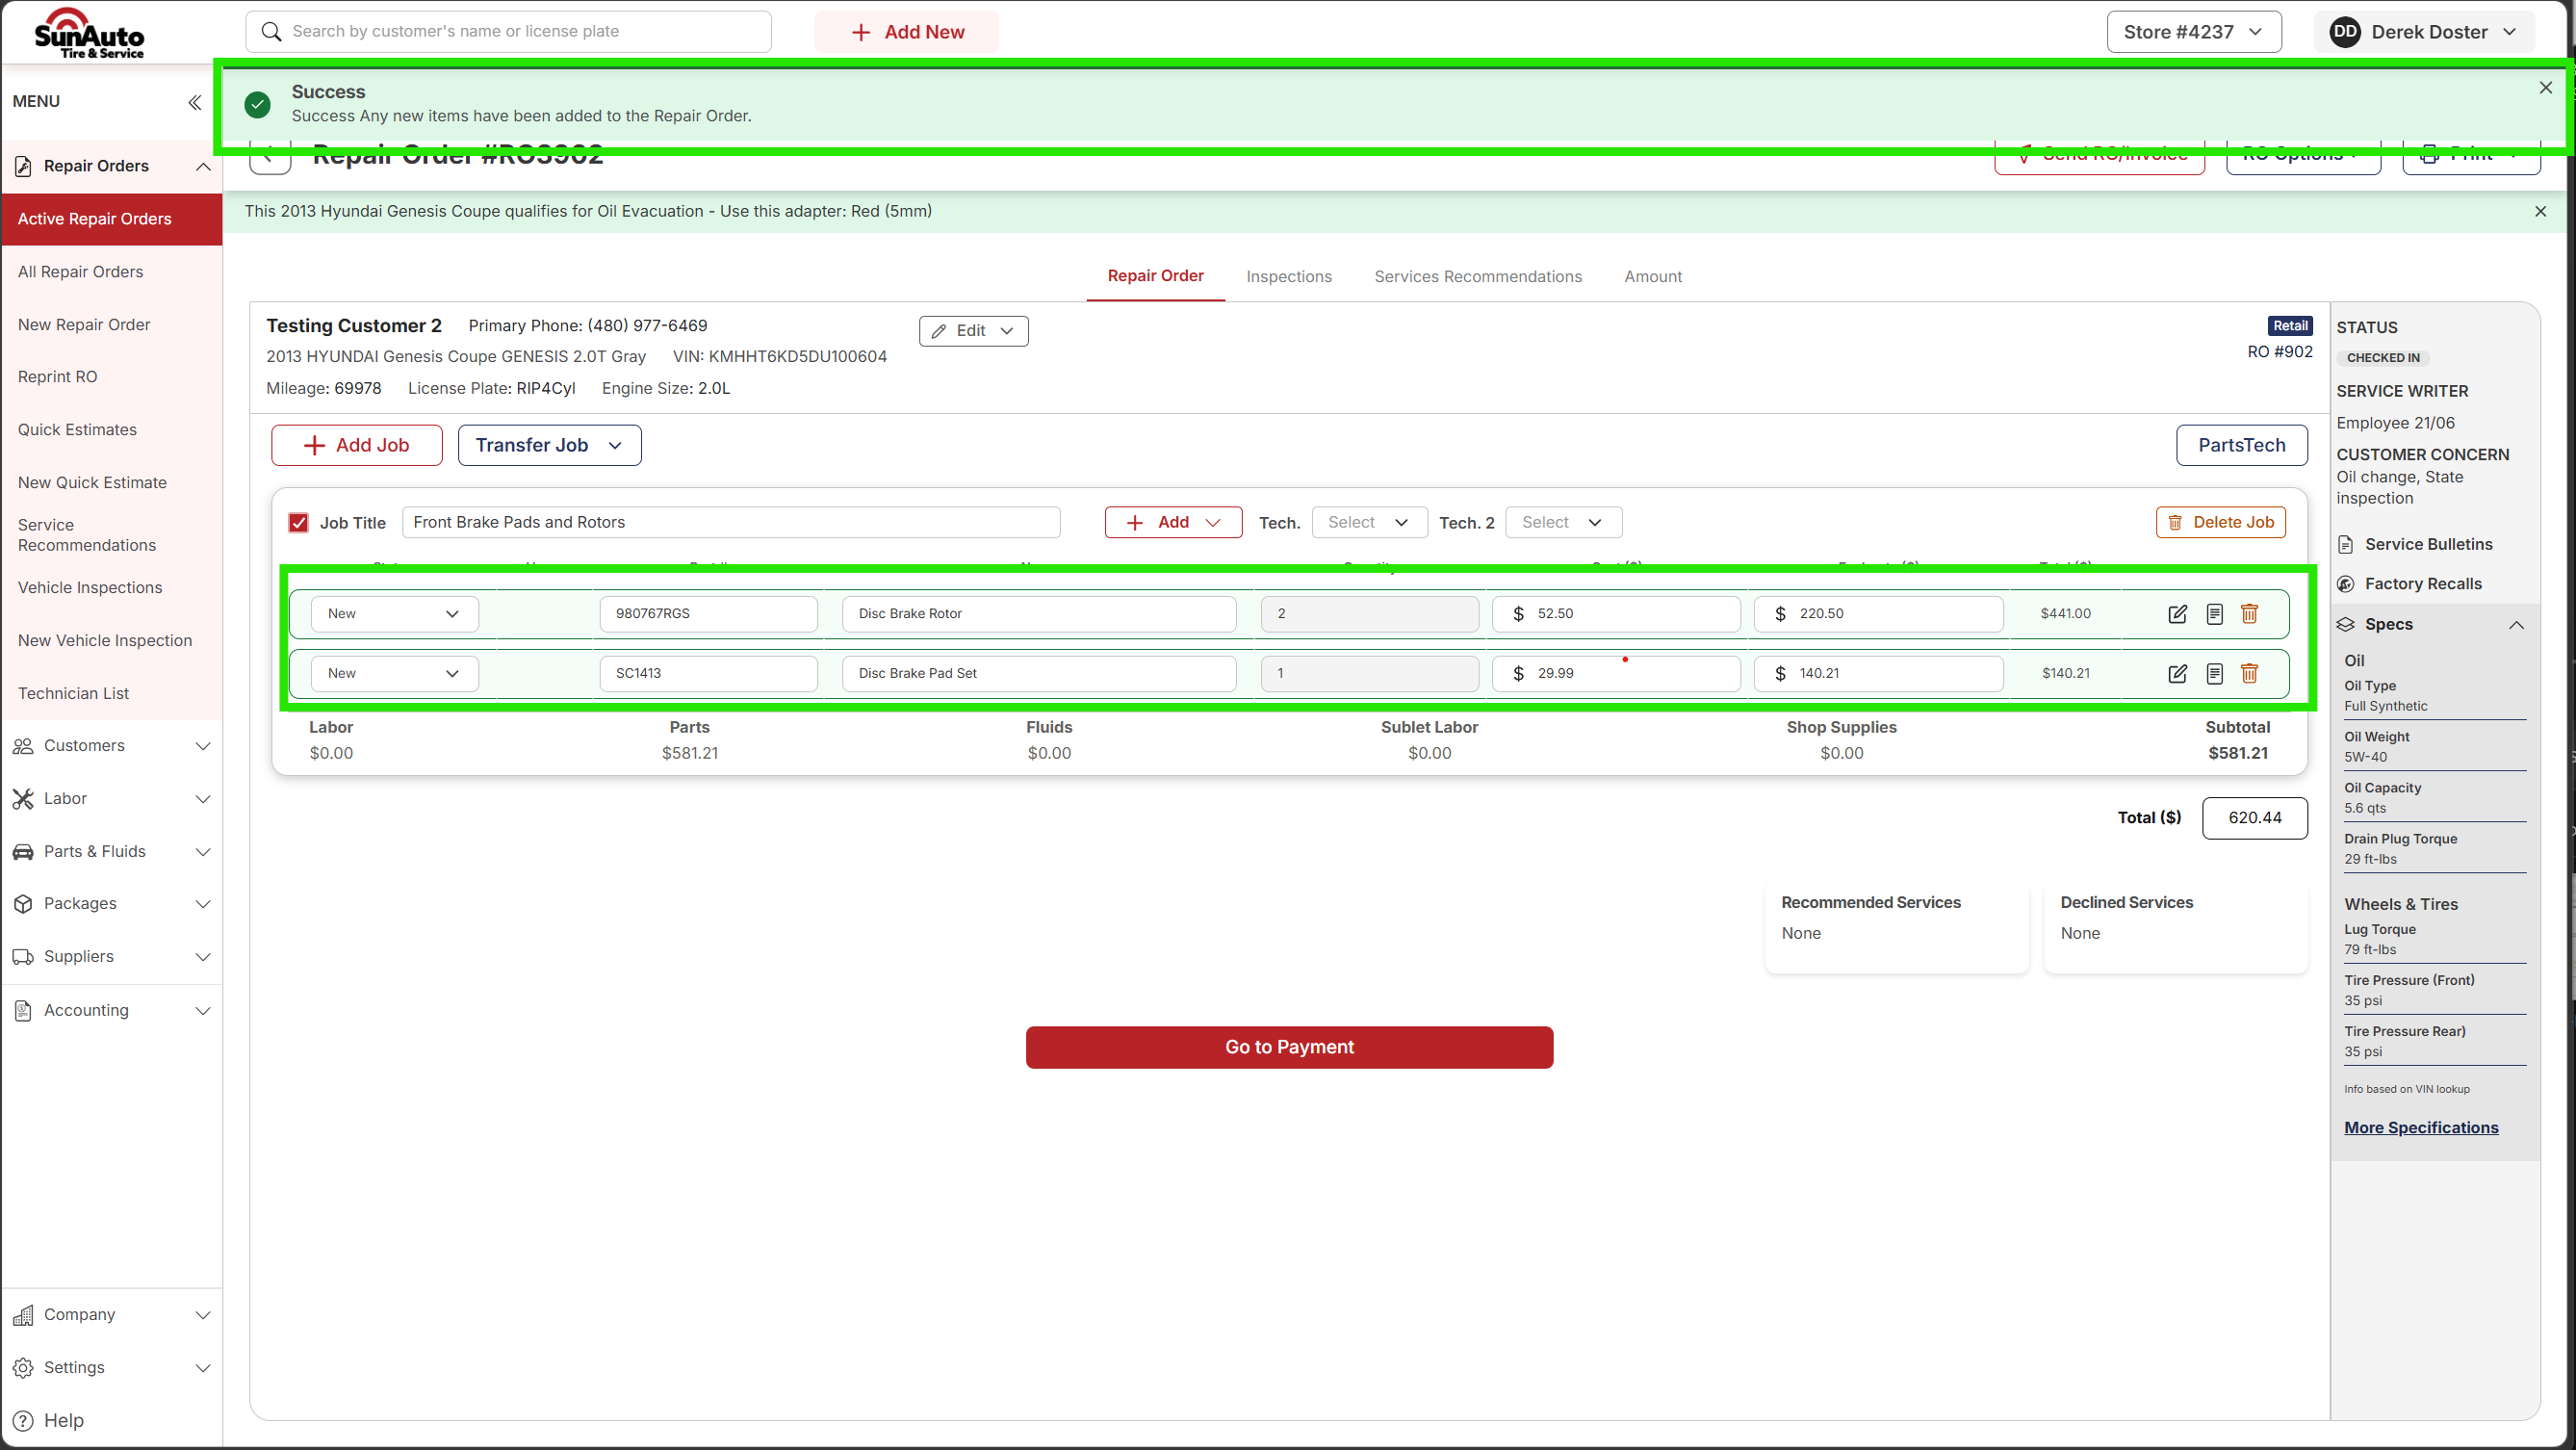
Step 8 — Lines come back to the RO. Click Submit quote in PartsTech and the lines flow back onto the Job automatically. A green Success banner confirms the add. From here, treat the lines like any other part line — adjust quantity, set the tech if needed, head to Payment when the customer authorizes.
Watch the flow
A few PartsTech tips
- Submit quote, not Buy now — unless you already have pre-approval. Submit quote sends the order to the supplier for confirmation and pulls the priced lines onto the RO. Buy now commits an immediate purchase — only use it when the customer has already authorized the work and price (in person, by phone, or through a signed estimate). Otherwise stick with Submit quote.
- Check the PO Number. PartsTech fills it from the RO number, so an order placed on RO3902 should show PO Number: 3902. If it doesn't, you're on the wrong tab or somewhere went sideways — back out and start again from the Job.
- One PartsTech order per Job. Keeps the lines tied to the right work and makes it easy to reconcile when the parts arrive.
Related
- Adding Labor — putting labor operations on a Job.
- Outside Purchases — tracking PartsTech parts once they're on the way: Order, Receive, Return.
- Inventory Purchase Orders — buying stock for the shelf, a different flow.