Payments
Take the customer's payment on the New Payment screen. The screen is the same every time — what changes is how the customer is paying. Fill in the shared fields, then follow the tab for the payment method.
The New Payment screen
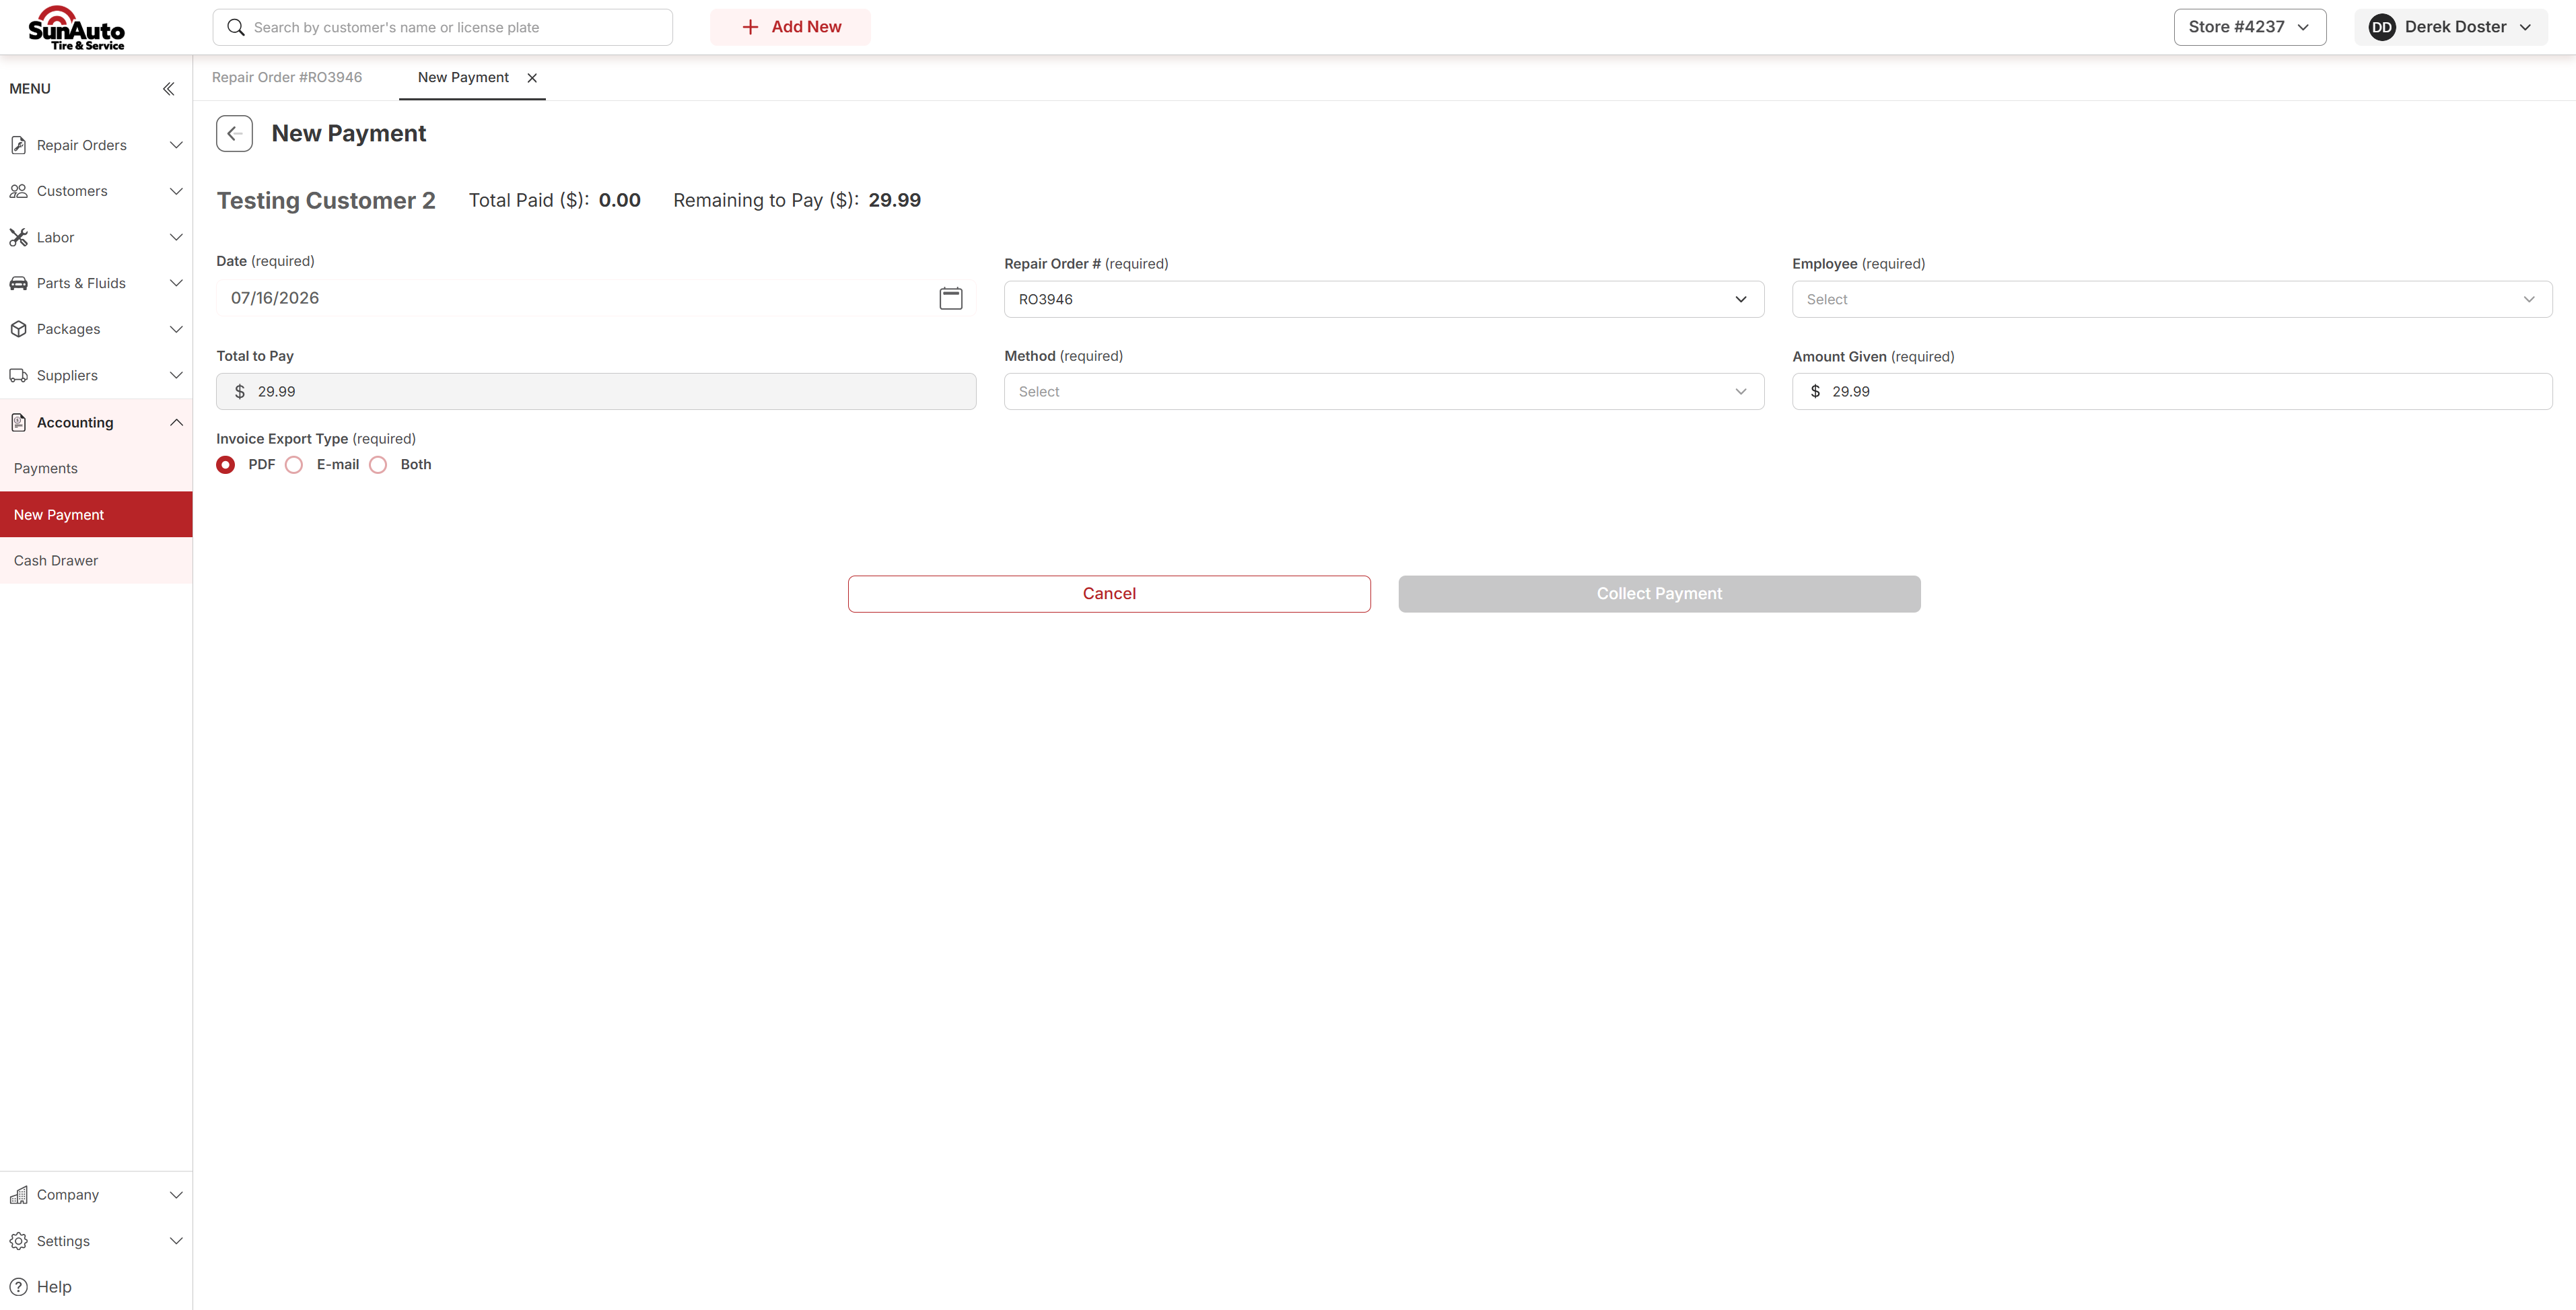
You reach the payment screen from the RO by clicking Go to Payment — for the full RO-close sequence, see Closing an RO. The header tracks Total Paid ($) and Remaining to Pay ($) as you work; they update every time a payment is recorded. Fill in the required fields, then pick the method tab below.
- Date (required) — the payment date.
- Repair Order # (required) — pre-filled from the RO you came in on.
- Employee (required) — starts on Select; pick who's taking the payment.
- Total to Pay — what the RO is asking for.
- Method (required) — starts on Select; choose how the customer is paying.
- Amount Given (required) — pre-fills to the amount owed; change it if the customer is handing over a different amount.
- Invoice Export Type (required) — radio buttons: PDF, E-mail, or Both. This controls how the invoice comes out once the RO is paid in full.
Collect Payment stays greyed out until the required fields are set. The left nav under Accounting holds Payments, New Payment, and Cash Drawer.
 1
Total Paid ($) / Remaining to Pay ($) — the running header. It updates every time a payment is recorded.
2
Method (required) — starts on Select; choose how the customer is paying.
3
Invoice Export Type (required) — PDF, E-mail, or Both. Controls how the invoice comes out once the RO is paid in full.
4
Collect Payment — greyed out until every required field is set.
1
Total Paid ($) / Remaining to Pay ($) — the running header. It updates every time a payment is recorded.
2
Method (required) — starts on Select; choose how the customer is paying.
3
Invoice Export Type (required) — PDF, E-mail, or Both. Controls how the invoice comes out once the RO is paid in full.
4
Collect Payment — greyed out until every required field is set.
Take the payment by method
Pick the tab for how the customer is paying.
Set Method to Cash and pick an Employee. A Change field appears — enter the Amount Given and OverDrive calculates the change to hand back. With the required fields set, Collect Payment turns solid red and is ready to click.
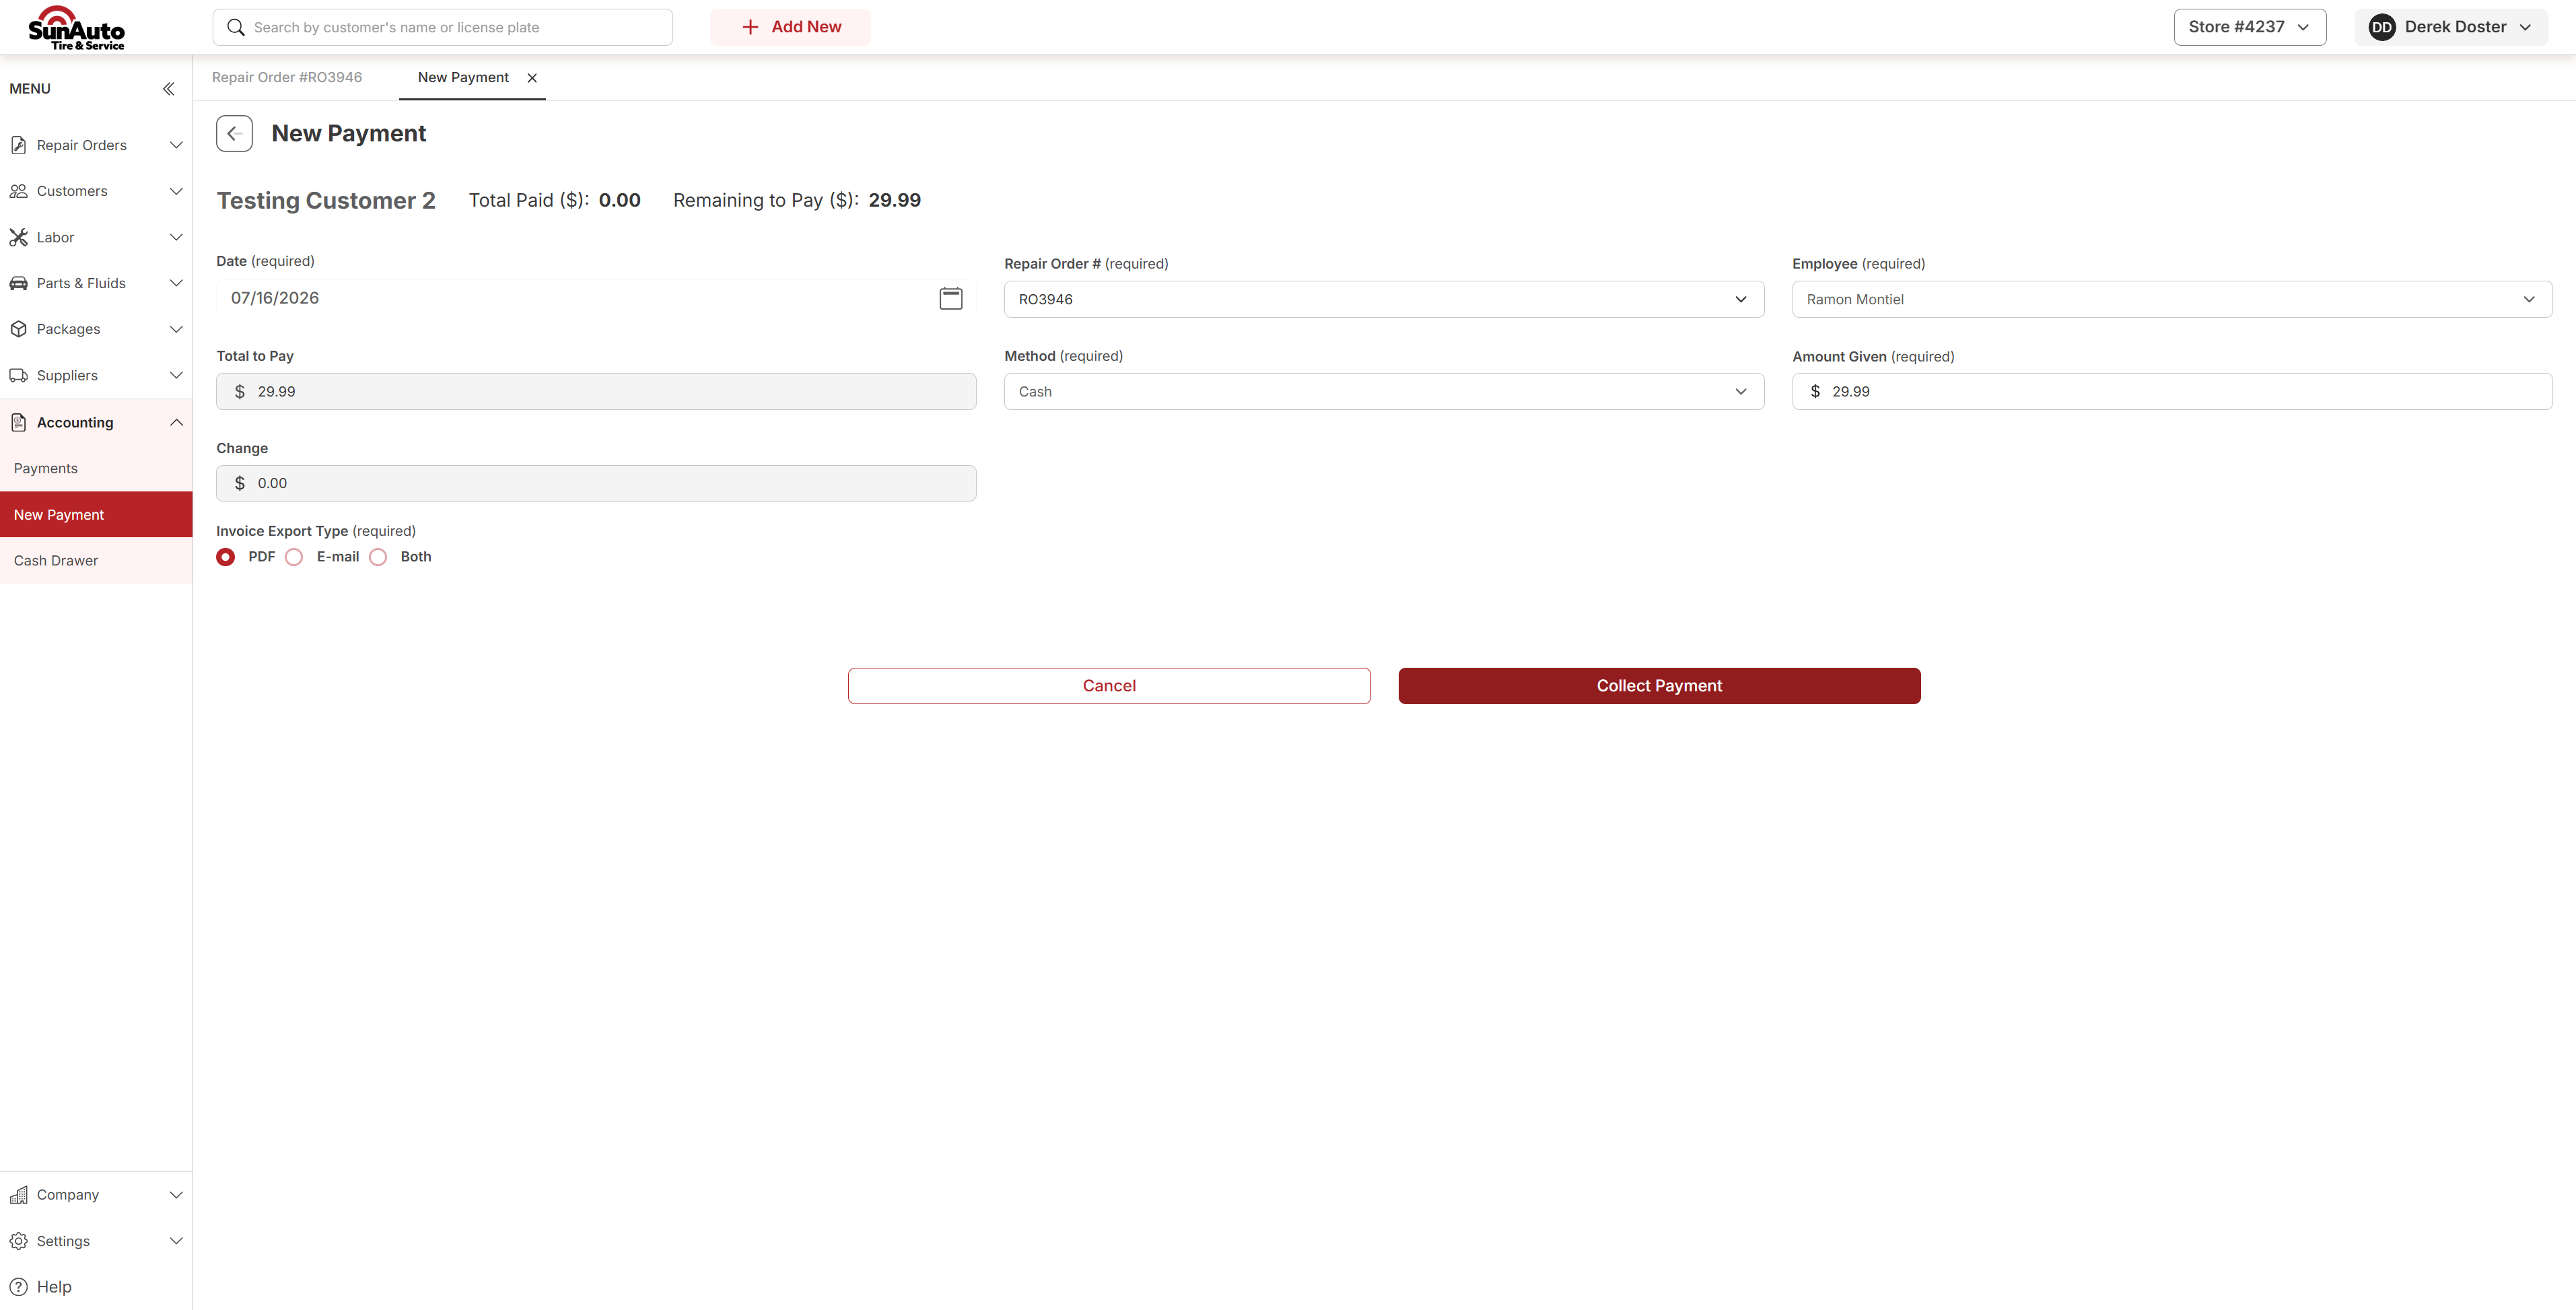 1Method set to Cash — this is what makes the Change field appear.
2Amount Given — what the customer handed over. Change it if it differs from the amount owed.
3Change — OverDrive calculates the change to hand back.
4Collect Payment — now solid red and ready to click.
1Method set to Cash — this is what makes the Change field appear.
2Amount Given — what the customer handed over. Change it if it differs from the amount owed.
3Change — OverDrive calculates the change to hand back.
4Collect Payment — now solid red and ready to click.
Set Method to Check and a Check Information section appears with extra required fields. A check can cover the whole RO or just the remaining balance on an RO you've already taken money against.
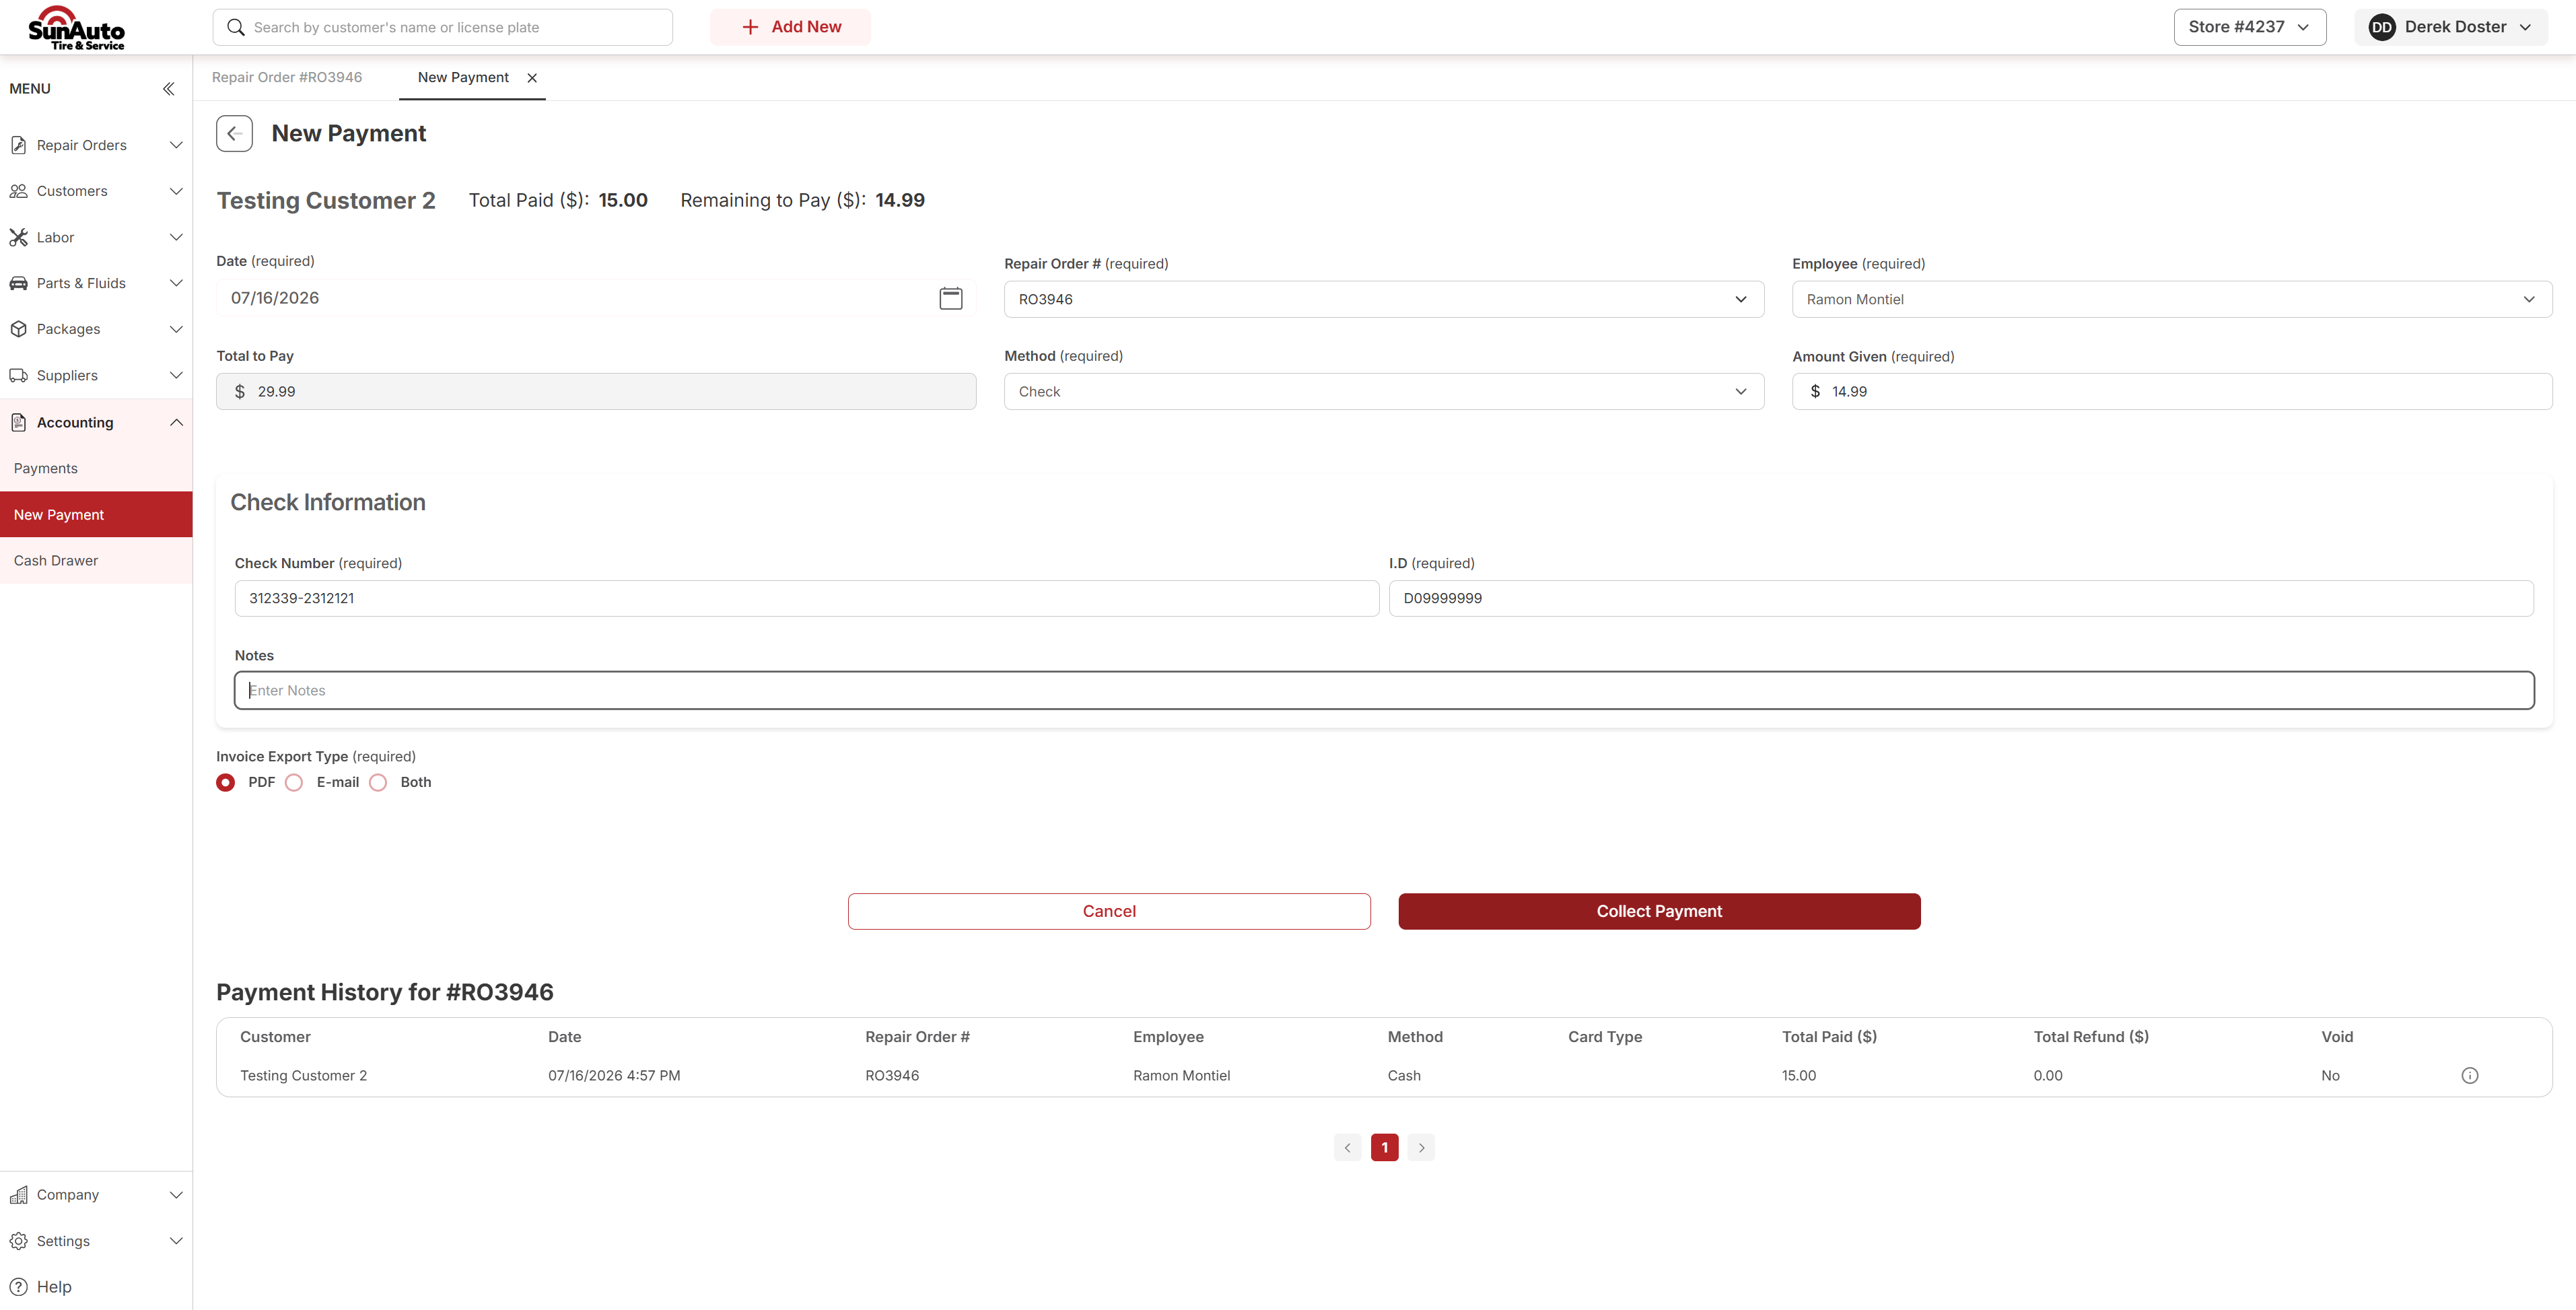 1Method set to Check — reveals the Check Information section below.
2Check Number (required) — enter before collecting.
3I.D (required) — the customer's ID for the check.
4Notes — optional free-text field.
1Method set to Check — reveals the Check Information section below.
2Check Number (required) — enter before collecting.
3I.D (required) — the customer's ID for the check.
4Notes — optional free-text field.
Card payments run through the FirstMile Credit Card Sale window. Step through the slides — click the chips at the top, the Previous / Next buttons, or use the ← → arrow keys.
Step 1 — Swipe the card. Choosing card opens the FirstMile Credit Card Sale window over the payment screen. Confirm the Terminal is your station, then swipe the customer's card at the Please Swipe Your Card... prompt.
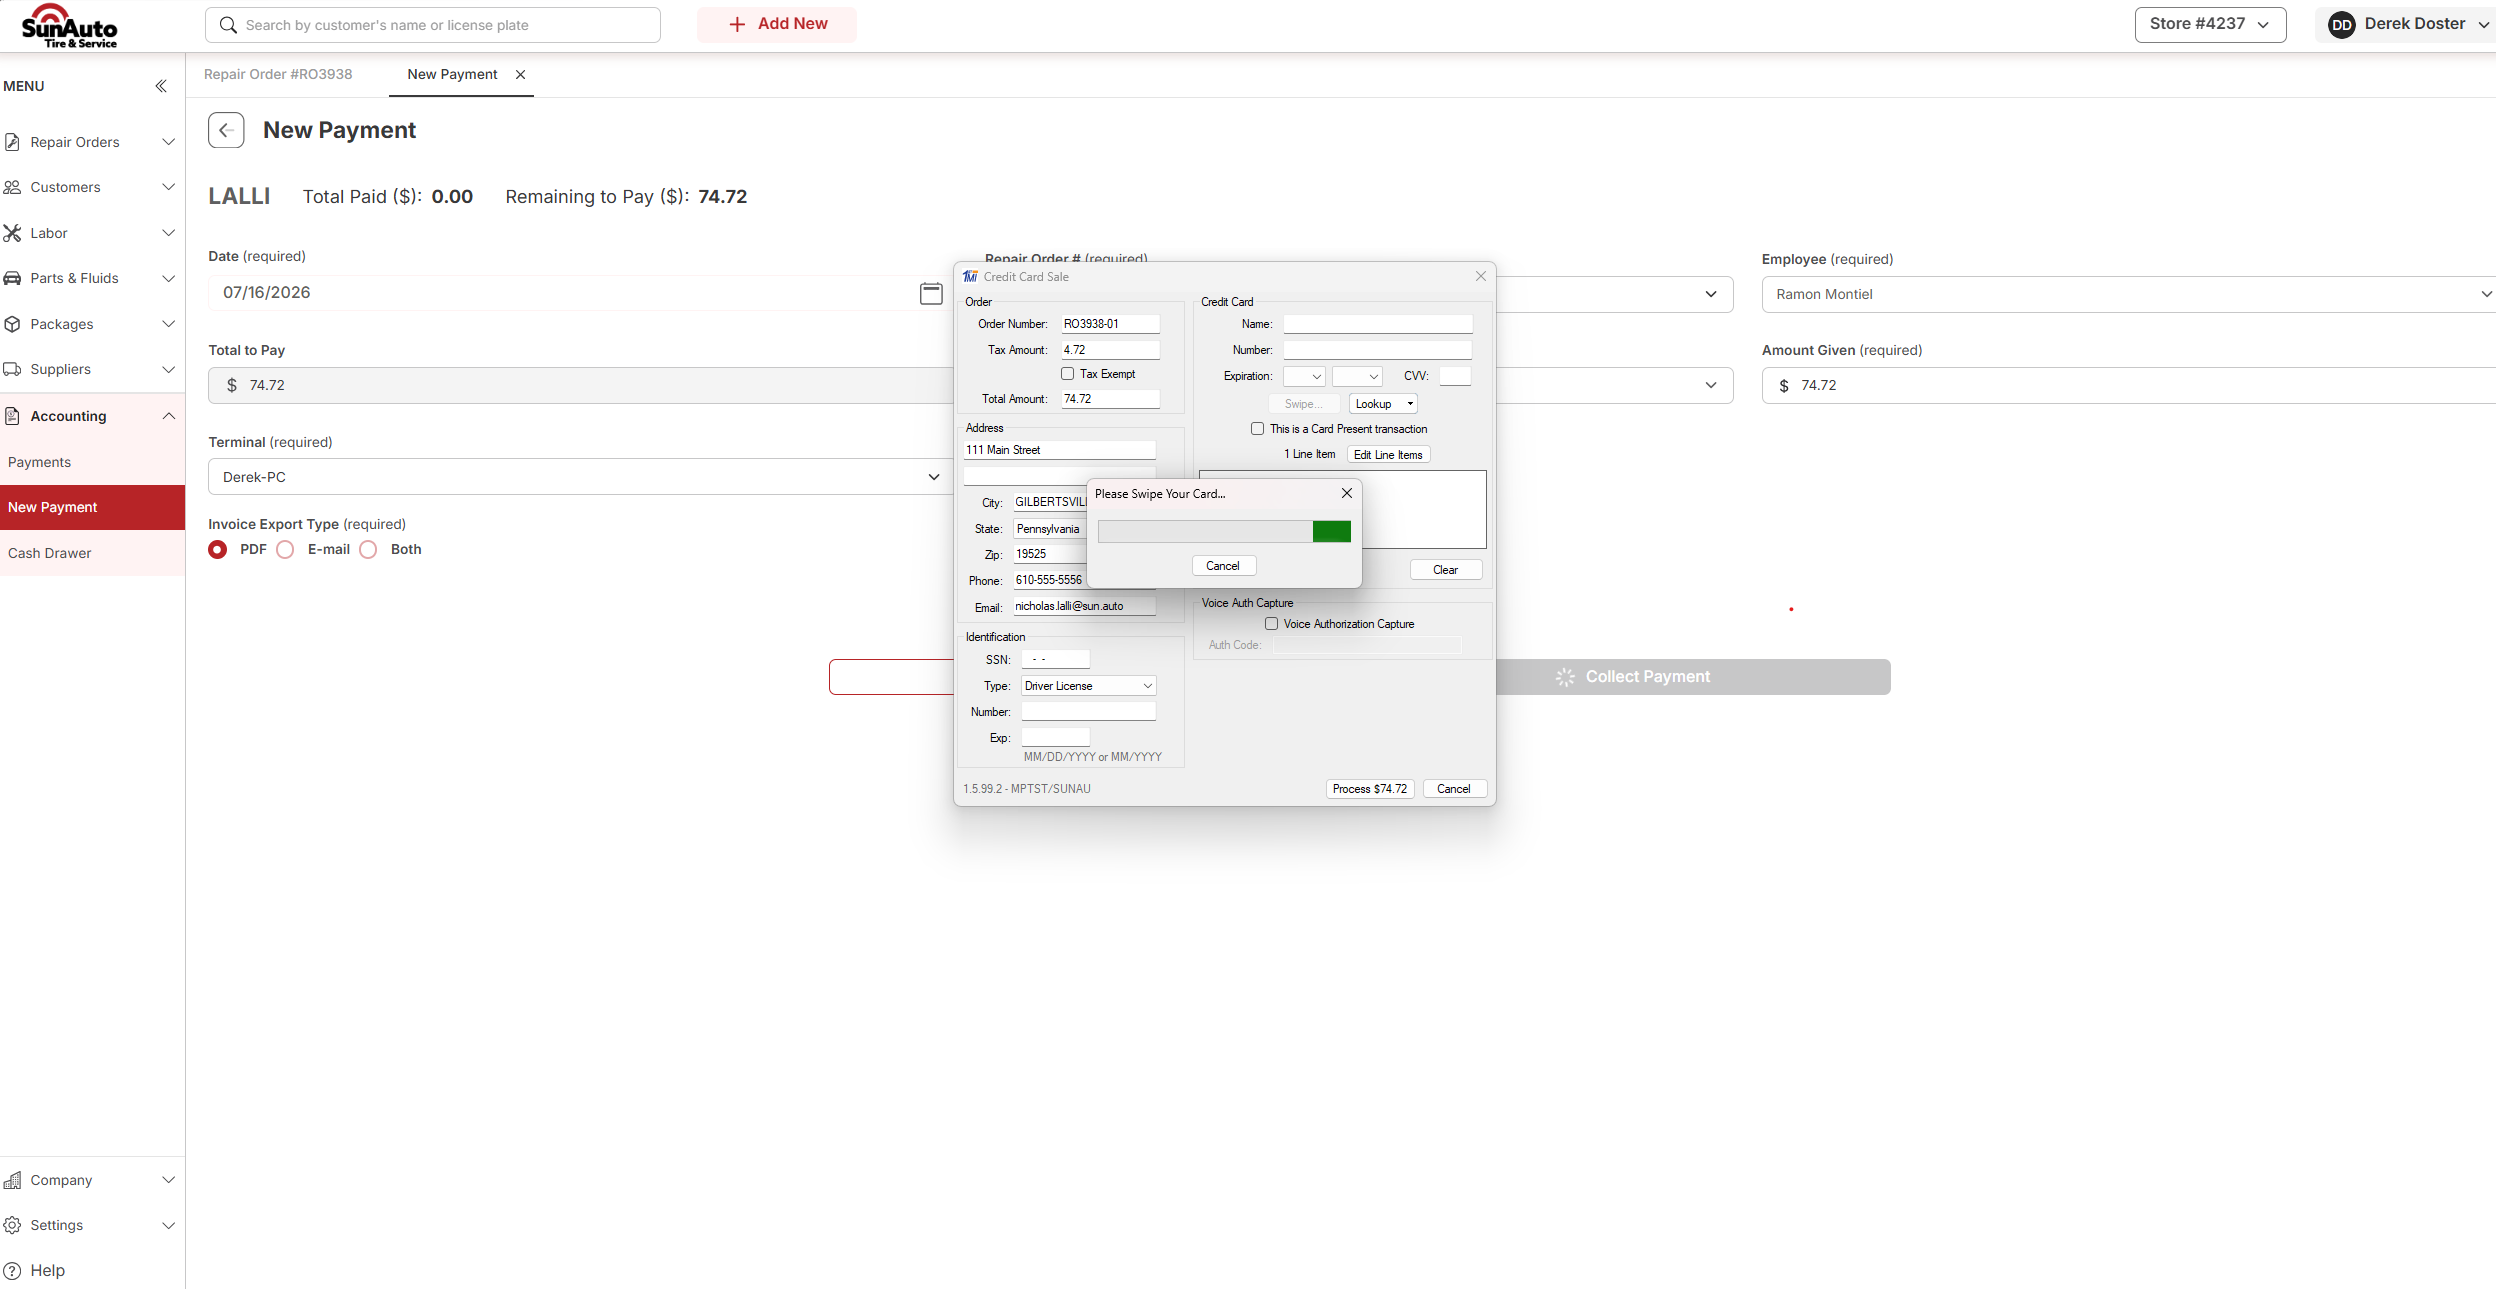 1Terminal (required) — the station the card runs through; here Derek-PC.
2Credit Card Sale — the FirstMile window that opens over the payment screen.
3Please Swipe Your Card... — swipe the customer's card to read it in.
1Terminal (required) — the station the card runs through; here Derek-PC.
2Credit Card Sale — the FirstMile window that opens over the payment screen.
3Please Swipe Your Card... — swipe the customer's card to read it in.
Step 2 — Process the sale. Once the card is read, the Name and card Number fill in — the number shows masked to the last four digits. Check the amount, then click Process to send it to FirstMile.
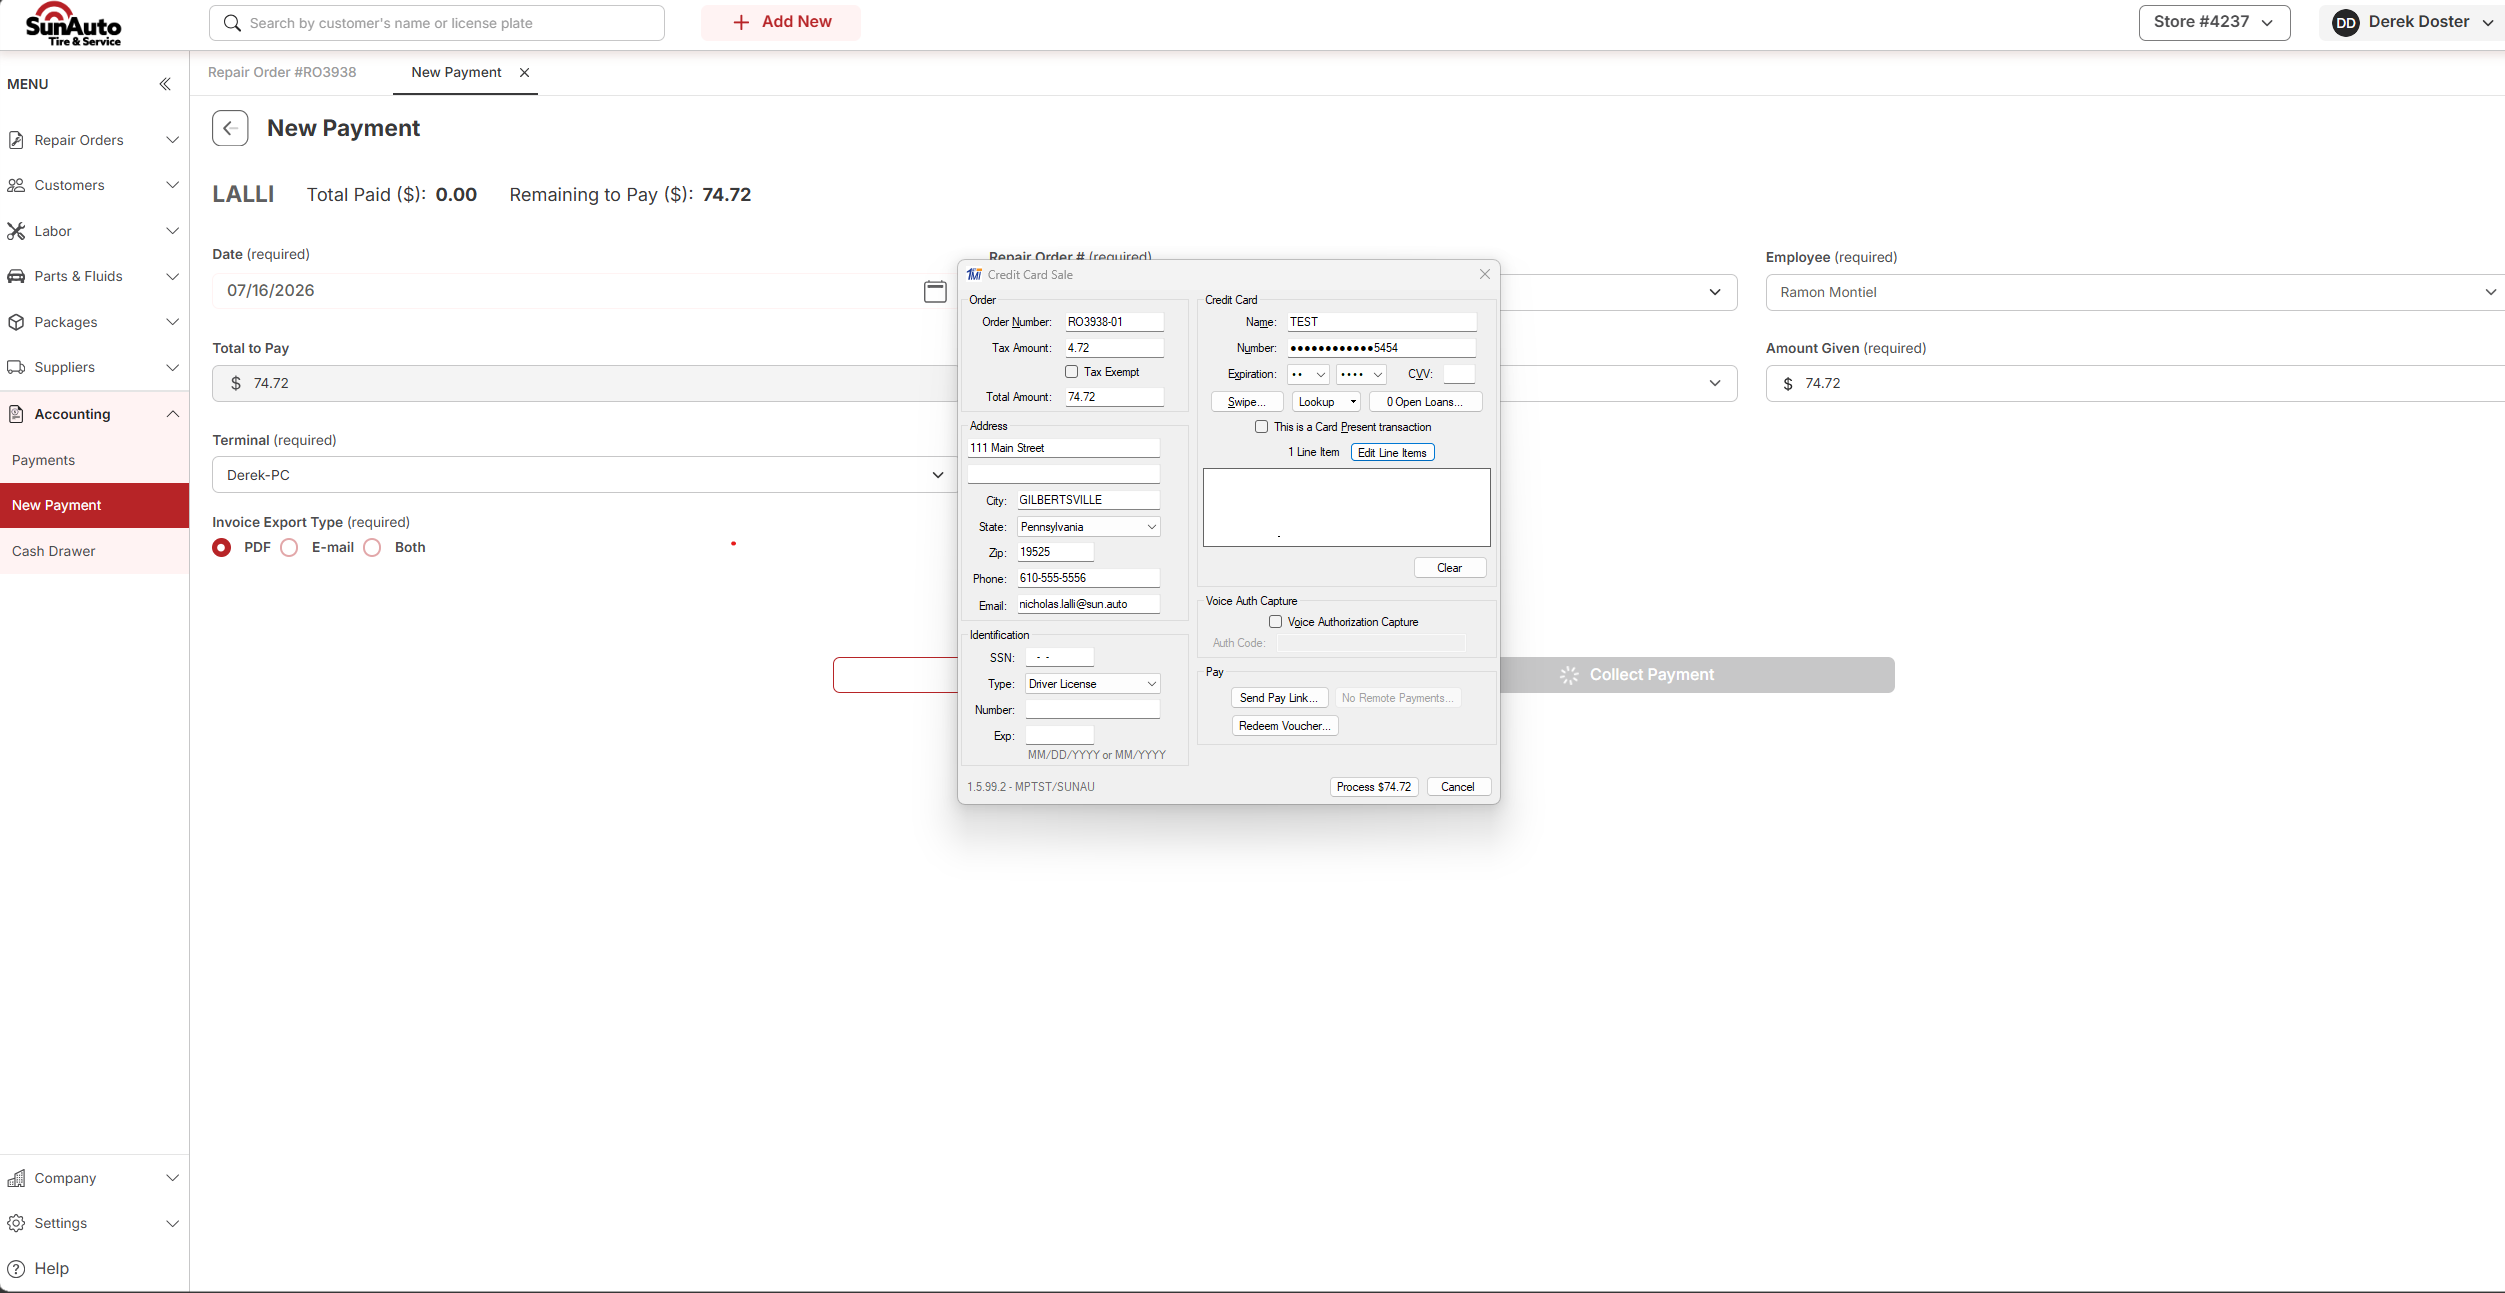 1Name — the cardholder name read from the card.
2Number — fills in after the read, masked to the last four digits.
3Process — sends the sale to FirstMile for approval.
1Name — the cardholder name read from the card.
2Number — fills in after the read, masked to the last four digits.
3Process — sends the sale to FirstMile for approval.
Step 3 — Transaction accepted. A green Transaction Accepted! confirmation shows the amount charged. Click Print Receipt for the customer's copy, then OK to close the window and finish the payment.
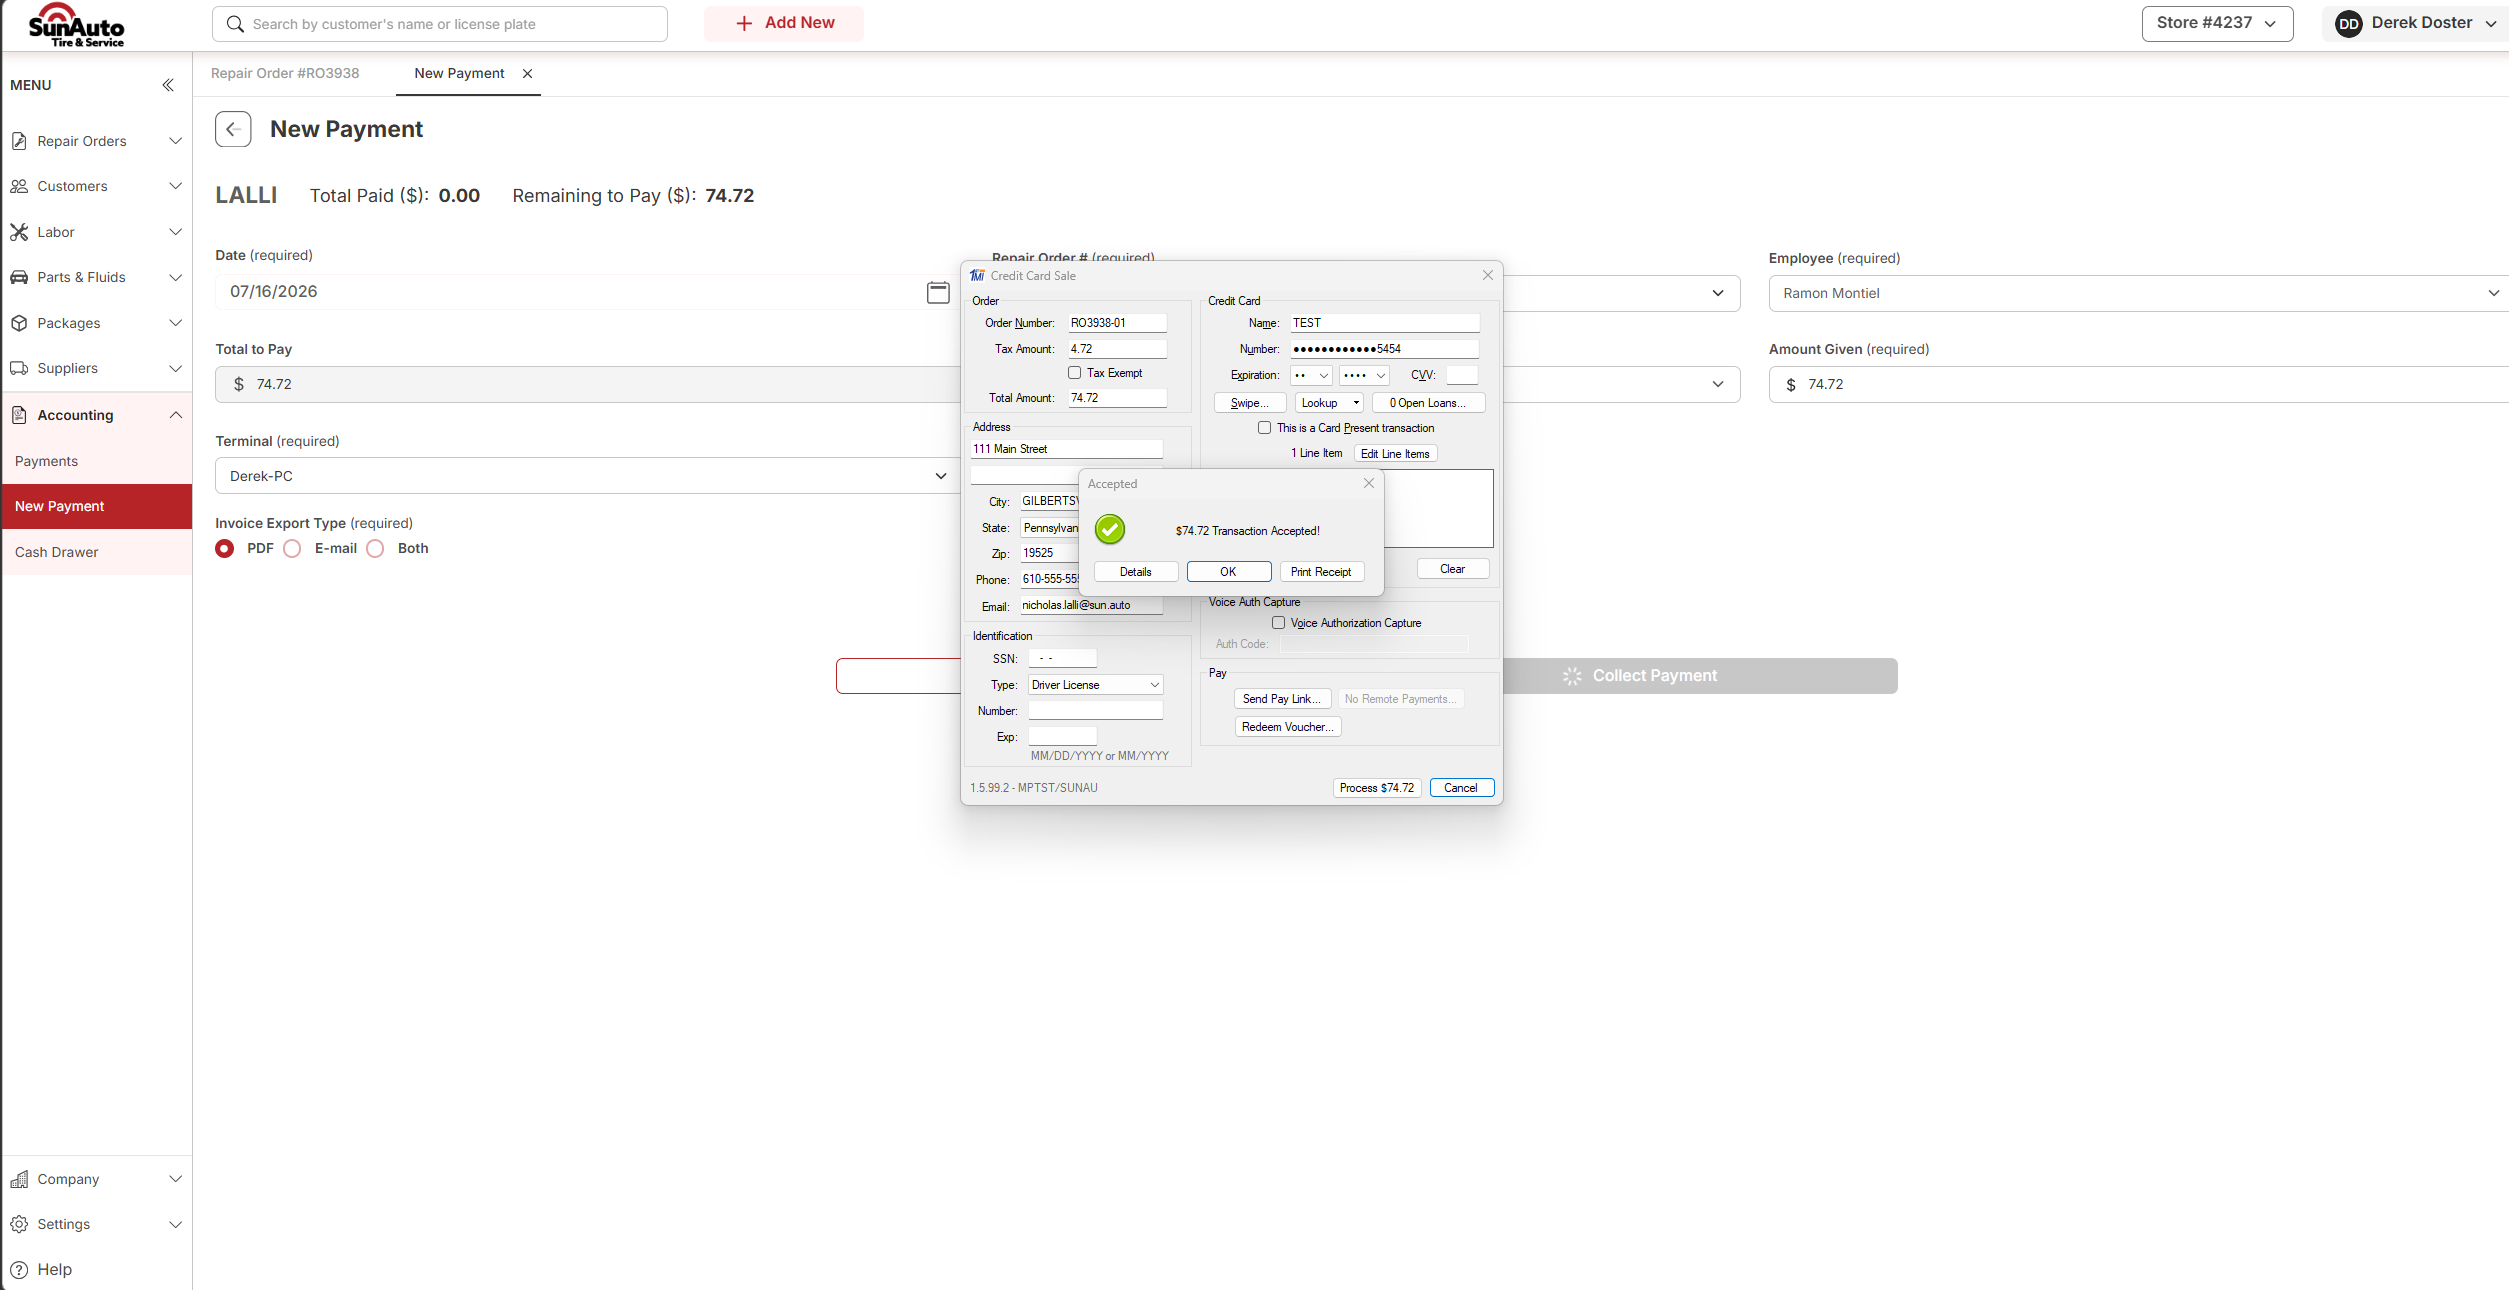 1Transaction Accepted! — the green check confirms FirstMile approved the charge.
2Print Receipt — prints the customer's copy.
3OK — closes the window and completes the payment.
1Transaction Accepted! — the green check confirms FirstMile approved the charge.
2Print Receipt — prints the customer's copy.
3OK — closes the window and completes the payment.
Coming soon
This tab will cover redeeming a Groupon voucher against the RO once the screenshots are captured.
Paying with more than one method
You don't have to collect the whole balance in one payment. In the express lane a customer may split the bill across two methods — part cash and part card, or a check topped off with cash. Take the first payment for whatever they're handing over and click Collect Payment; OverDrive records just that amount and keeps the RO open with the balance still owed. Repeat with the next method until the balance reaches zero.
The header Total Paid ($) climbs and Remaining to Pay ($) drops with each payment, and every payment lands in the Payment History for #RO... table.
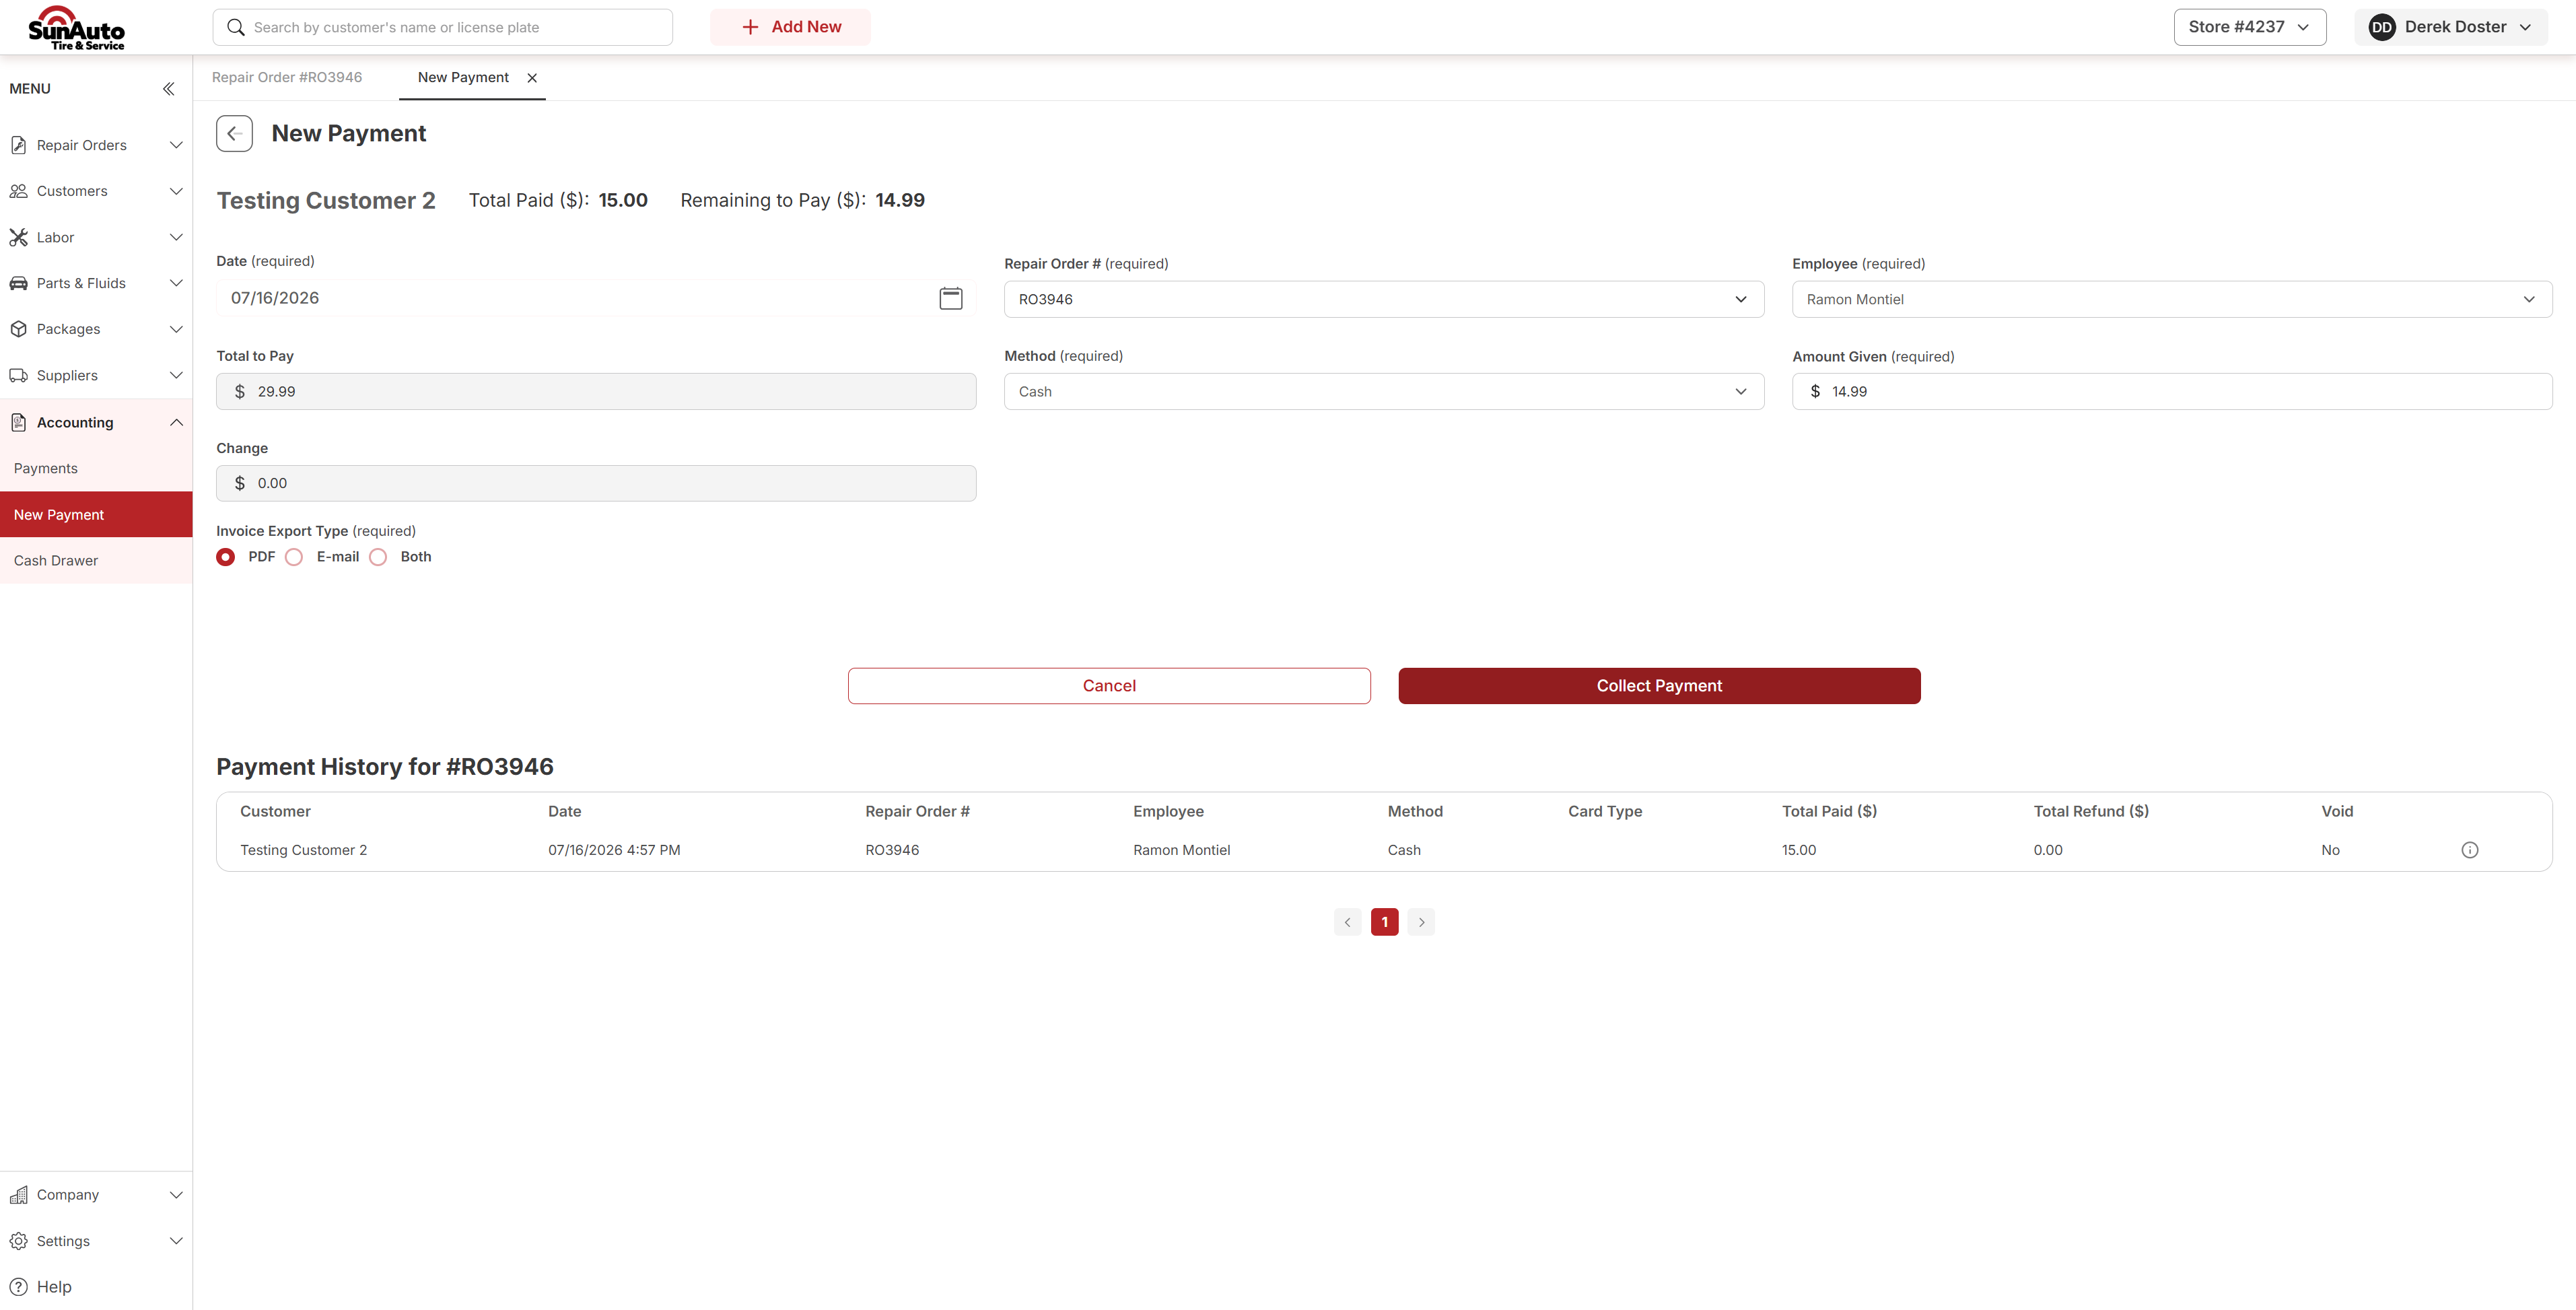 1
Total Paid ($) climbs and Remaining to Pay ($) drops below the full total.
2
Amount Given — the amount collected on this payment.
3
Collect Payment — records just this amount; the RO stays open with the balance still owed.
4
Payment History for #RO... — columns Customer, Date, Repair Order #, Employee, Method, Card Type, Total Paid ($), Total Refund ($), and Void.
1
Total Paid ($) climbs and Remaining to Pay ($) drops below the full total.
2
Amount Given — the amount collected on this payment.
3
Collect Payment — records just this amount; the RO stays open with the balance still owed.
4
Payment History for #RO... — columns Customer, Date, Repair Order #, Employee, Method, Card Type, Total Paid ($), Total Refund ($), and Void.
Once the balance reaches zero, OverDrive generates the invoice and marks the RO REPAIR ORDER CLOSED — the invoice and the closed-RO view live on Closing an RO → Invoice + closed.
Related
- Closing an RO — the full sequence for closing and invoicing a Repair Order.