Completing a DVI
A DVI runs on whichever screen the tech and writer are in front of — the desktop POS workstation in the shop, or a phone/tablet at the bay. The flow is the same on both. The pages below show them side by side so you can recognize the same step on either device.
Run the full DVI every time
Even on a "just an oil change" visit. The full DVI is what catches the leaking shock, the worn tire, or the cracked belt before it leaves the shop.
Where it lives
On any open Repair Order, click the Inspections tab. That's the DVI workspace for this visit.
What you see when you open it
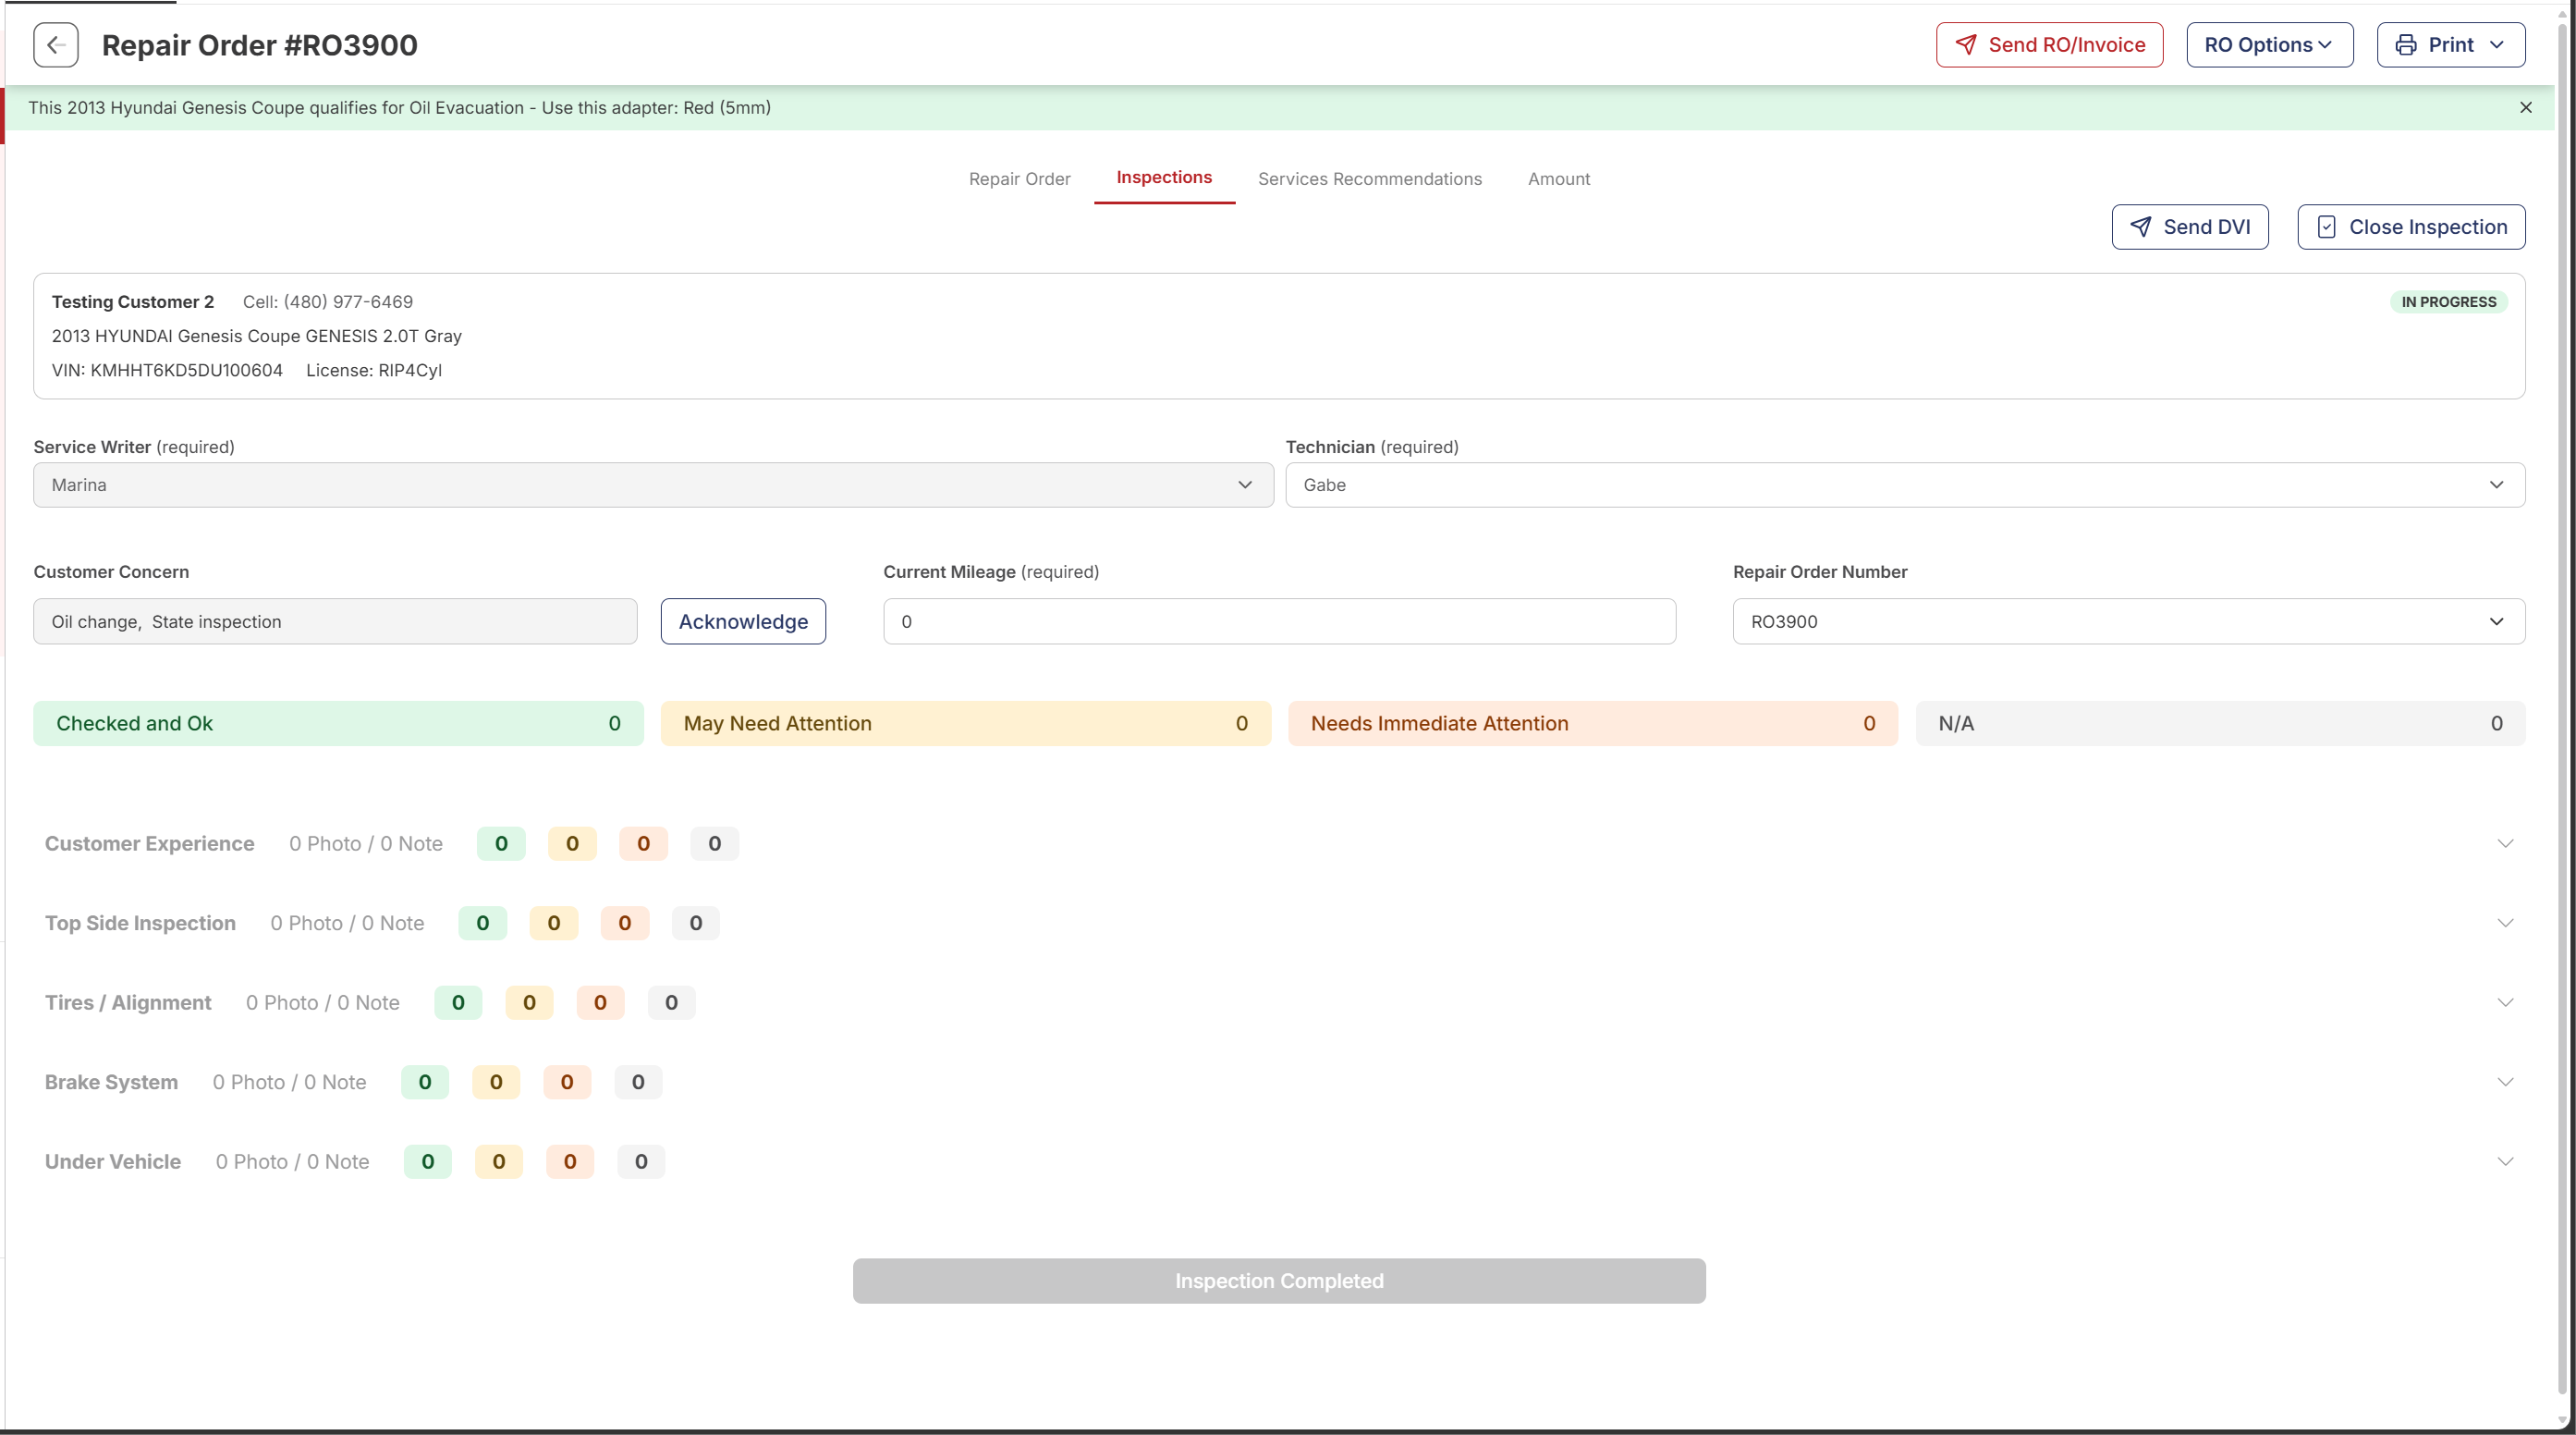
A fresh DVI shows IN PROGRESS in the customer panel, all four status counters at zero, and five inspection categories collapsed. Nothing is recorded yet.
 1
Inspections tab — the DVI workspace for this RO. Repair Order, Services Recommendations, and Amount are the other RO tabs.
2
Send DVI — sends the inspection to the customer by SMS or email. Use this after the tech finishes.
3
IN PROGRESS badge — visible until you mark the inspection complete. Flips to COMPLETED when the tech is done.
4
Service Writer + Technician — both required. The writer is usually pre-filled; assign the tech before going further.
5
Acknowledge — click once you've read the customer's concern. Required before you can complete the inspection.
6
Current Mileage — required. Read off the dash before the tech starts.
7
Status counters — running totals across the whole DVI. Checked and Ok, May Need Attention, Needs Immediate Attention, and N/A. All zero until items get marked.
8
Categories — Customer Experience, Top Side Inspection, Tires / Alignment, Brake System, Under Vehicle. Expand each one to mark items.
9
Inspection Completed — grayed out until required fields are filled. Turns red when you can mark the DVI done.
1
Inspections tab — the DVI workspace for this RO. Repair Order, Services Recommendations, and Amount are the other RO tabs.
2
Send DVI — sends the inspection to the customer by SMS or email. Use this after the tech finishes.
3
IN PROGRESS badge — visible until you mark the inspection complete. Flips to COMPLETED when the tech is done.
4
Service Writer + Technician — both required. The writer is usually pre-filled; assign the tech before going further.
5
Acknowledge — click once you've read the customer's concern. Required before you can complete the inspection.
6
Current Mileage — required. Read off the dash before the tech starts.
7
Status counters — running totals across the whole DVI. Checked and Ok, May Need Attention, Needs Immediate Attention, and N/A. All zero until items get marked.
8
Categories — Customer Experience, Top Side Inspection, Tires / Alignment, Brake System, Under Vehicle. Expand each one to mark items.
9
Inspection Completed — grayed out until required fields are filled. Turns red when you can mark the DVI done.
 1
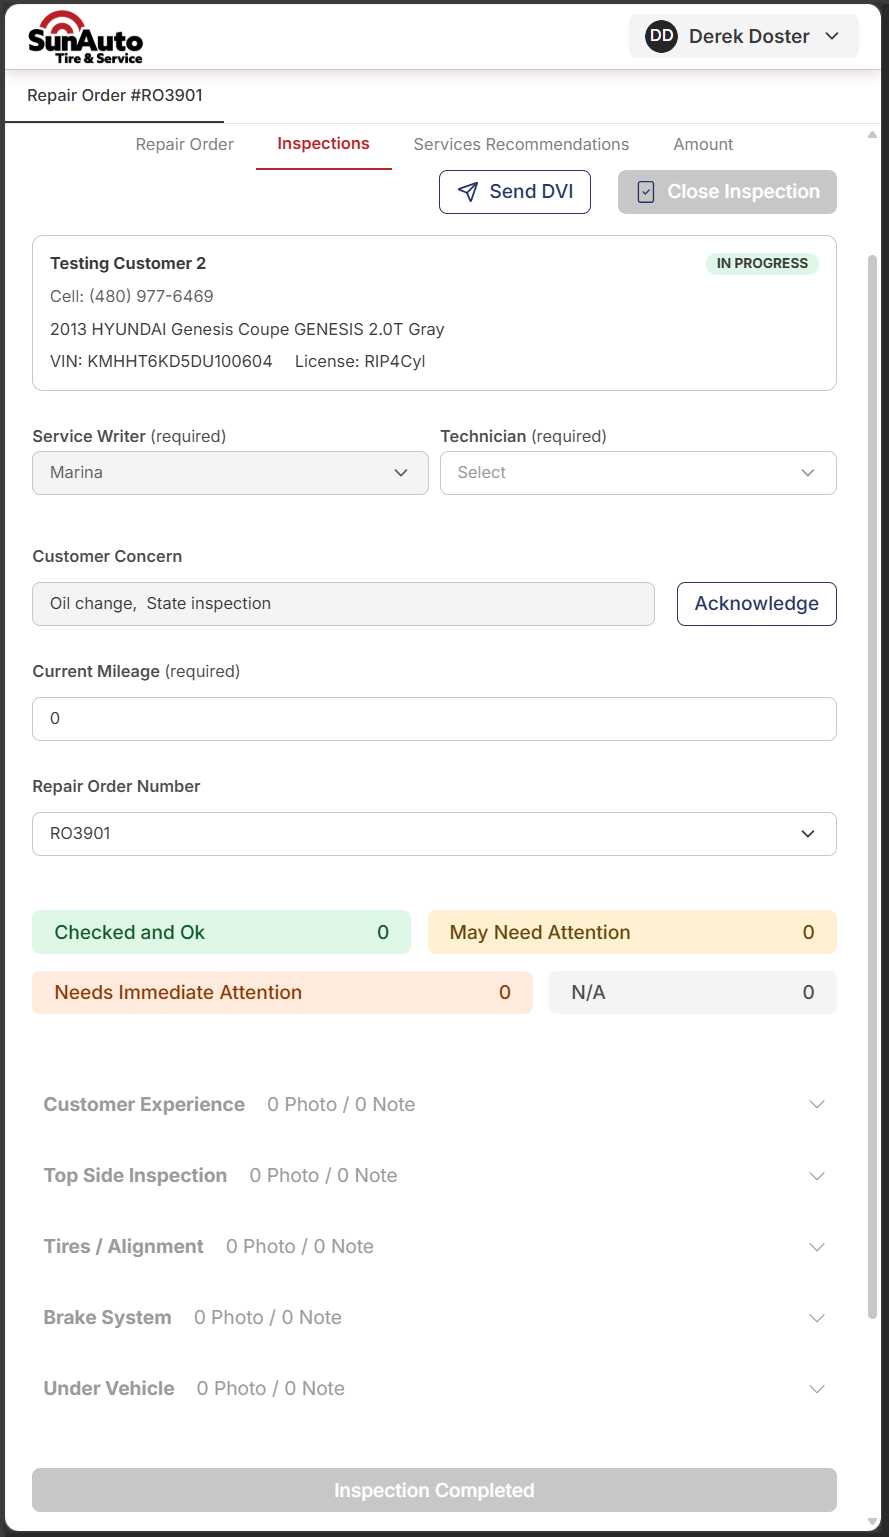
Inspections tab — same DVI workspace, stacked for narrow screens.
2
Send DVI + Close Inspection — same buttons as desktop, just sitting under the tabs.
3
IN PROGRESS badge — same indicator, in the customer panel.
4
Service Writer + Technician — both required.
5
Acknowledge — read the concern, then tap to acknowledge.
6
Current Mileage — required.
7
Status counters — same four totals as desktop, in a 2×2 grid.
8
Categories — tap to expand.
9
Inspection Completed — grayed until everything is ready.
1
Inspections tab — same DVI workspace, stacked for narrow screens.
2
Send DVI + Close Inspection — same buttons as desktop, just sitting under the tabs.
3
IN PROGRESS badge — same indicator, in the customer panel.
4
Service Writer + Technician — both required.
5
Acknowledge — read the concern, then tap to acknowledge.
6
Current Mileage — required.
7
Status counters — same four totals as desktop, in a 2×2 grid.
8
Categories — tap to expand.
9
Inspection Completed — grayed until everything is ready.
Marking items
Expand a category and step through each item. Every item gets one of four statuses:
| Status | Color | What it means |
|---|---|---|
| Checked and Ok | Green | Inspected and within spec. No action. |
| May Need Attention | Yellow | Wearing or marginal. Should be addressed soon, but safe today. Rolls up under Suggested Services at the top of the DVI and lands on the RO as its own Job. |
| Needs Immediate Attention | Red | Unsafe or out of spec. Rolls up under Needs Immediate Attention at the top of the DVI and lands on the RO as its own Job. |
| N/A | Gray | Doesn't apply to this vehicle (e.g., 4WD checks on a 2WD car). |
Yellow or red item = at least one photo. Show the actual finding — the gauge reading, the worn pad, the cracked belt — not a generic shot of the vehicle.
Plain-language notes. "Front brake pads worn to 3mm, replacement recommended" reads better than "FR brk pad 3mm." Use measurements (tread depth, pad thickness, battery health, fluid condition) when there is one.
What a finished DVI looks like
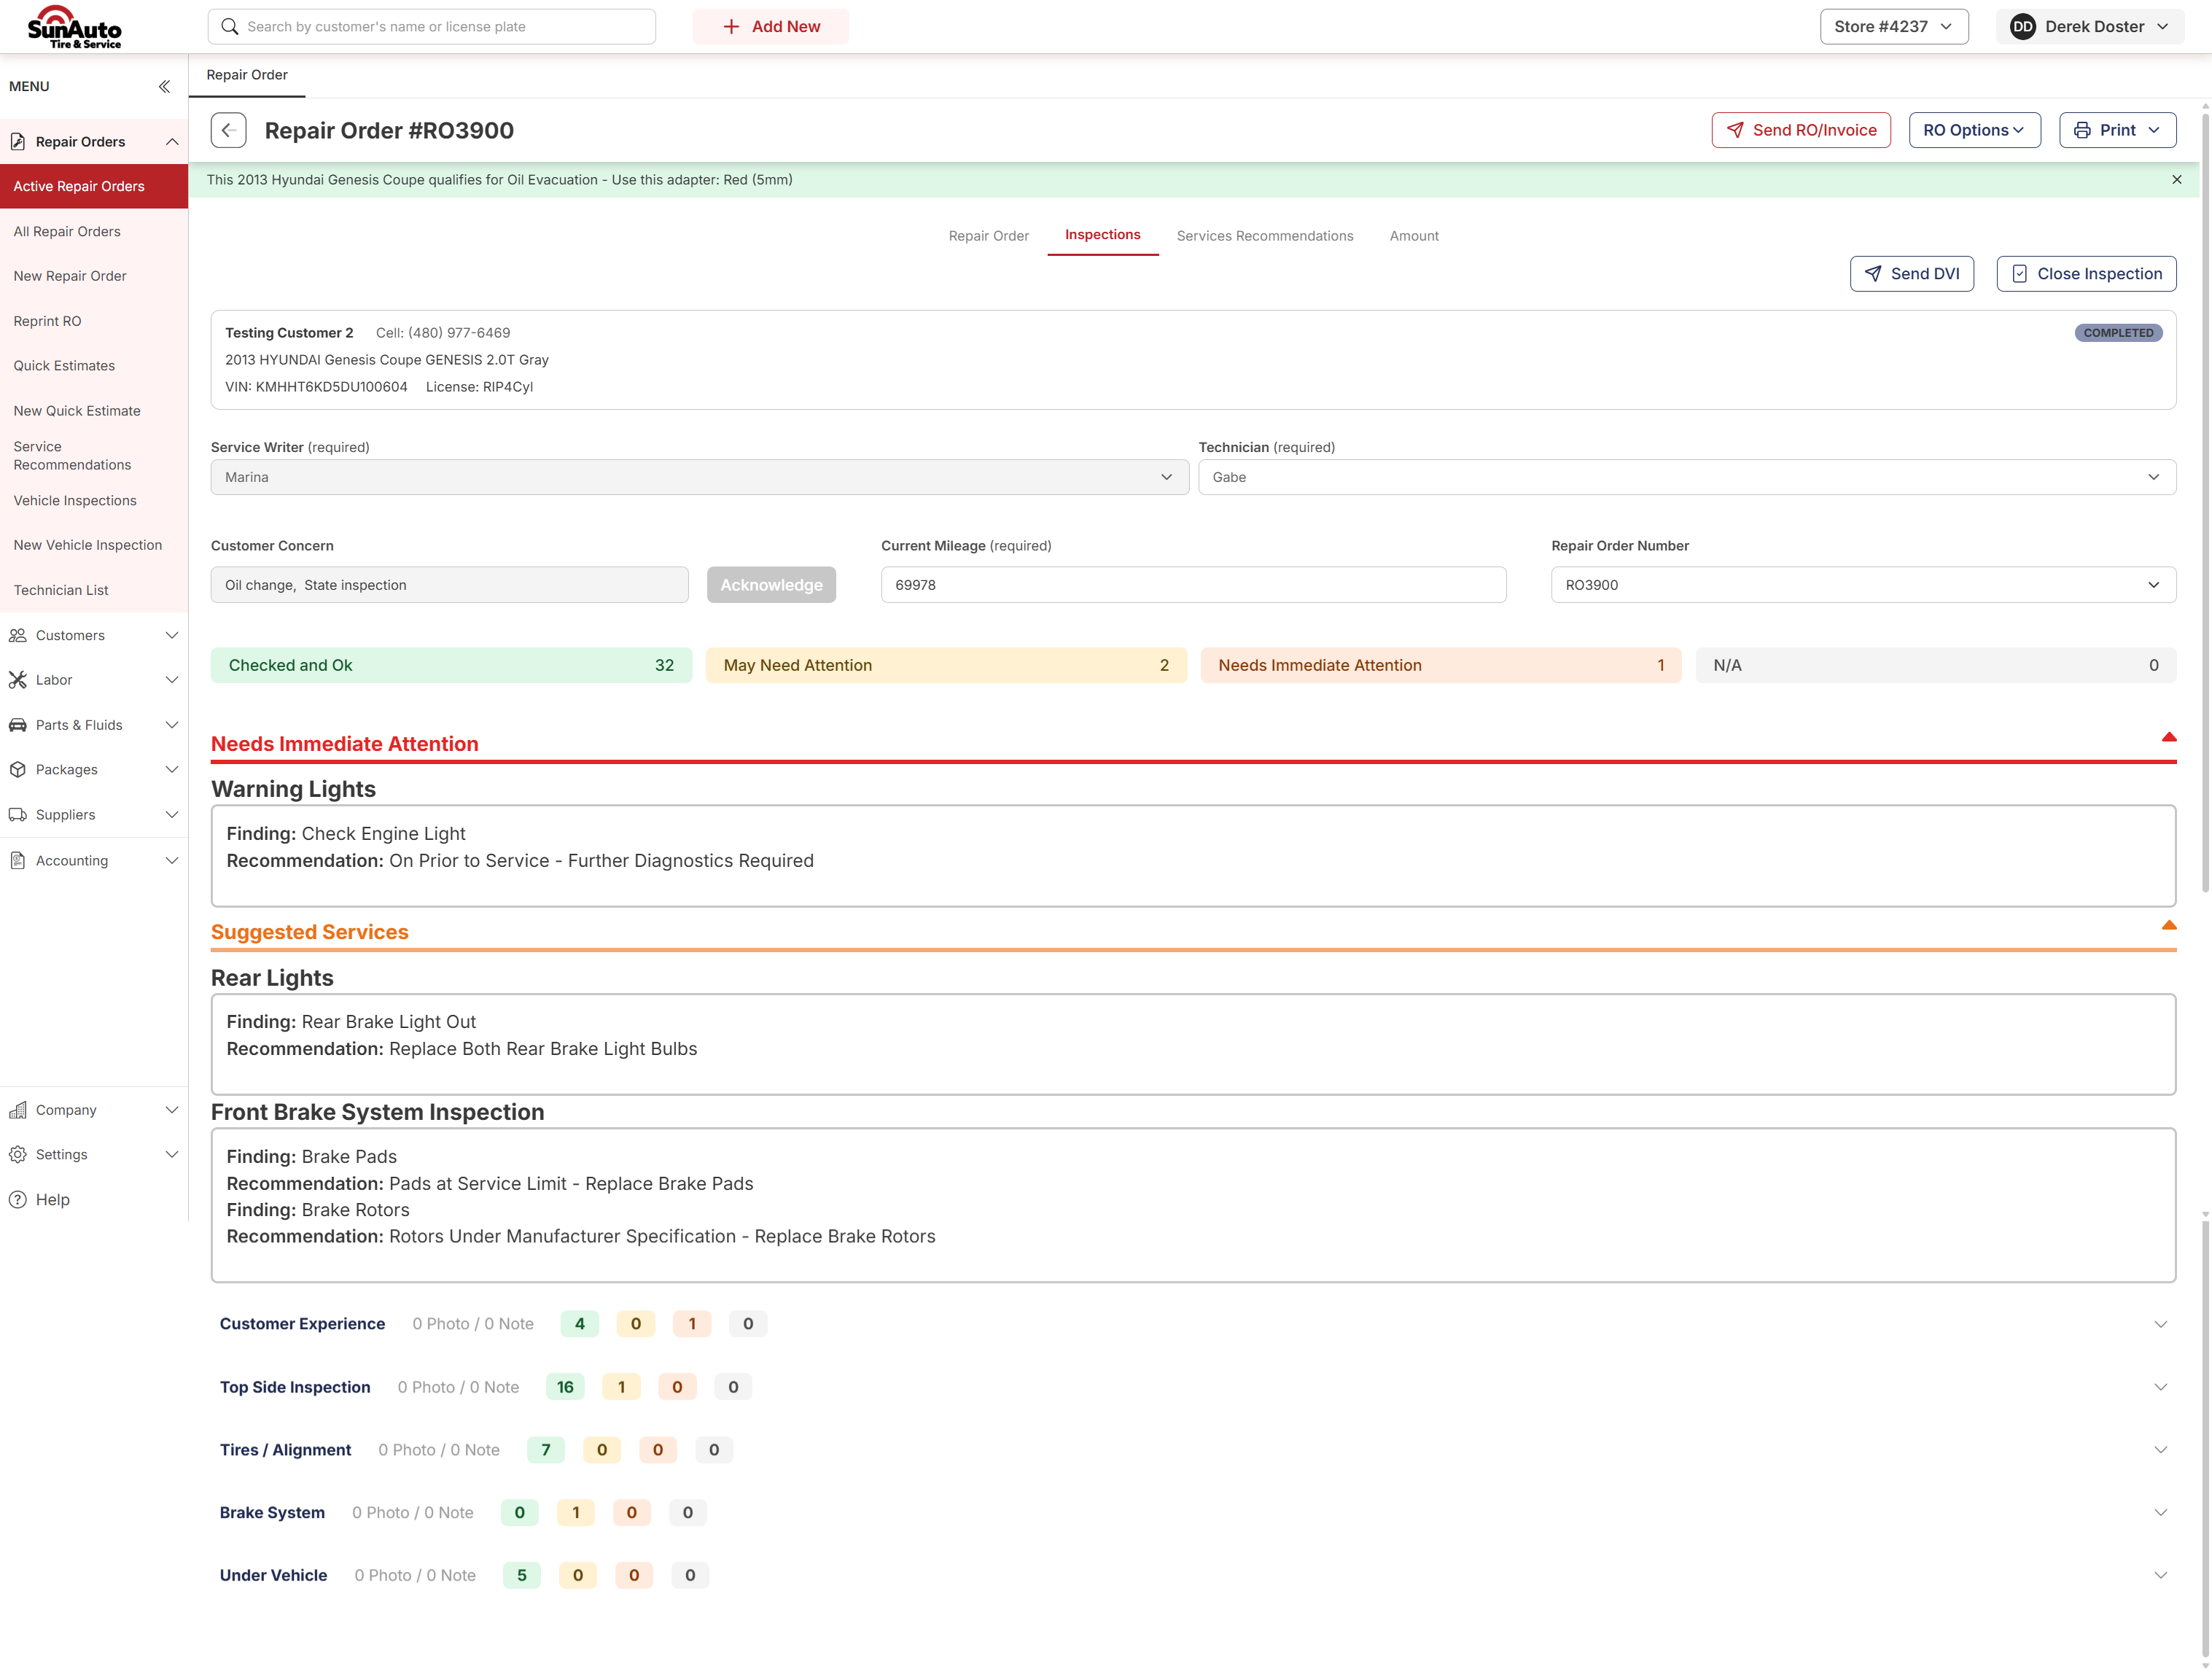
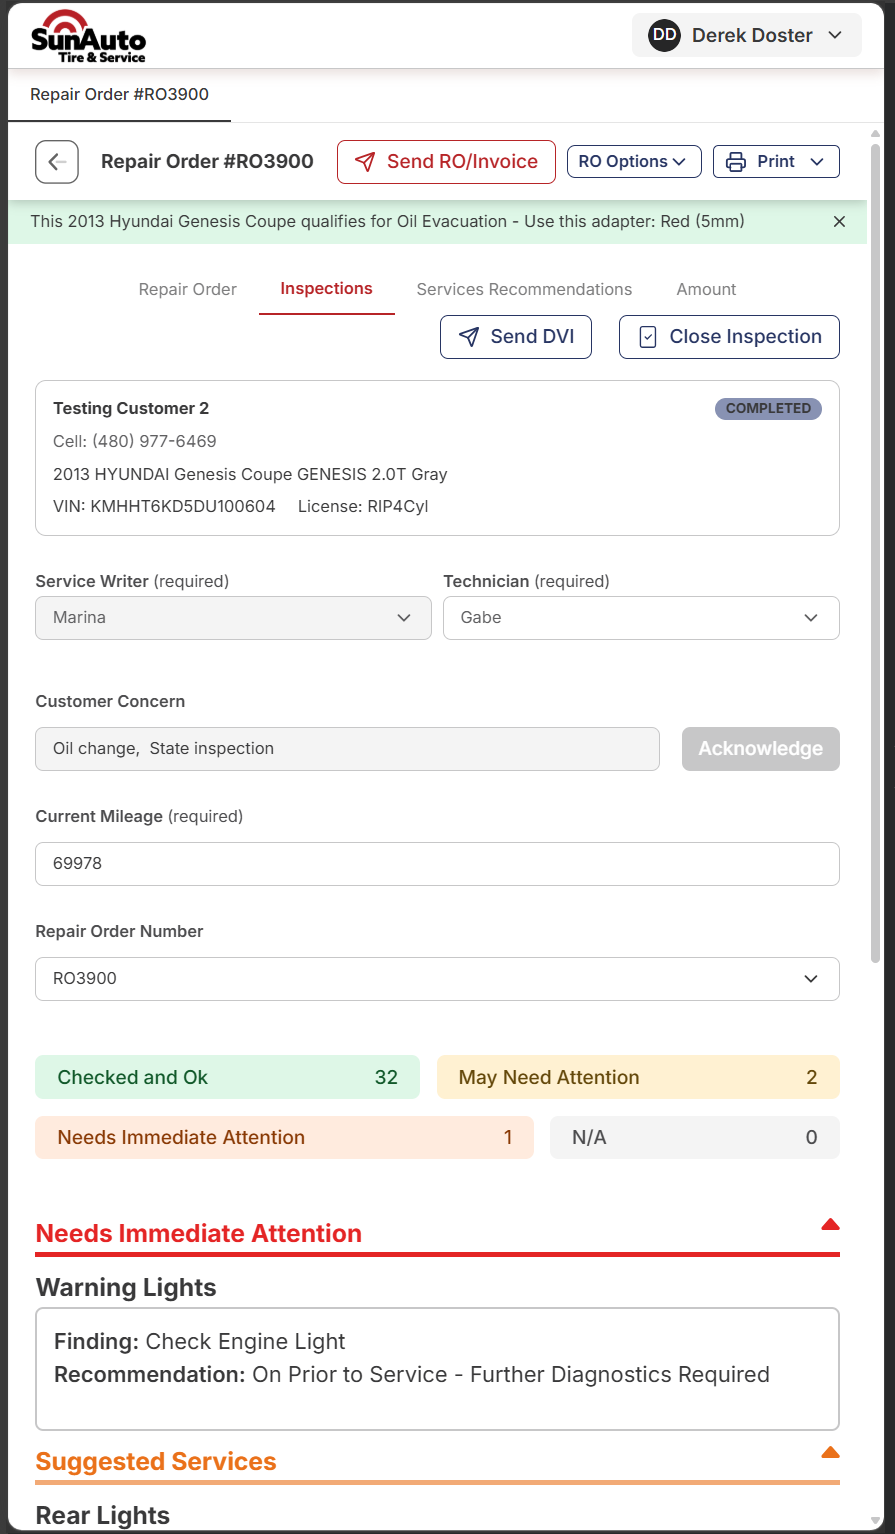
Once items are marked, two things change at the top:
- The status counters fill in with totals.
- Yellow findings auto-group under Suggested Services. Red findings auto-group under Needs Immediate Attention. Each row shows the Finding and the Recommendation the tech wrote.
The customer panel flips to COMPLETED, and the Inspection Completed button turns red.
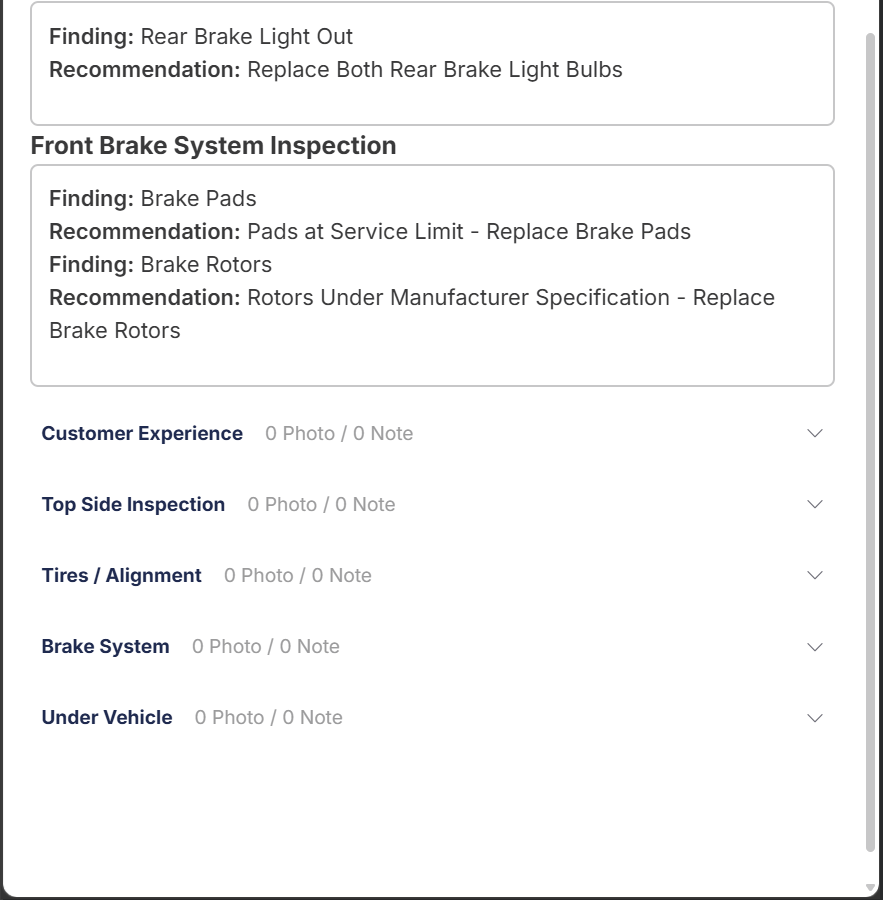
Sending the DVI to the customer
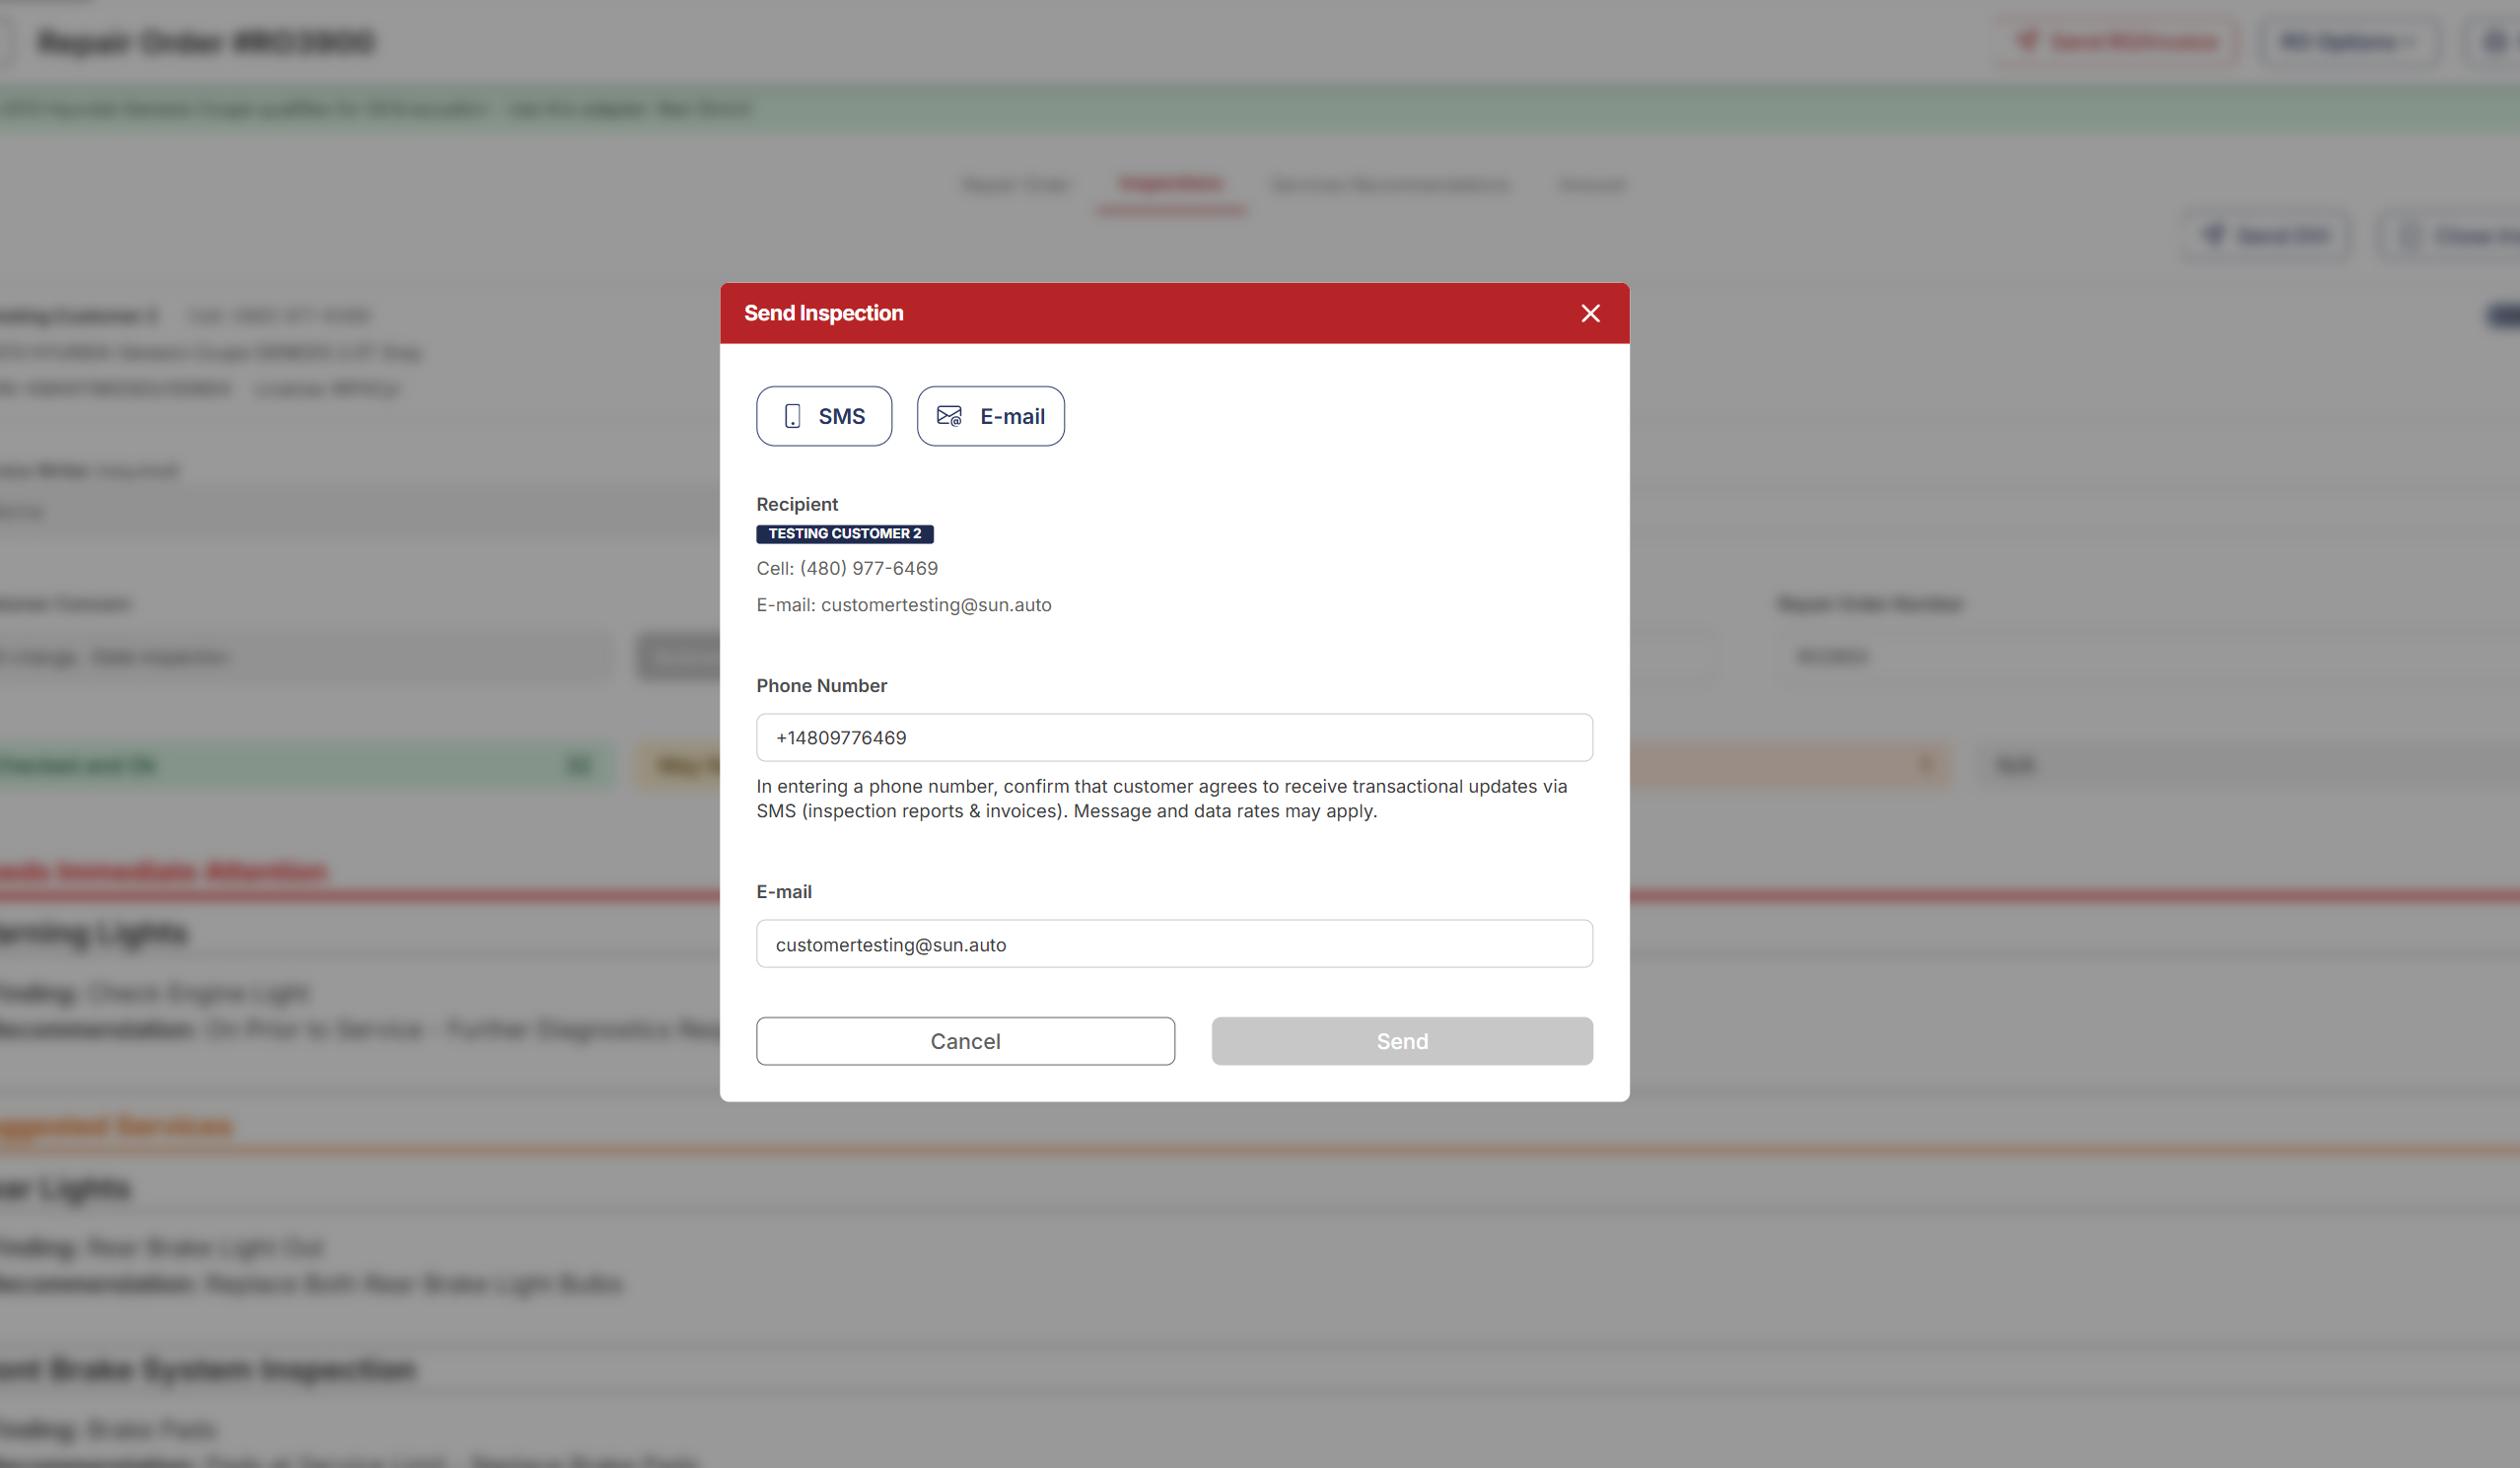
When the tech is done and you've reviewed it, click Send DVI at the top of the inspection. The Send Inspection modal opens — choose SMS or E-mail and confirm the contact info that's pre-filled from the customer record.
The customer gets a link and opens the DVI on their phone — they can see everything the tech found: the photos, the notes, the rollup of yellow and red items. That's their visibility into the work. Approvals don't happen through the link — the customer reviews the priced estimate with you, in person or by phone, after you've added parts and labor.
The mobile view of this modal is the same — same SMS/E-mail tabs, same pre-filled fields, narrower layout.
Yellow and red findings become Jobs automatically
As soon as the tech marks an item May Need Attention or Needs Immediate Attention, it hits the Repair Order as its own Job — same wording as the Recommendation the tech wrote. You don't wait on the customer for this to happen, and the customer doesn't pick what gets quoted. Your job is to build the estimate.
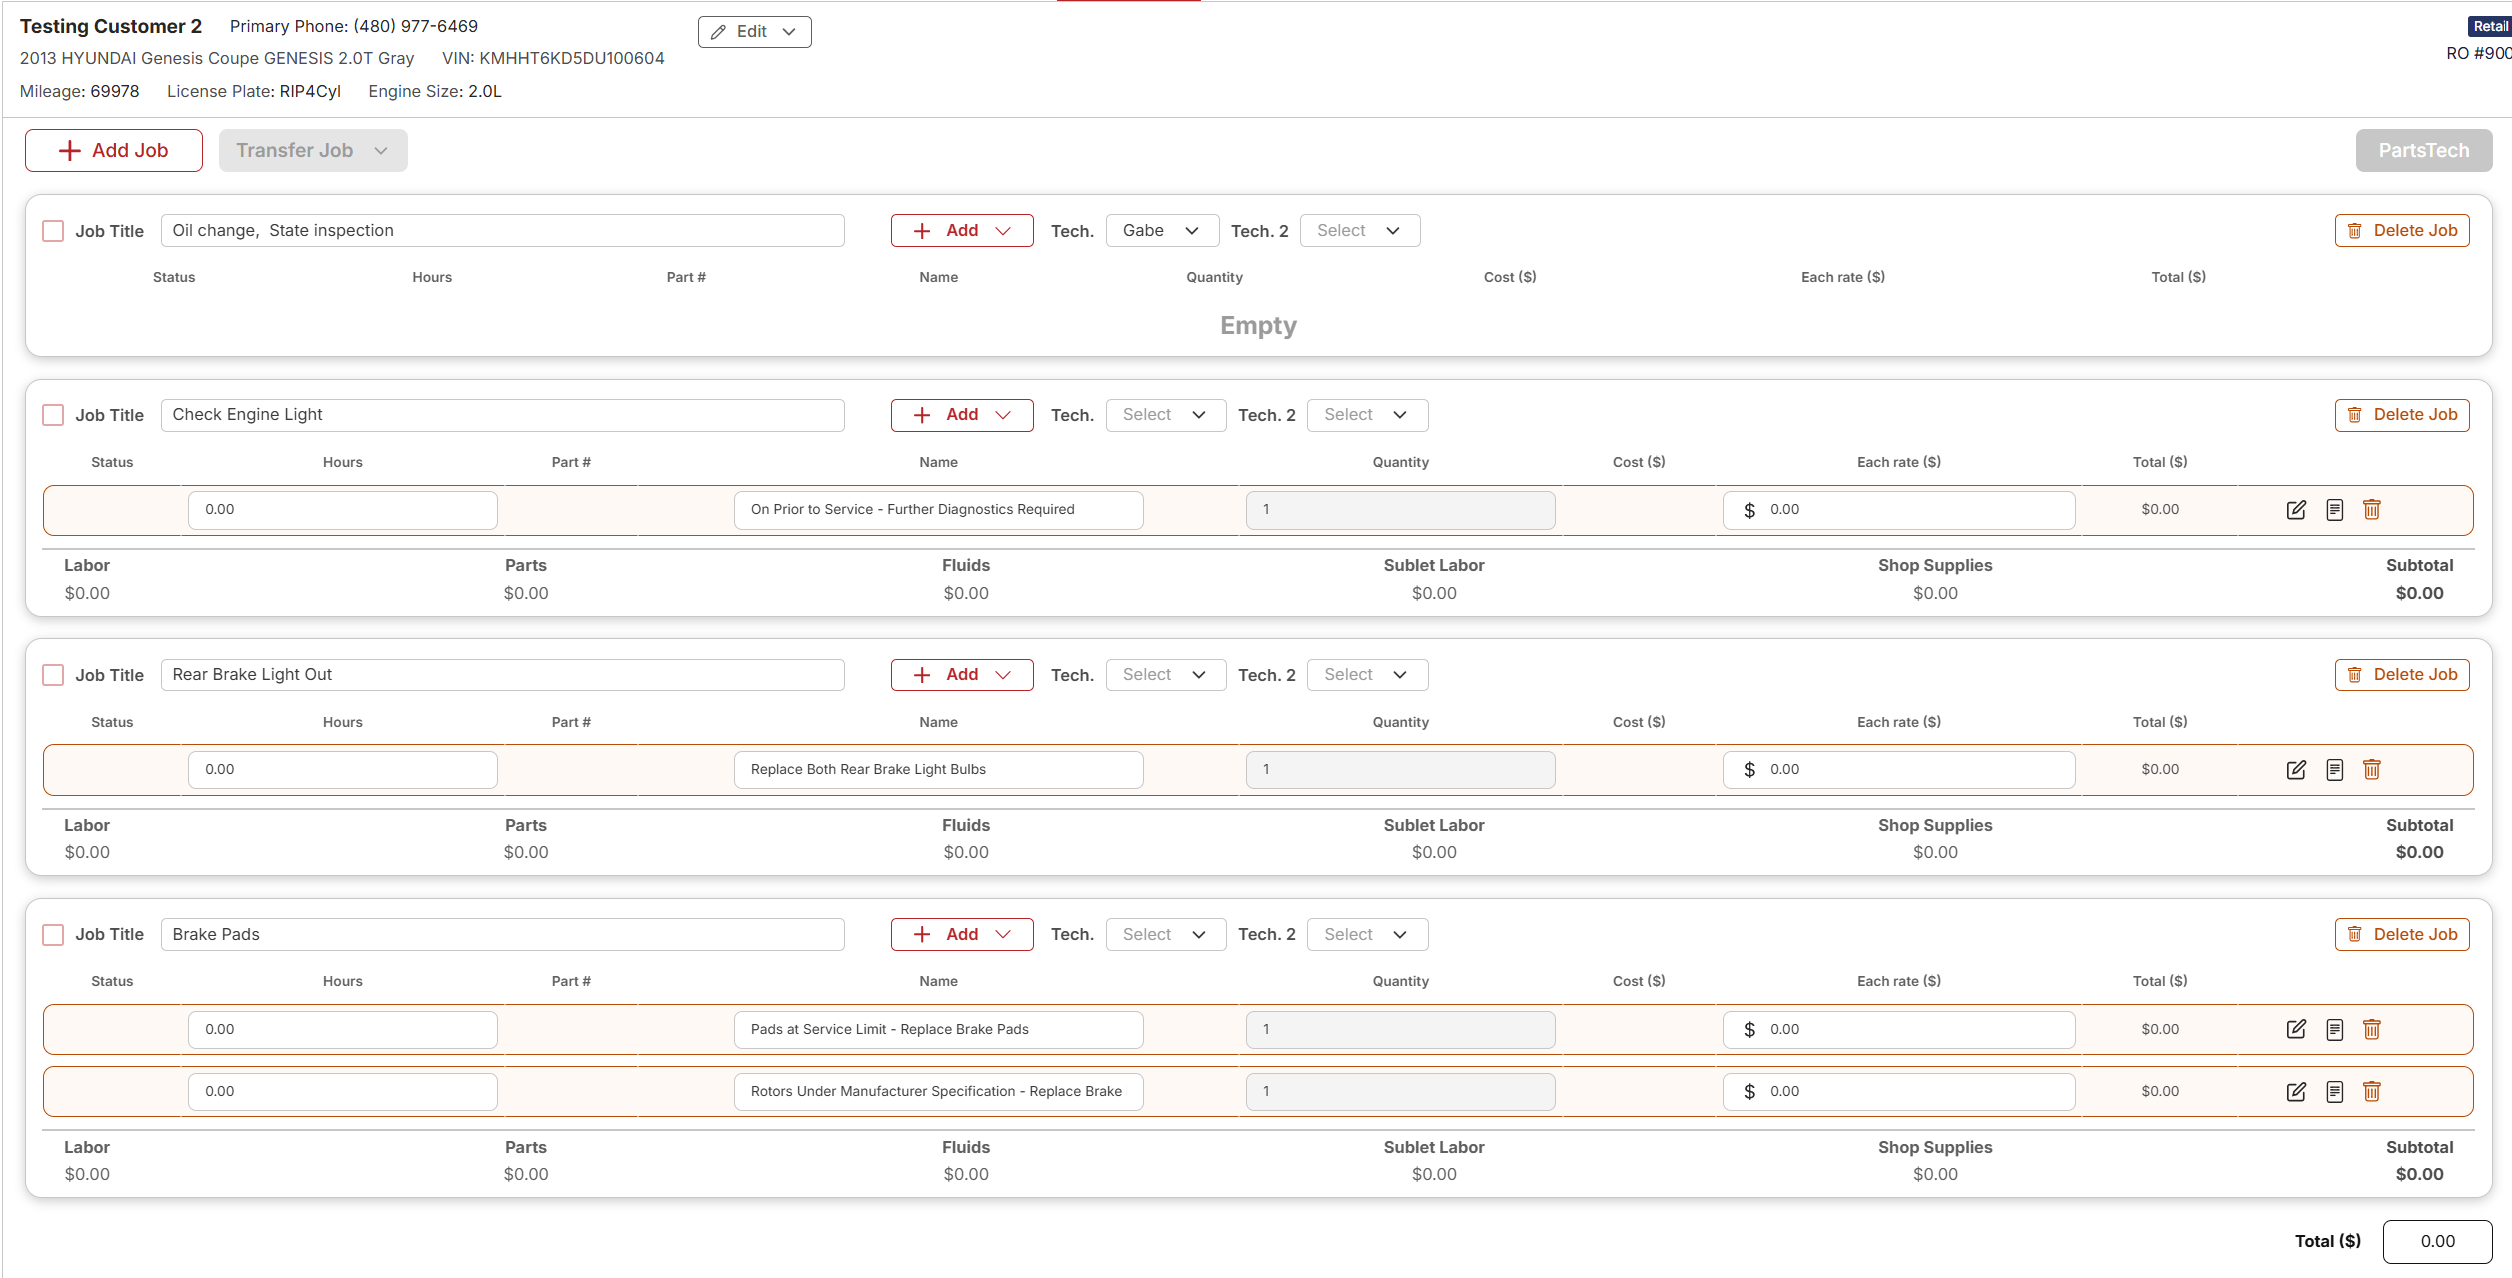
For the RO above, the DVI produced three findings, so three new Jobs landed on the RO alongside the original "Oil change, State inspection" job:
- Check Engine Light → On Prior to Service - Further Diagnostics Required
- Rear Brake Light Out → Replace Both Rear Brake Light Bulbs
- Brake Pads → Pads at Service Limit + Rotors Under Manufacturer Specification
From here, add parts and labor to each new Job so it's priced and ready to review. Walk the customer through the estimate in person or over the phone. For anything they decline or want to defer, use Transfer Job to move it into Declined or Recommended Services — that's what removes it from the active work and the running total.
Watch the flow
The desktop walkthrough, end to end:
A few tips
- Acknowledge the concern before the tech starts. It's required for completion anyway, and it makes sure you've actually read what the customer came in for.
- Photos beat words. A 3-second clip of the dashboard, the worn pad, or the leaking gasket sells the recommendation faster than any paragraph.
- Don't downgrade yellow/red items to "tidy up" the DVI. Those are what land on the RO as Jobs. Strip them out and there's nothing to quote and nothing for the customer to see was found.
Related
- Declining Jobs — when a customer says no to a finding.