Creating, Saving & Receiving a Shop Supply
A Shop Supply captures every "paid out" purchase — the ones the shop makes for itself, not a customer. You create one, save it as a Draft while you gather the receipt, then Receive it once the totals line up.
Shop Supply ≠ Inventory PO
Same idea, different flow. A Shop Supply is for operational spend (safety gear, cleaning supplies, uniforms). Parts you're stocking on the shelf go through an Inventory Purchase Order. Don't mix the two.
Shop Supply Statuses
| Status | What it means |
|---|---|
| Draft | Started but not final. Vendor is locked in, lines and invoice details can still change. |
| Received | Total Cost matches the invoice, payment method is on file, and the Shop Supply is closed. |
| Voided | Cancelled. Kept on record for the audit trail; no money moved. |
Walkthrough
Step through the slides — click the chips at the top, the Previous / Next buttons, or use the ← → arrow keys.
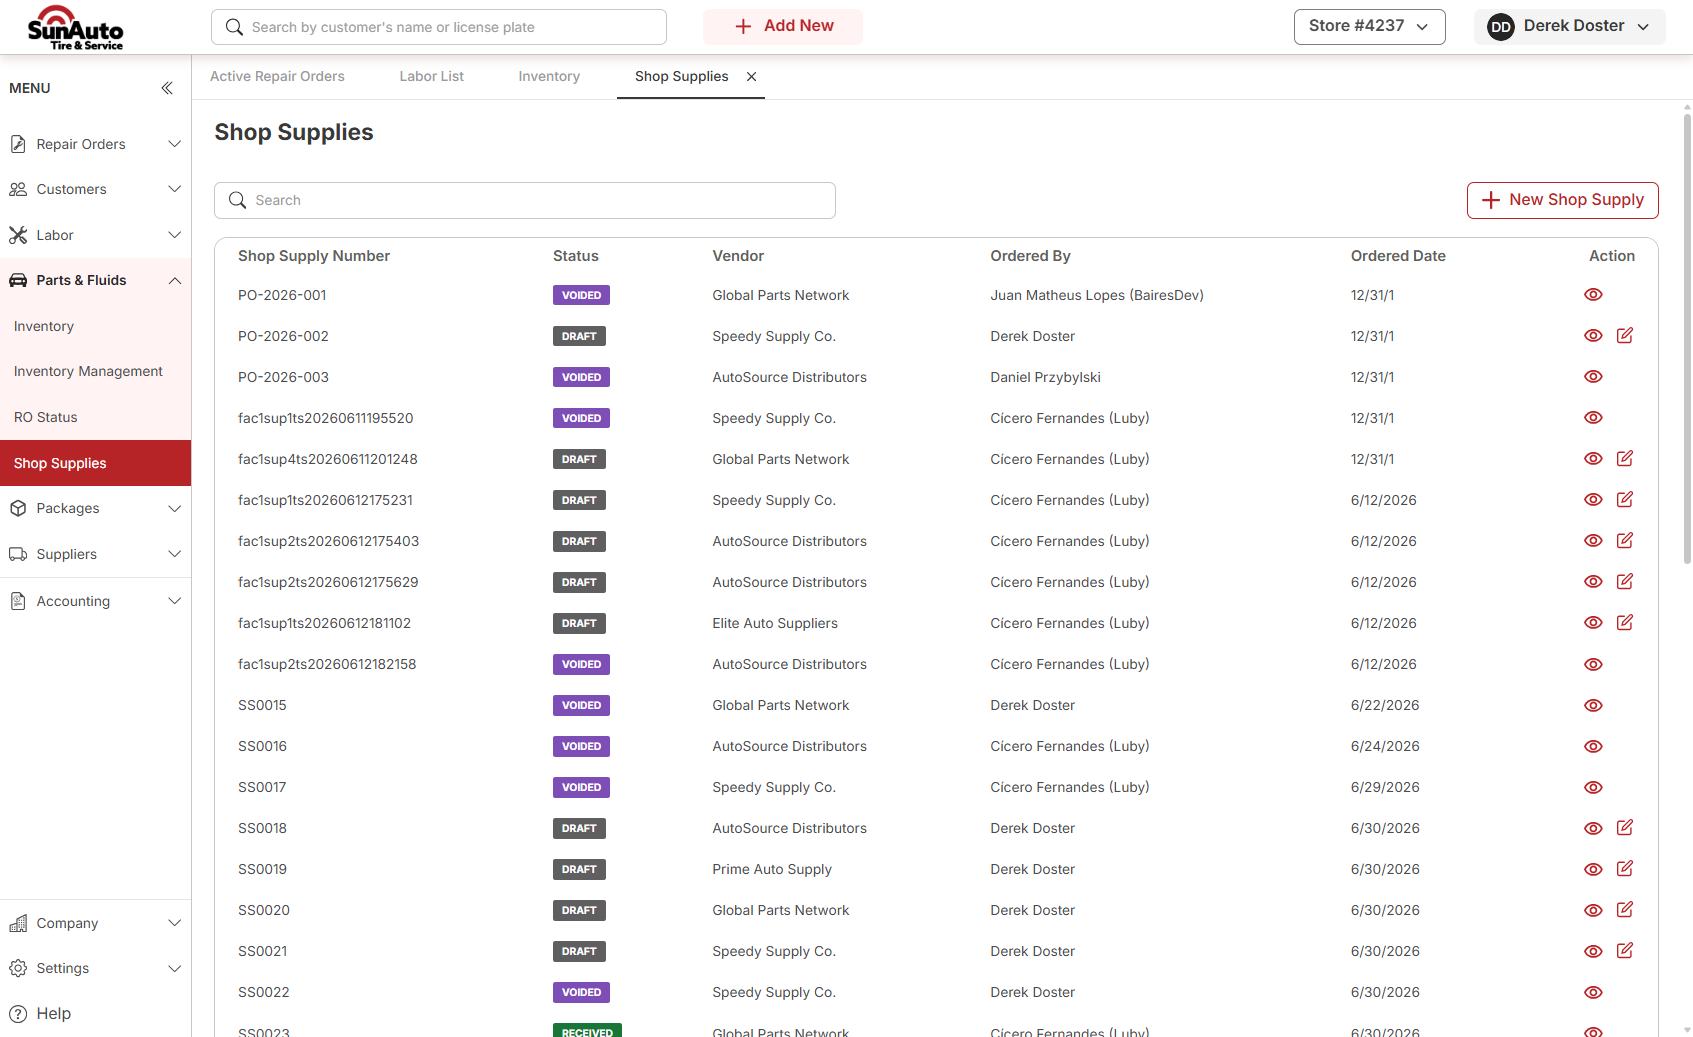
Step 1 — Open Shop Supplies. From the left menu, go to Parts & Fluids → Shop Supplies. The list shows every Shop Supply for this store with its status, vendor, who ordered it, and date.
 1
Shop Supplies lives under Parts & Fluids. Highlighted red when you're on the page.
2
+ New Shop Supply — top right. Opens a blank form.
3
Status column — DRAFT, RECEIVED, or VOIDED. Draft rows have an edit pencil in the Action column; Received and Voided are view-only.
1
Shop Supplies lives under Parts & Fluids. Highlighted red when you're on the page.
2
+ New Shop Supply — top right. Opens a blank form.
3
Status column — DRAFT, RECEIVED, or VOIDED. Draft rows have an edit pencil in the Action column; Received and Voided are view-only.
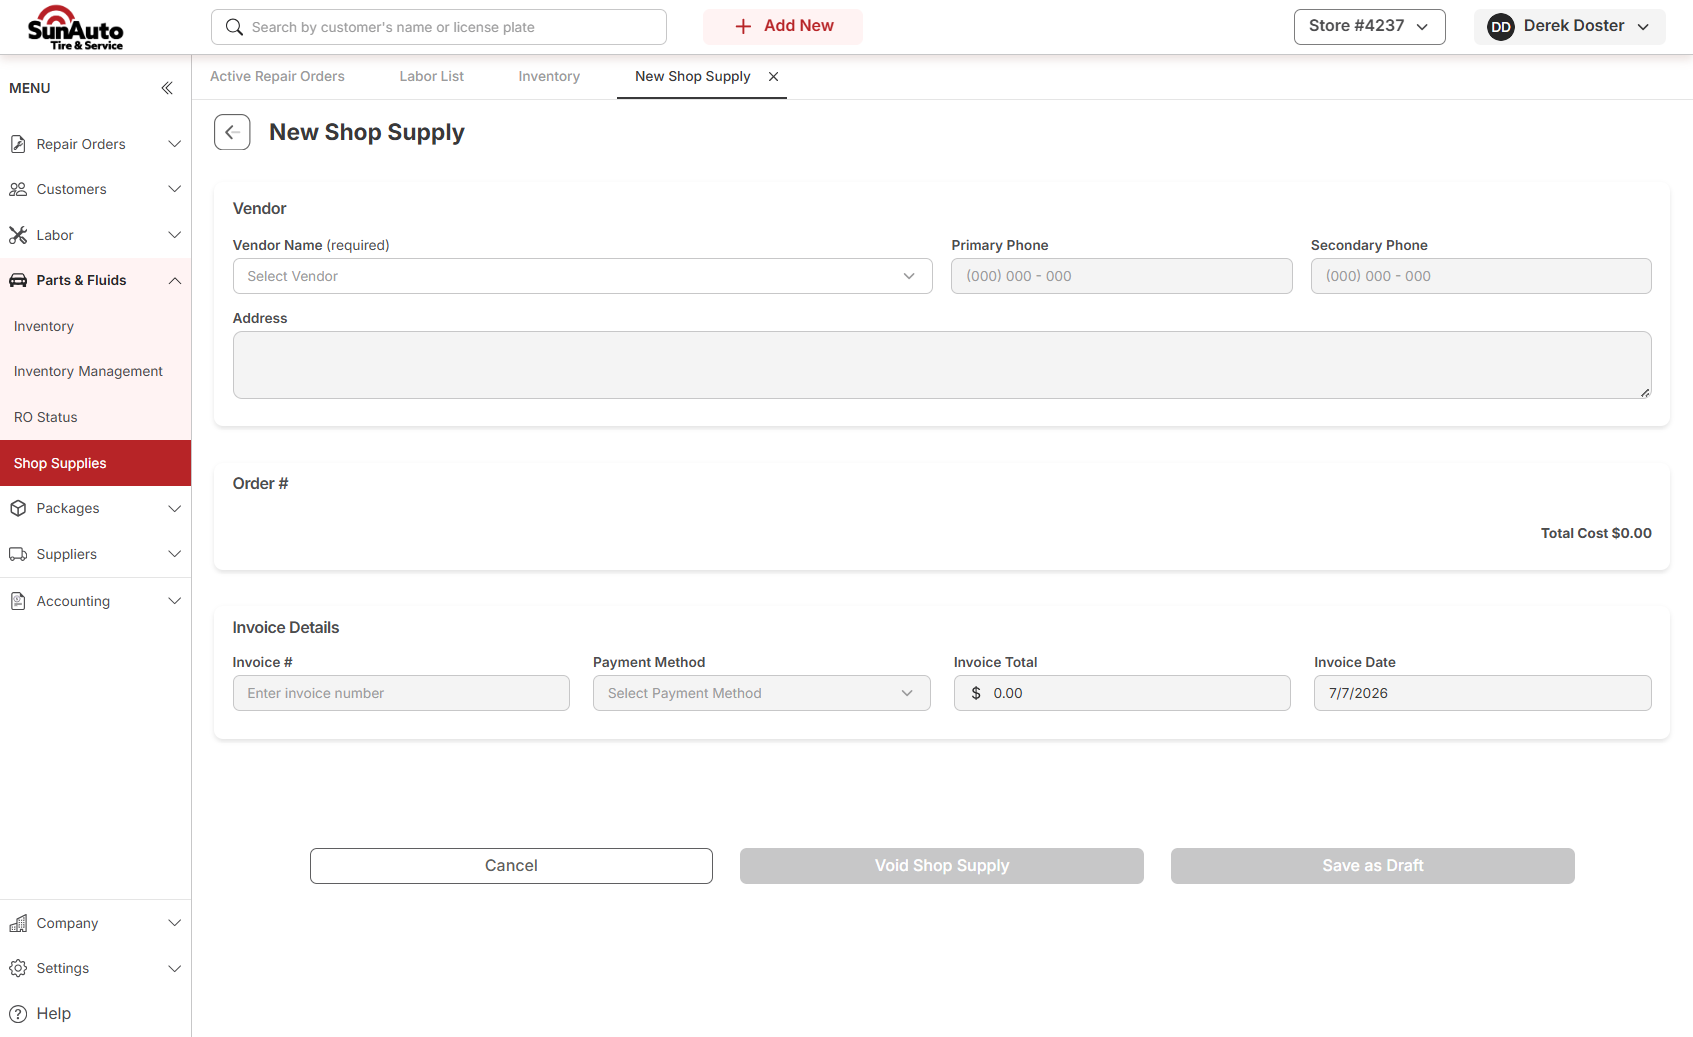
Step 2 — Pick the vendor. The blank form has three sections — Vendor, Order #, and Invoice Details. Vendor is the only field you can fill on a fresh form.
 1
Vendor Name (required) — the gas station, hardware store, or supplier you bought from. Phone and address auto-fill from the vendor record.
2
Order # is blank — the Shop Supply doesn't get an ID until you save the draft.
3
Save as Draft is disabled until you pick a vendor.
1
Vendor Name (required) — the gas station, hardware store, or supplier you bought from. Phone and address auto-fill from the vendor record.
2
Order # is blank — the Shop Supply doesn't get an ID until you save the draft.
3
Save as Draft is disabled until you pick a vendor.
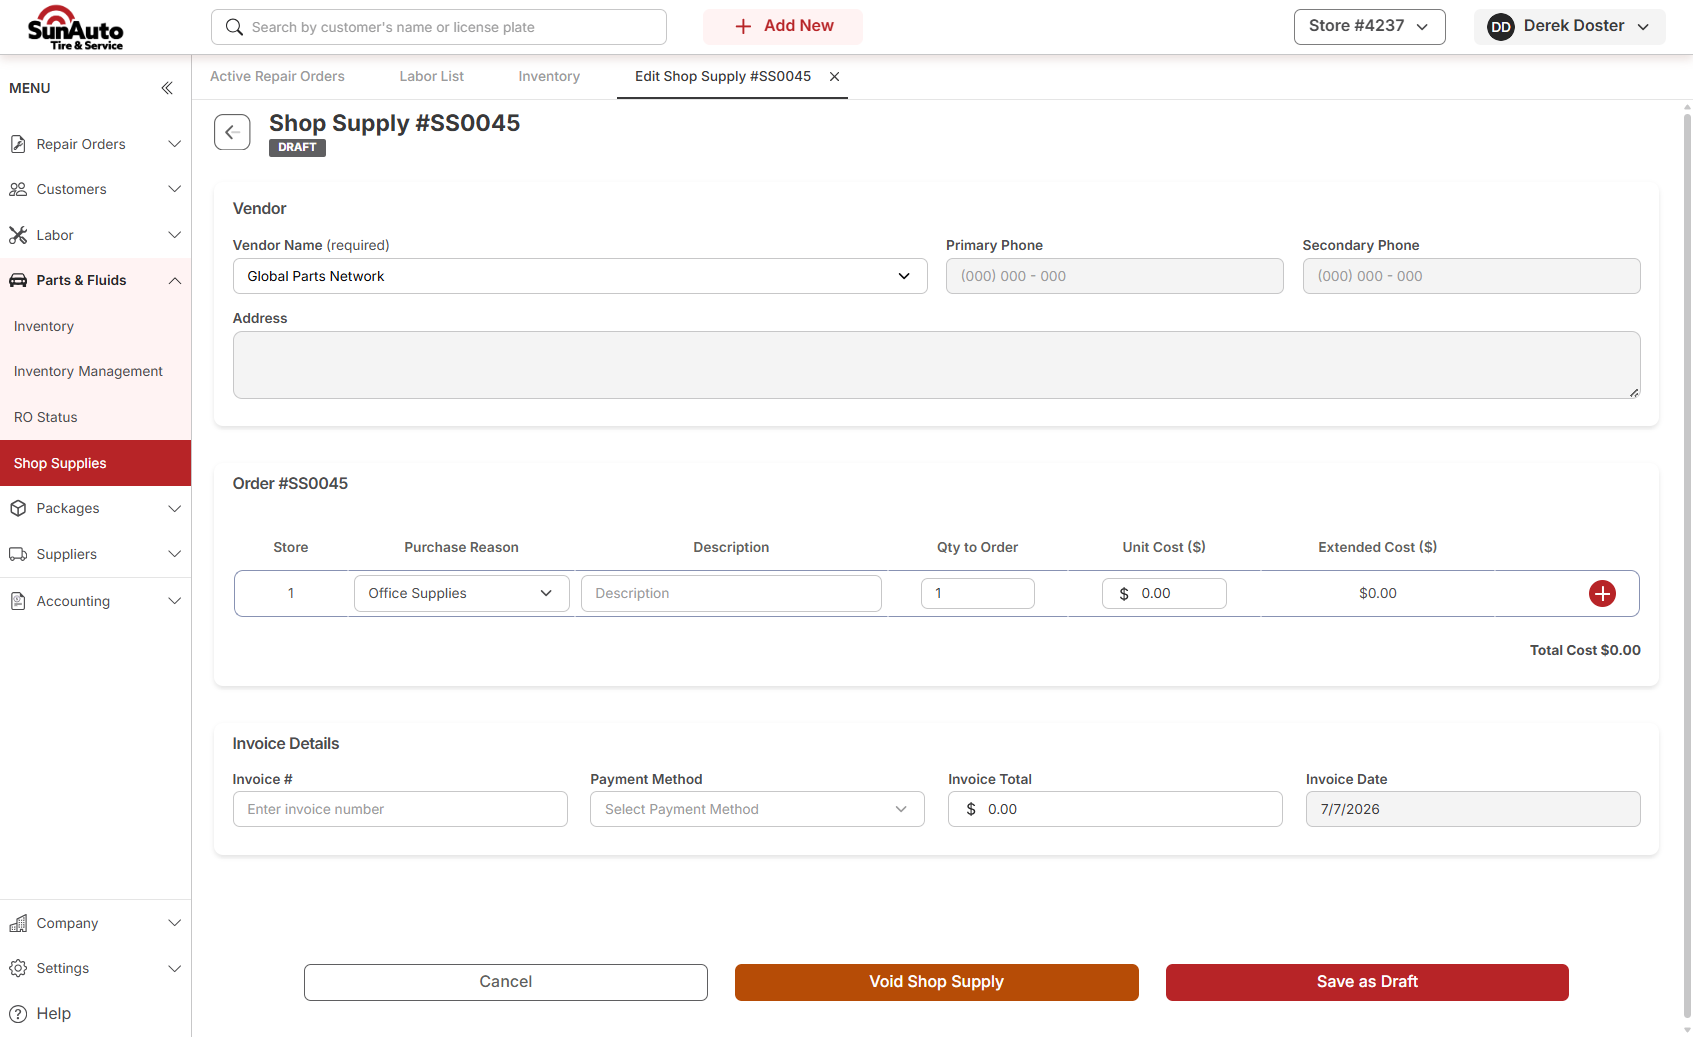
Step 3 — Save as Draft. Once a vendor is selected, Save as Draft unlocks. Clicking it assigns an SS#### order number and drops in the first blank line so you can start itemizing.
 1
SS0045 & DRAFT badge — the Shop Supply exists now. You can leave and come back to it any time.
2
First blank line — Store, Purchase Reason (defaults to Office Supplies), Description, Qty, Unit Cost. Use the red + on the right to add more lines.
3
Save as Draft stays live as you edit. Nothing is final until you Receive it.
1
SS0045 & DRAFT badge — the Shop Supply exists now. You can leave and come back to it any time.
2
First blank line — Store, Purchase Reason (defaults to Office Supplies), Description, Qty, Unit Cost. Use the red + on the right to add more lines.
3
Save as Draft stays live as you edit. Nothing is final until you Receive it.
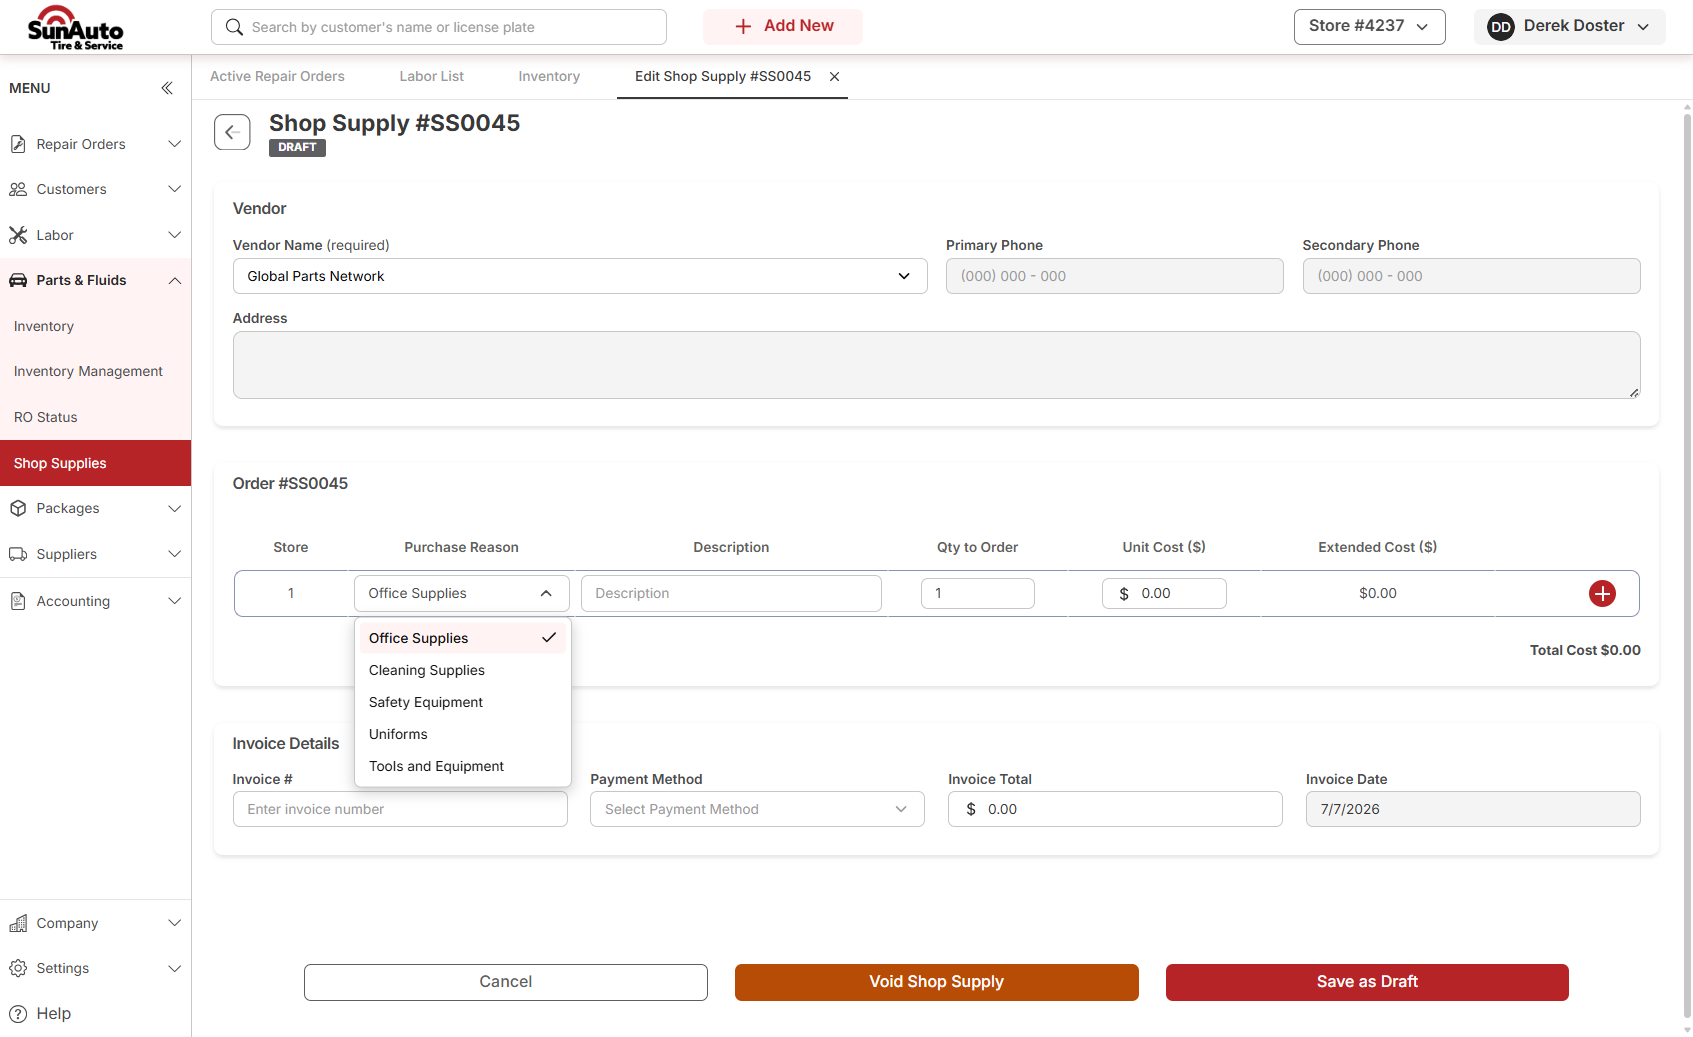
Step 4 — Categorize each line. Every line needs a Purchase Reason. This is what accounting uses to bucket the spend, so pick the closest fit.
 1
Purchase Reason categories — Office Supplies, Cleaning Supplies, Safety Equipment, Uniforms, Tools and Equipment. Pick one per line.
2
Buying two things from different categories on the same receipt? One line per category — split the receipt rather than lumping them together.
1
Purchase Reason categories — Office Supplies, Cleaning Supplies, Safety Equipment, Uniforms, Tools and Equipment. Pick one per line.
2
Buying two things from different categories on the same receipt? One line per category — split the receipt rather than lumping them together.
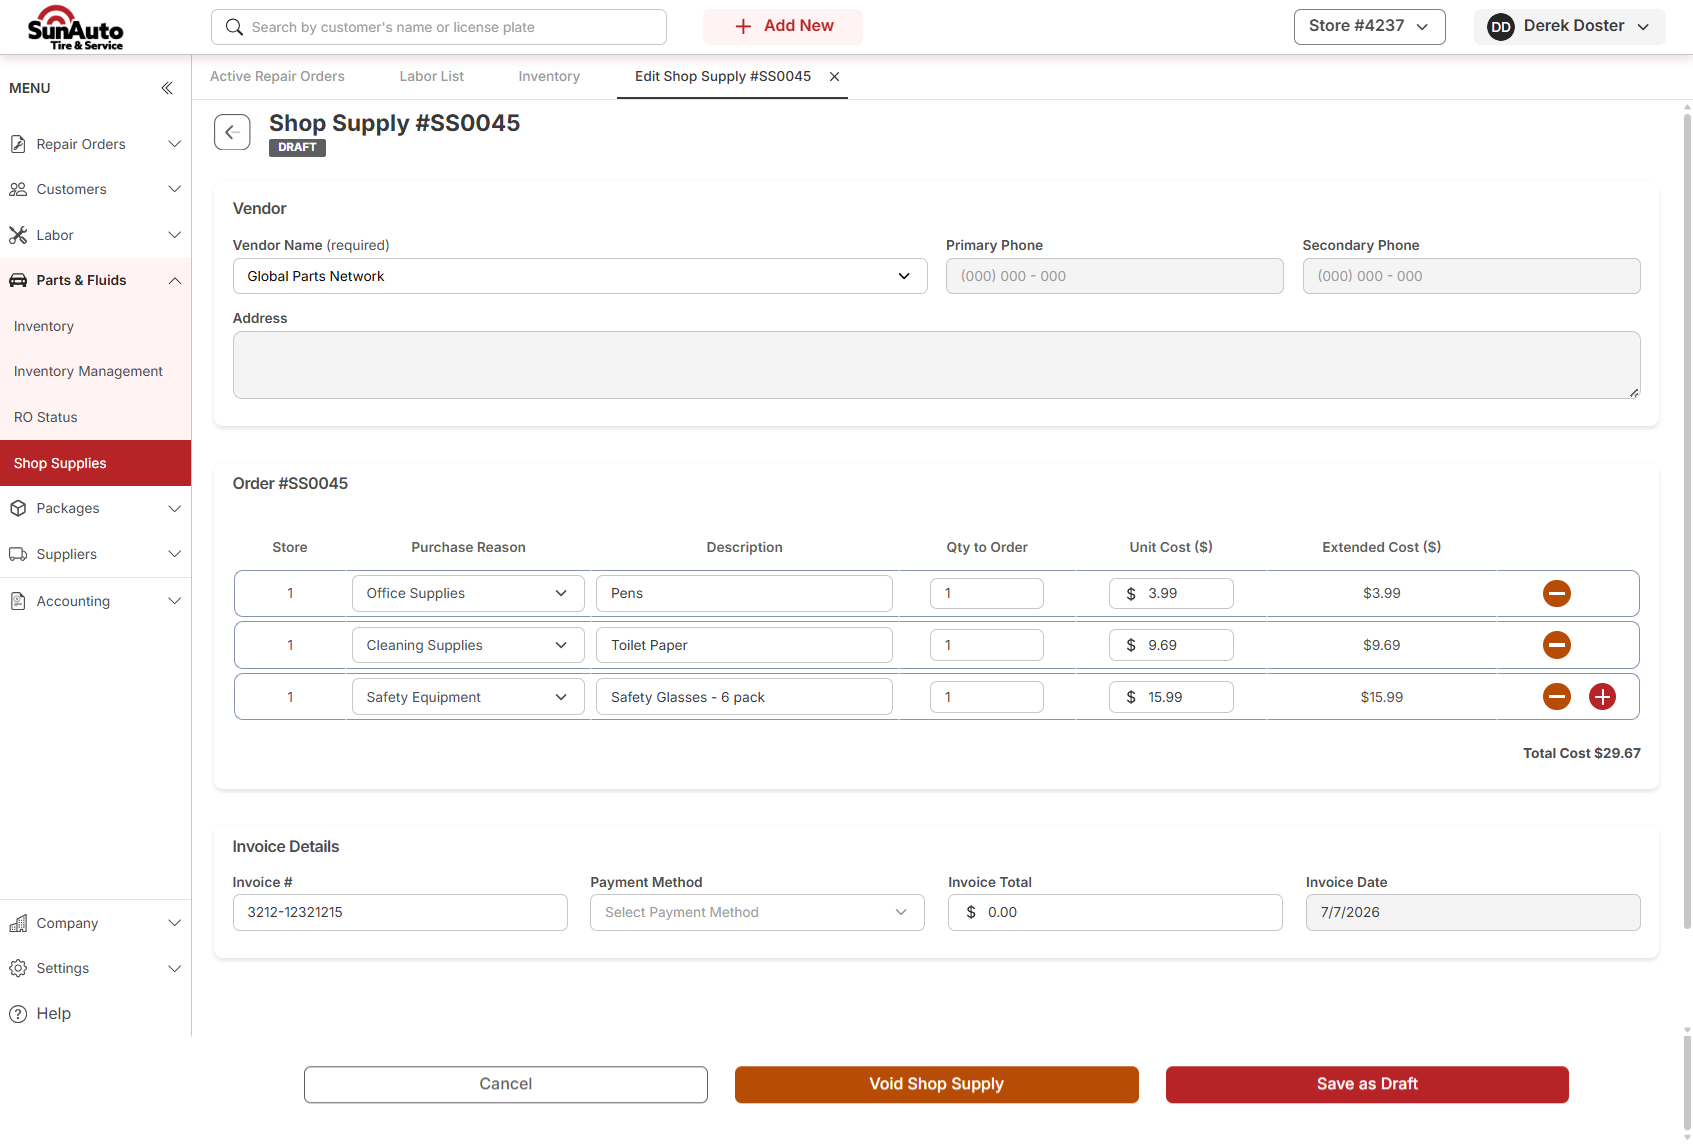
Step 5 — Add one line per item. Fill Description, Qty, and Unit Cost. Extended Cost and Total Cost tally automatically. Fill the Invoice # down in Invoice Details while you're here.
 1
One line per item — the description is what makes the entry readable later. "Pens" beats "office stuff."
2
Total Cost — sum of every line. This is the number the invoice has to match.
3
Invoice # — off the receipt. Payment Method and Invoice Total come next.
1
One line per item — the description is what makes the entry readable later. "Pens" beats "office stuff."
2
Total Cost — sum of every line. This is the number the invoice has to match.
3
Invoice # — off the receipt. Payment Method and Invoice Total come next.
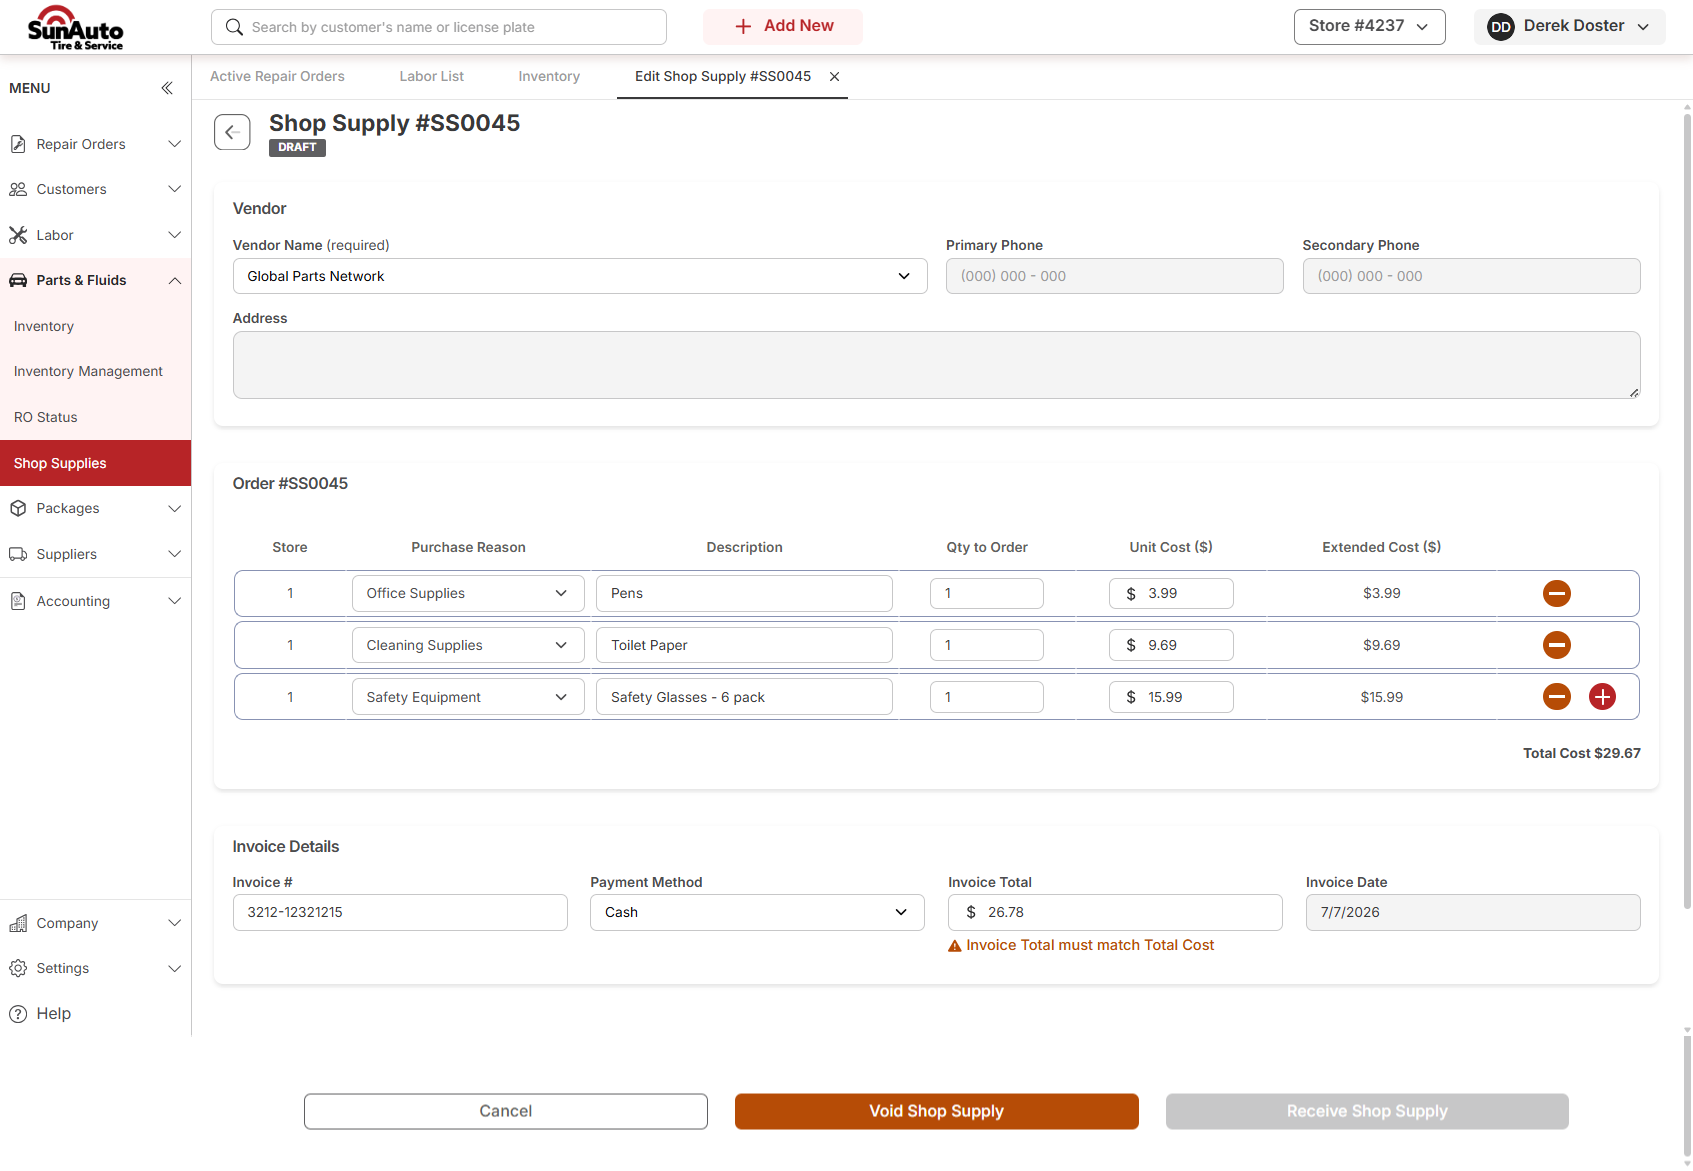
Step 6 — Invoice Total must match Total Cost. Enter the Payment Method and the Invoice Total from the receipt. If the numbers don't line up, OverDrive flags it and won't let you Receive.
 1
Total Cost $29.67 — what the lines add up to.
2
Invoice Total $26.78 — what you typed. Doesn't match, so the warning shows.
3
"Invoice Total must match Total Cost" — fix the line unit cost or the invoice total until they agree. Don't fudge either number.
1
Total Cost $29.67 — what the lines add up to.
2
Invoice Total $26.78 — what you typed. Doesn't match, so the warning shows.
3
"Invoice Total must match Total Cost" — fix the line unit cost or the invoice total until they agree. Don't fudge either number.
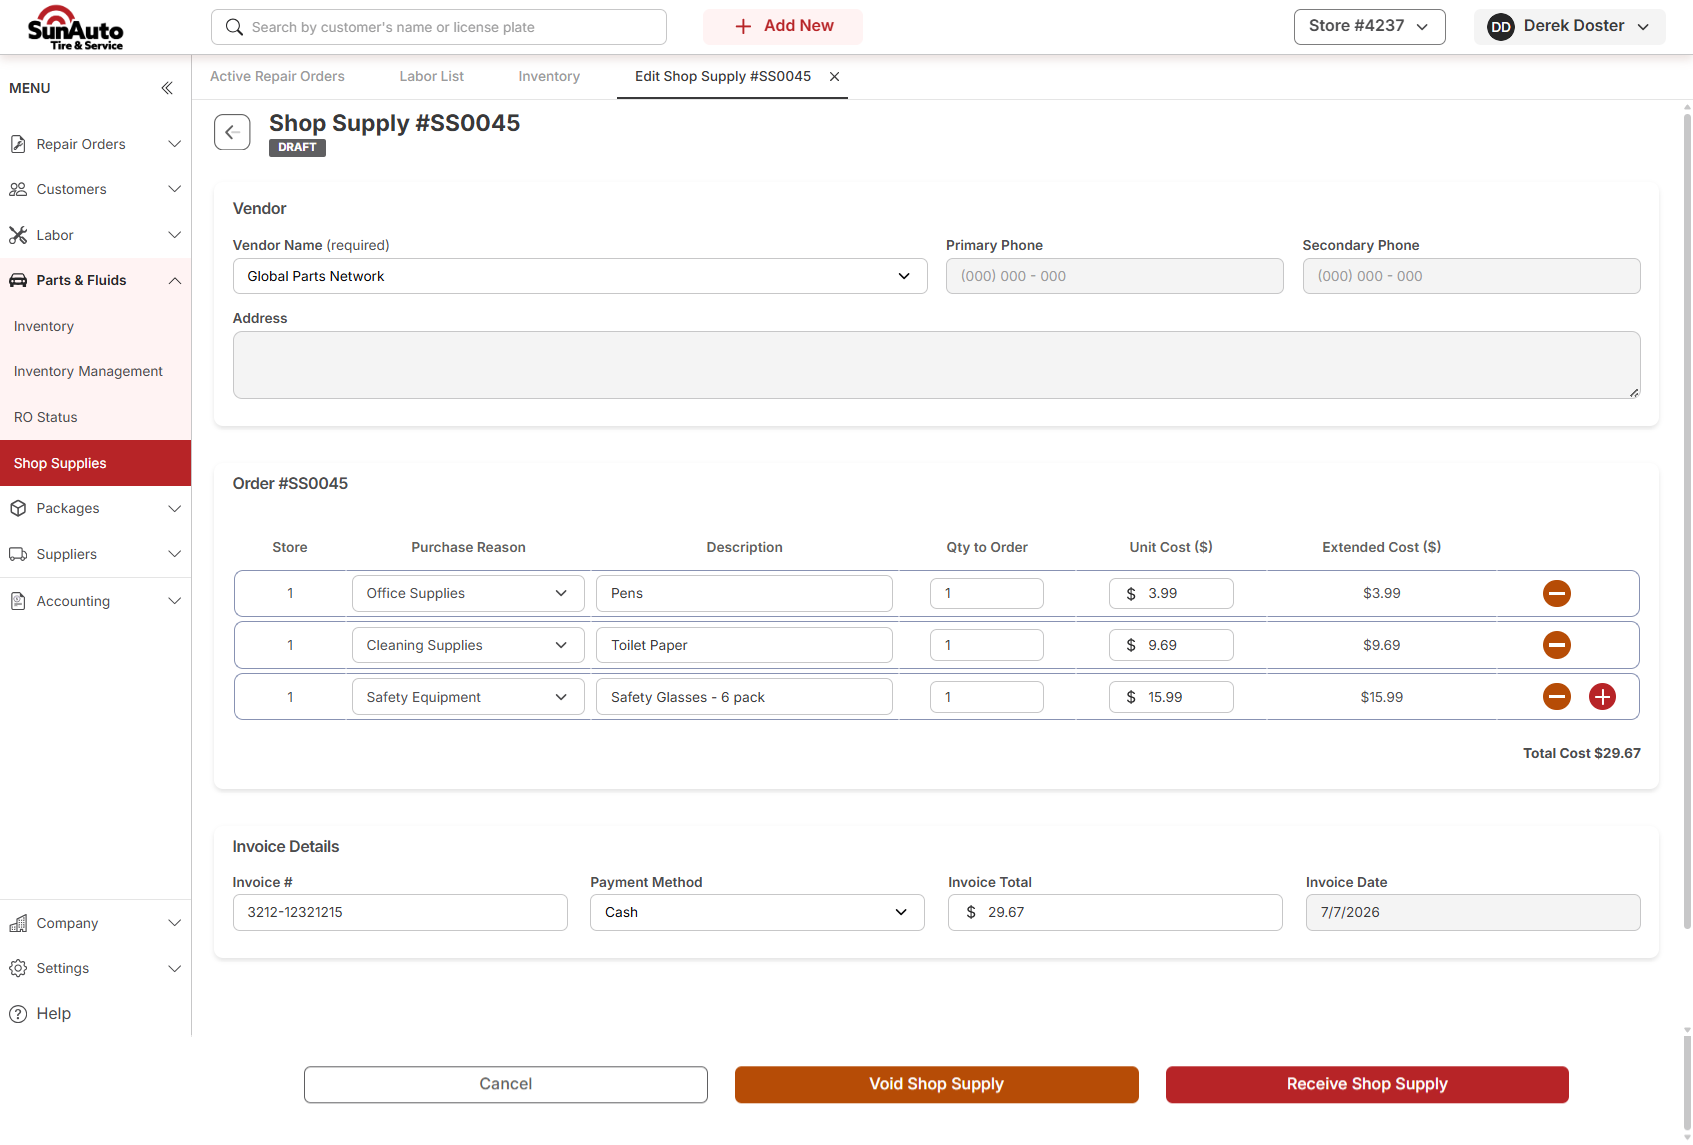
Step 7 — Ready to Receive. Once Payment Method is set and Invoice Total matches Total Cost, the Receive Shop Supply button turns red.
 1
Payment Method = Cash — Cash, Card, Check, whatever the receipt shows. This is how the shop paid the vendor.
2
Receive Shop Supply — now active. Clicking it opens the confirmation summary.
1
Payment Method = Cash — Cash, Card, Check, whatever the receipt shows. This is how the shop paid the vendor.
2
Receive Shop Supply — now active. Clicking it opens the confirmation summary.
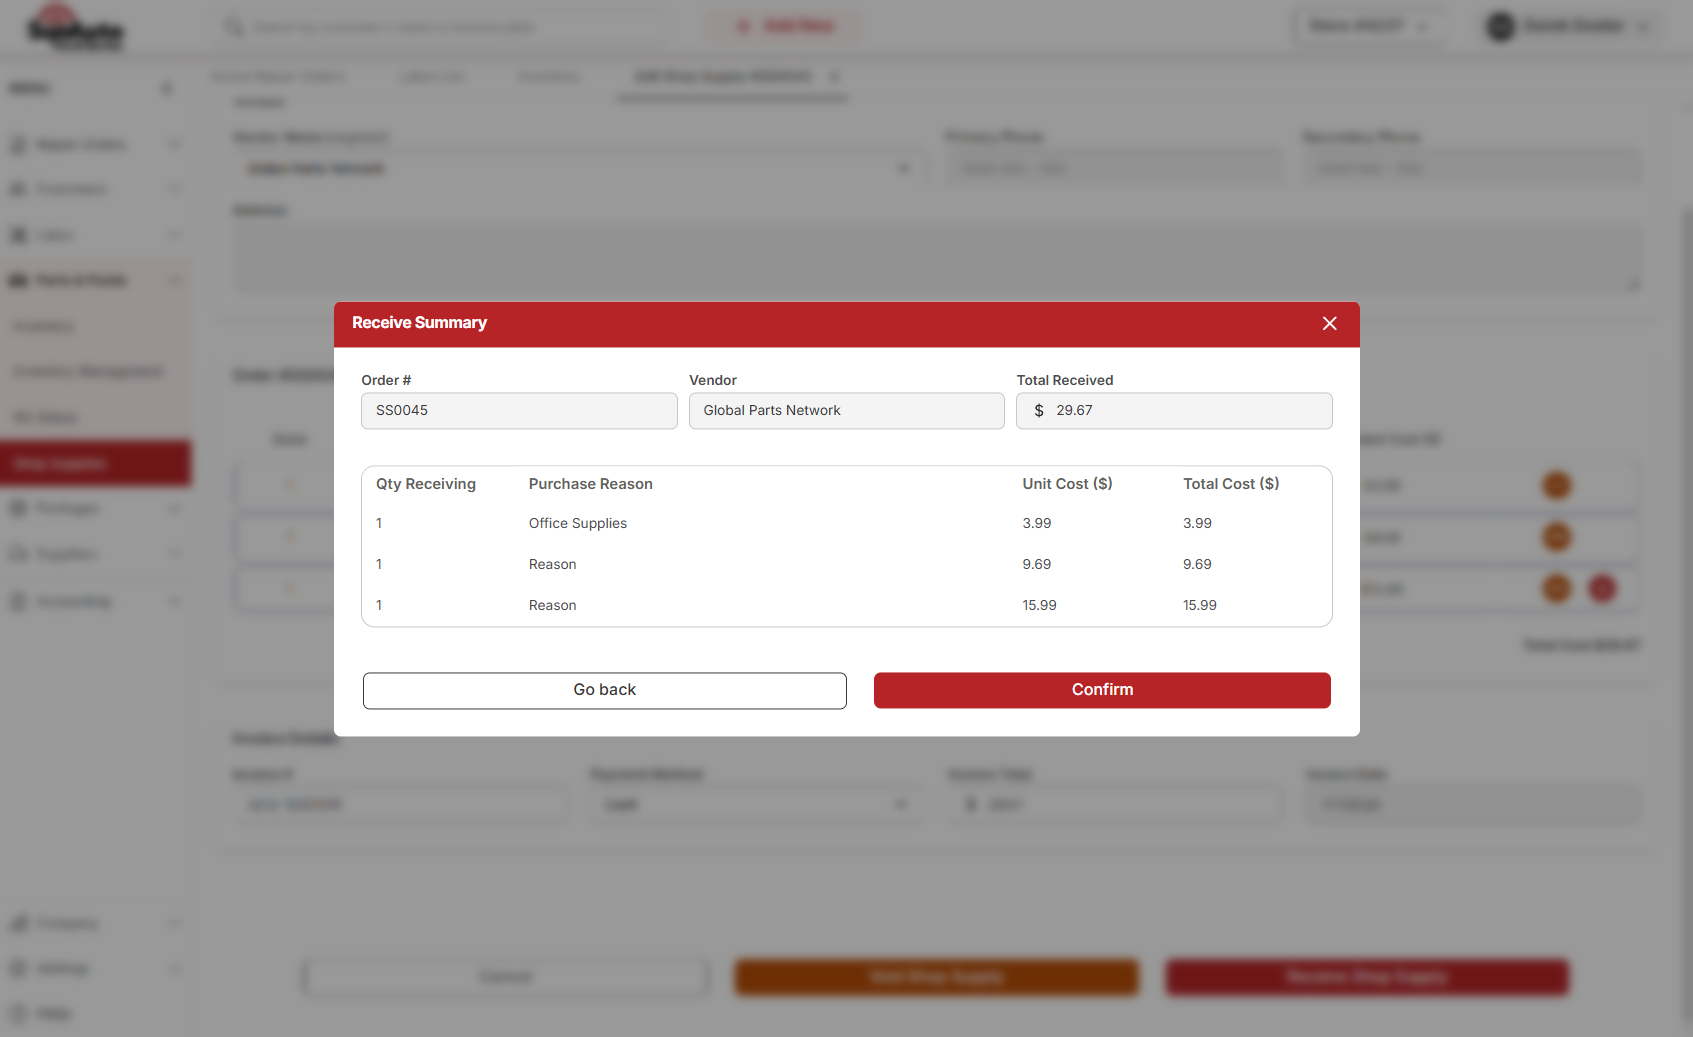
Step 8 — Confirm the summary. The Receive Summary modal recaps the order — Order #, Vendor, Total Received, and every line. Read it before hitting Confirm. There's no going back to Draft after this.
 1
Order #, Vendor, Total Received — the three things to eyeball before clicking Confirm.
2
Line recap — Qty, Purchase Reason, Unit Cost, Total Cost per line. If a description looks wrong, click Go back and fix it now.
3
Confirm — closes the Shop Supply as Received. Terminal.
1
Order #, Vendor, Total Received — the three things to eyeball before clicking Confirm.
2
Line recap — Qty, Purchase Reason, Unit Cost, Total Cost per line. If a description looks wrong, click Go back and fix it now.
3
Confirm — closes the Shop Supply as Received. Terminal.
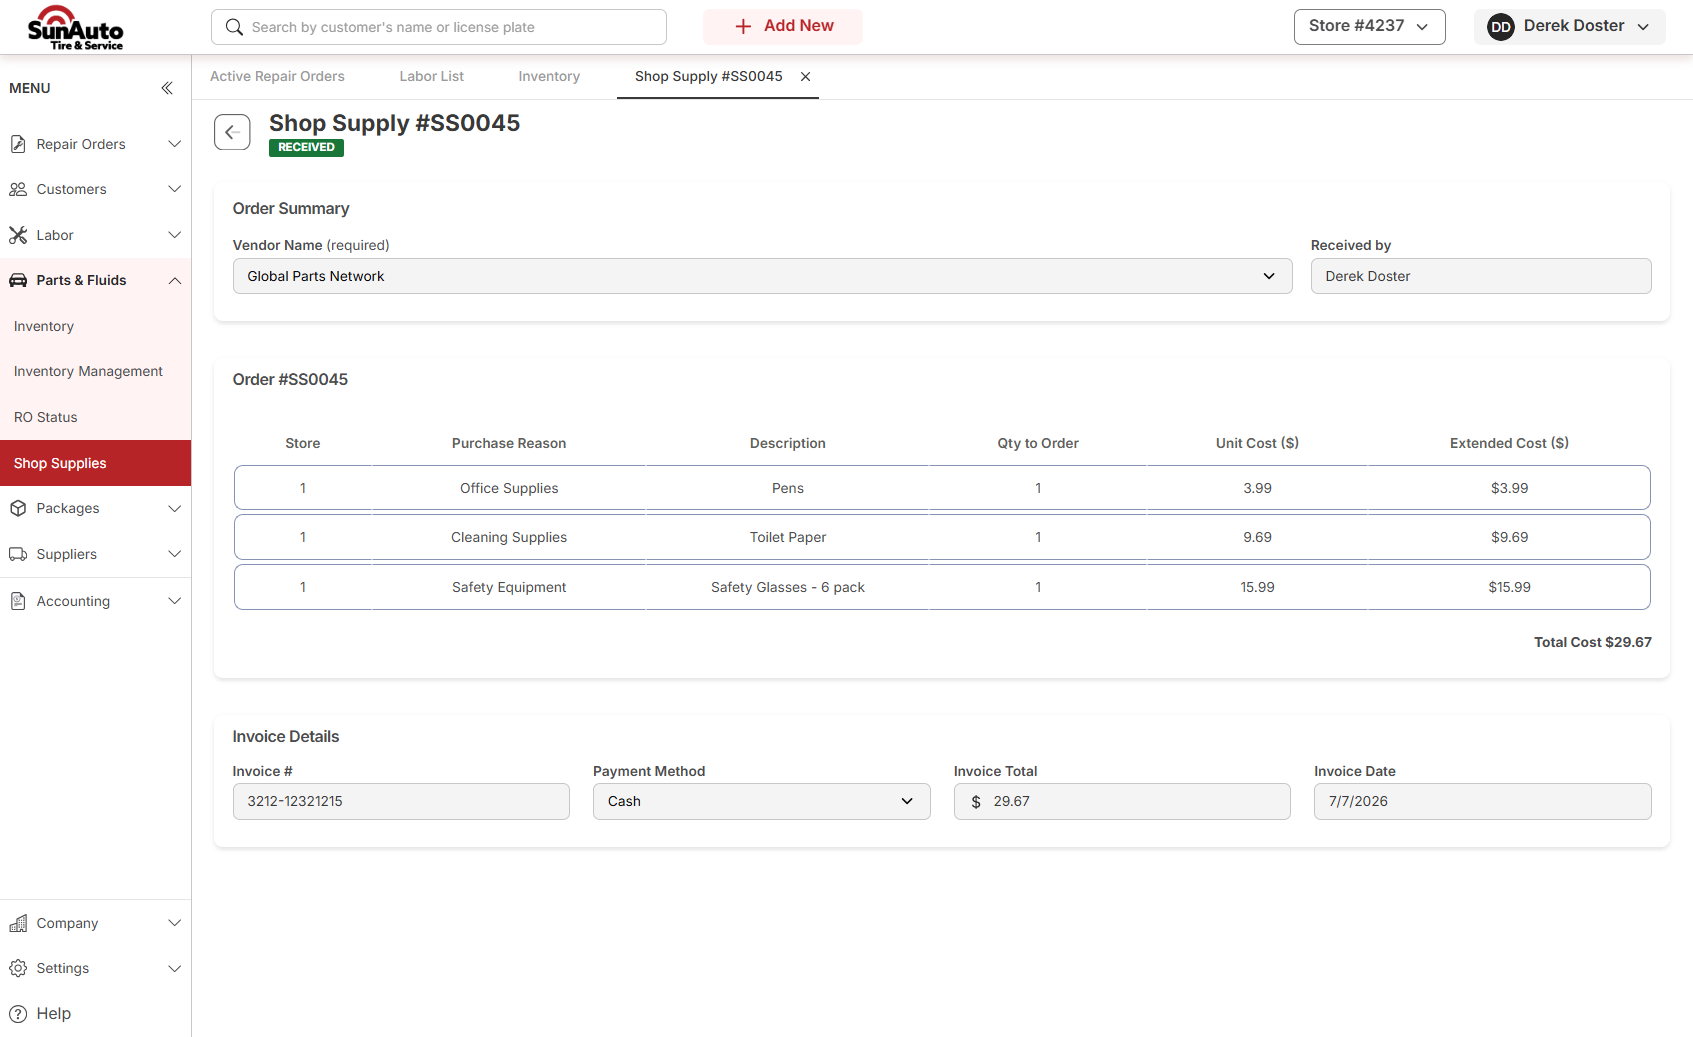
Step 9 — Received. The badge flips to RECEIVED, every field goes read-only, and Received by stamps in your name. The Shop Supply is done.
 1
RECEIVED badge — green. Terminal state.
2
Received by — auto-stamped with the logged-in user. Useful when accounting has a question.
3
Everything is read-only — no line edits, no invoice edits. If something was wrong, it stays wrong on this record.
1
RECEIVED badge — green. Terminal state.
2
Received by — auto-stamped with the logged-in user. Useful when accounting has a question.
3
Everything is read-only — no line edits, no invoice edits. If something was wrong, it stays wrong on this record.
Voiding a Shop Supply
If a Shop Supply was started by mistake, or the purchase fell through, void it while it's still in Draft. Voided is terminal — it's the "cancel" record accountants can look at later.
Received can't be voided
Once a Shop Supply is Received, it's locked. If the purchase needs reversed after that, talk to your manager — it's an accounting adjustment, not a POS action.
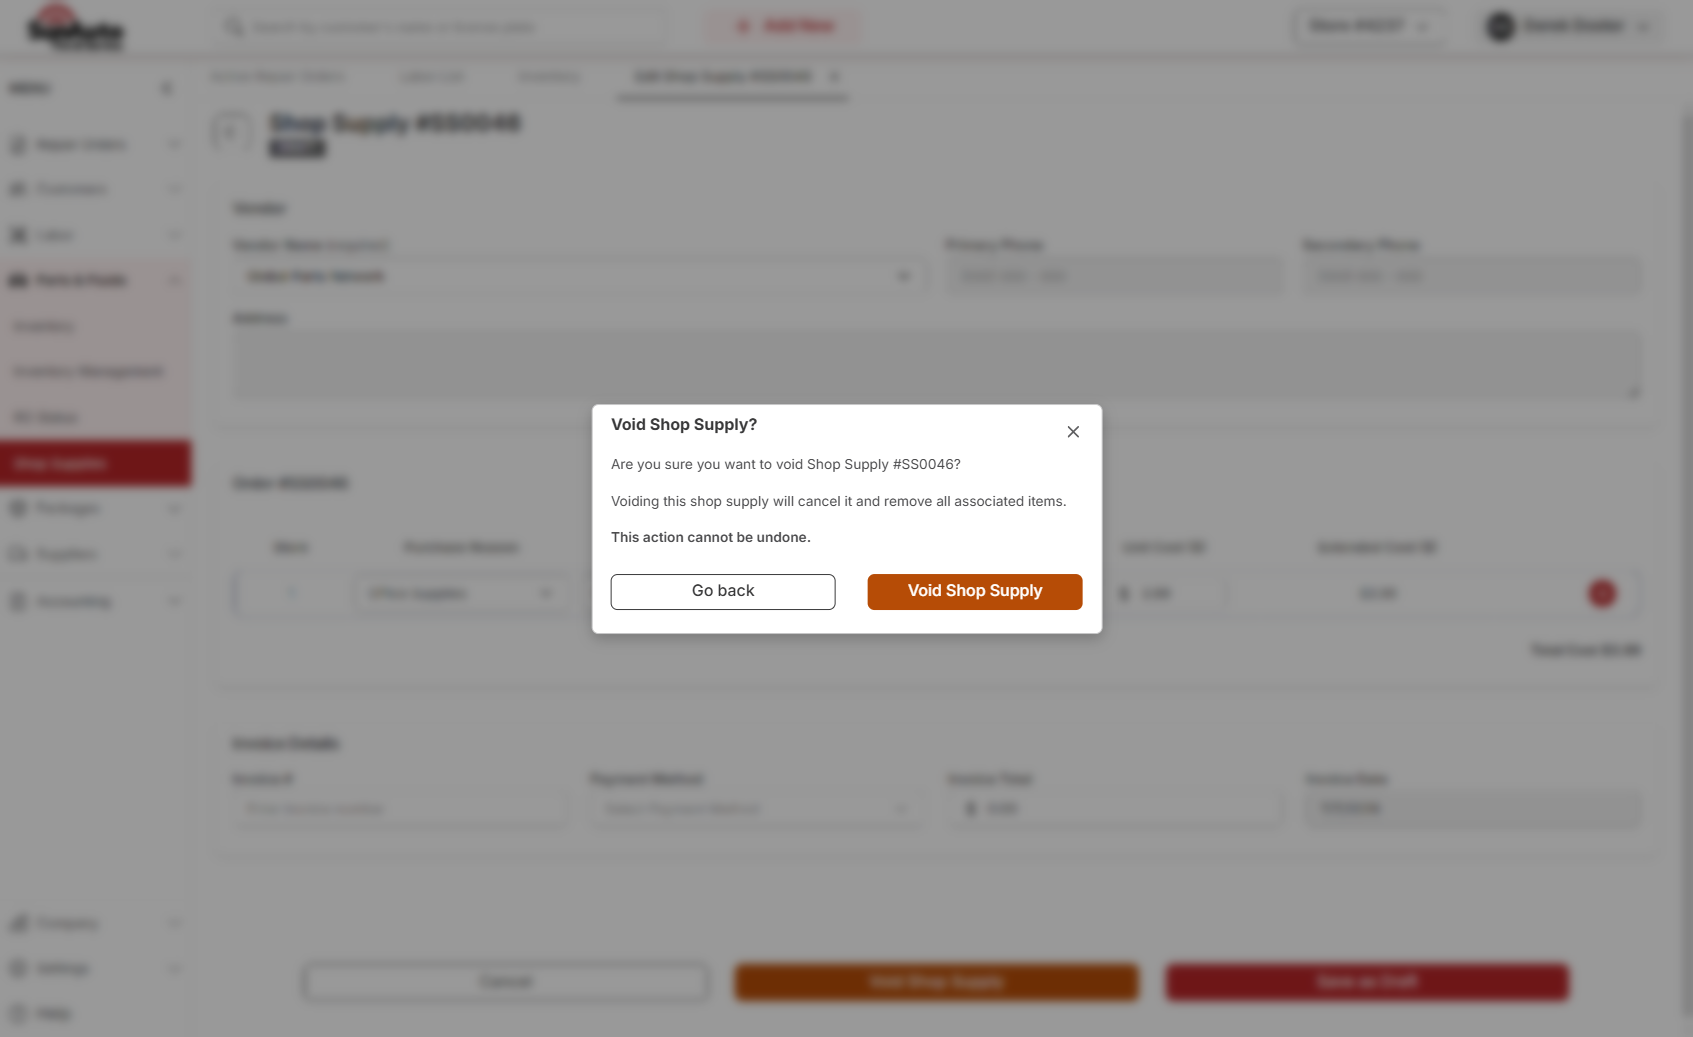
Step 1 — Confirm. From the Draft Shop Supply, click Void Shop Supply. A dialog asks you to confirm and reminds you the action can't be undone.
 1
"Voiding this shop supply will cancel it and remove all associated items." — the lines go with the void. The header record stays for the audit trail.
2
"This action cannot be undone." — no un-void. If you void by mistake, you'll have to start a new Shop Supply.
3
Void Shop Supply — confirms and closes.
1
"Voiding this shop supply will cancel it and remove all associated items." — the lines go with the void. The header record stays for the audit trail.
2
"This action cannot be undone." — no un-void. If you void by mistake, you'll have to start a new Shop Supply.
3
Void Shop Supply — confirms and closes.
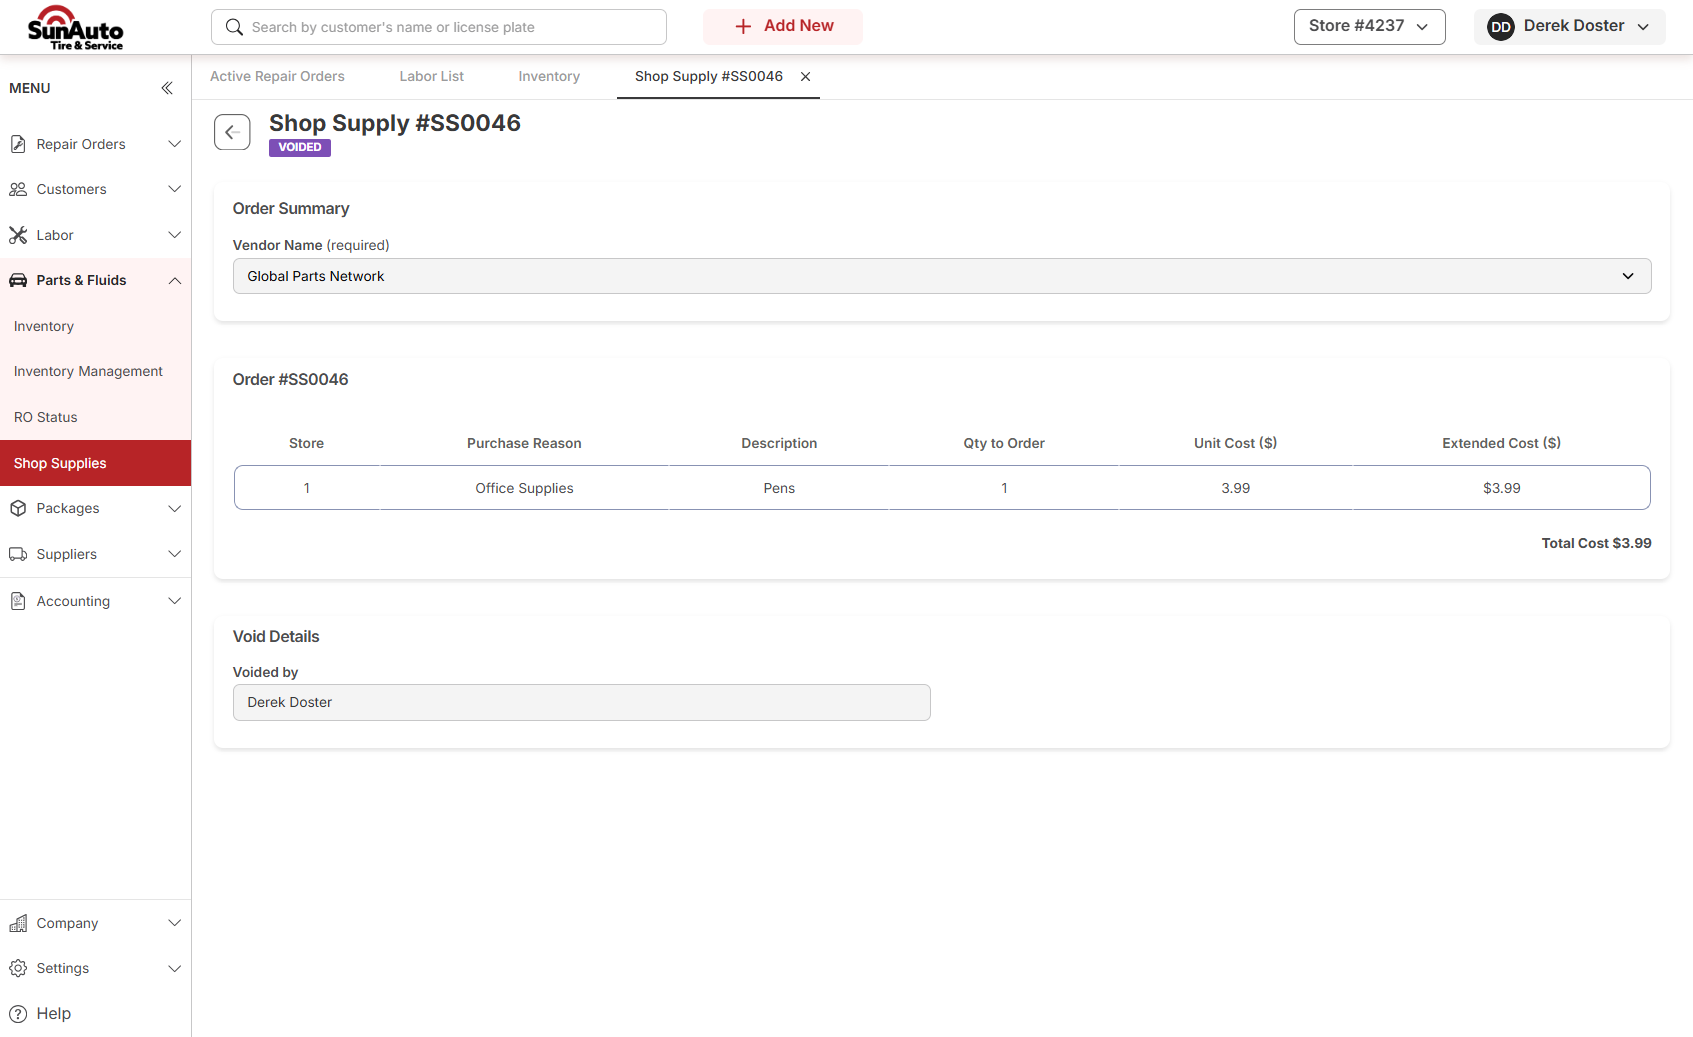
Step 2 — Voided. The badge turns VOIDED (purple), the form is read-only, and Void Details at the bottom logs who did it.
 1
VOIDED badge — purple. Terminal.
2
Void Details → Voided by — auto-stamped. This shows up in the audit trail for accounting.
1
VOIDED badge — purple. Terminal.
2
Void Details → Voided by — auto-stamped. This shows up in the audit trail for accounting.
Watch the full flow
A few things to keep in mind
- One Purchase Reason per line. If the receipt covers two categories, split it into two lines. Accounting reports rely on the split.
- Match the receipt exactly. If Total Cost and Invoice Total don't agree, OverDrive won't let you Receive. Don't round or estimate to force it through — fix the unit cost that's off.
- Enter same-day if you paid with cash from the drawer. The drawer count at End of Day pulls from these entries. Waiting means the drawer is off.
- Received is final. No edits, no un-receive. Double-check the summary modal before clicking Confirm.
- Voided is final too. Voiding removes the lines from the record but keeps the header for the audit trail. Started one by mistake? Void it — don't leave a random Draft floating around.